KAddressBook/Tutorials/How to add a new contact?/uk: Difference between revisions
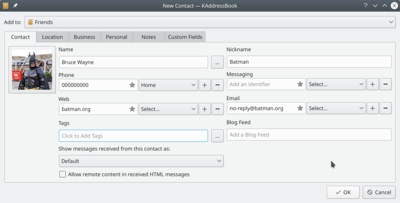
(Created page with "File:KAddressBookNewContact2.png|400px|center|thumb|Створення запису контакту ([https://de.wikipedia.org/wiki/Batman#/media/File:MCM_2013_-_Batman_(89...") |
(Created page with "400px|center|thumb|Натисніть <menuchoice>+ Новий контакт</menuchoice>") |
||
| Line 7: | Line 7: | ||
First click on <menuchoice>+ New Contact</menuchoice> button, this will open a form in a popup. | First click on <menuchoice>+ New Contact</menuchoice> button, this will open a form in a popup. | ||
[[File:KAddressBookNewContact1.png|400px|center|thumb| | [[File:KAddressBookNewContact1.png|400px|center|thumb|Натисніть <menuchoice>+ Новий контакт</menuchoice>]] | ||
In the popup, fill out the form with the information that you want to save. At the top of the form, you can select the address book, you want to add the contact. | In the popup, fill out the form with the information that you want to save. At the top of the form, you can select the address book, you want to add the contact. | ||
Revision as of 08:14, 12 March 2019
Додавання нових записів контактів є одним із базових завдань програми обслуговування адресної книги.
First click on button, this will open a form in a popup.

In the popup, fill out the form with the information that you want to save. At the top of the form, you can select the address book, you want to add the contact.

More informations can be added, for this navigate between the tab: , , , , .
Then you are done, confirm the contact creating by clicking on .


