Archive:Kdenlive/Manual/Monitors/ru: Difference between revisions
(Updating to match new version of source page) |
(Updating to match new version of source page) |
||
| Line 4: | Line 4: | ||
'''Kdenlive''' uses 2 monitor widgets to display your videos: '''Clip Monitor''' and '''Project Monitor'''. A third monitor - the '''Record Monitor''' - previews video capture. These monitors can be selected by clicking the corresponding tabs which appear at the bottom of the monitor window. | |||
===Resizing the Monitors === | |||
You can resize the monitors by dragging the sizing widget. It is a bit tricky to find the bottom widget. You need to hover just between the bottom of the monitor tab and the timeline | |||
[[File:Kdenlive Scale project monitor.png]] | |||
<span id="Clip Monitor"> | <span id="Clip Monitor"> | ||
=== Монитор клипа === | === Монитор клипа === | ||
| Line 15: | Line 17: | ||
==== Виджеты монитора клипов==== | ==== Виджеты монитора клипов==== | ||
<!--(-->1) '''Set zone start''' button - click this to set an 'in' point. | |||
<!--(-->1) | |||
<!--(-->2) '''Set zone end''' button - click this to set an 'out' point. | |||
<!--(-->2) | |||
<!--(-->3) Zone duration indicator - selected by setting in and out points. Dragging the clip from the clip monitor to the timeline when there is a selected zone causes the selected zone, not the entire clip, to be copied to the timeline. | |||
<!--(-->3) | |||
<!--(-->4) Position Caret - can be dragged in the clip. (In ver >=0.9.4 and with OpenGL turned on in [[Special:myLanguage/Kdenlive/Manual/Settings_Menu/Configure_Kdenlive#Playback|Settings -> Configure Kdenlive -> Playback]], audio will play as you drag this.) | |||
<!--(-->4) | |||
<!--(-->5) Timecode widget - type a timecode here and hit <keycap>Enter</keycap> to go to an exact location in the clip. Timecode is in the format ''hours:minutes:seconds:frames'' (where ''frames'' will correspond to the number of frames per second in your project profile). | |||
<!--(-->5) | |||
<!--(-->6) Timecode arrows - can be used to change the current position of the clip in the clip monitor. | |||
<!--(-->6) | |||
==== Создание Зон в Мониторе клипа ==== | ==== Создание Зон в Мониторе клипа ==== | ||
Zones are defined regions of clips that are indictated by a colored section in the clip monitor's timeline - see item 3 above. The beginning of a zone is set by clicking '''[''' (item 1 in the pic above). The end of a zone is set by clicking ''']''' (item 2 in the pic above) | |||
==== Clip Monitor Right-click menu ==== | |||
=== | |||
The Clip Monitor has a right-click (context) menu as described [[Special:MyLanguage/Kdenlive/Manual/Monitors/Clip_Monitor_RightClick|here]]. | |||
<span id="Project Monitor"></span> | <span id="Project Monitor"></span> | ||
=== Монитор проекта === | === Монитор проекта === | ||
The '''Project Monitor''' displays your project's timeline - i.e. the edited version of your video. | |||
[[File:Project monitor.png]] | |||
[[File:Project | |||
==== Виджеты монитора проекта==== | ==== Виджеты монитора проекта==== | ||
<!--(-->1) The position caret. Shows the current location in the project relative to the whole project. You can click and drag this to move the position in the project. | |||
<!--(-->1) | |||
<!--(-->2) The timecode widget. You can type a timecode here and press <keycap>Enter</keycap> to bring the Project Monitor to an exact location. | |||
<!--(-->2) | |||
<!--(-->3) Timecode widget control arrows. You can move the Project Monitor one frame at a time with these. | |||
<!--(-->3) | |||
<span id="Creating Zones in Project Monitor"></span> | <span id="Creating Zones in Project Monitor"></span> | ||
====Создание зон на мониторе проекта==== | ====Создание зон на мониторе проекта==== | ||
You can use the '''[''' and ''']''' buttons to create a zone in the Project Monitor the same way you make zones in the clip monitor. | |||
The zone will be indicated by a colored bar both on the timeline and underneath the Project Monitor. | |||
[[File:Kdenlive Zone in project monitor.png]] | [[File:Kdenlive Zone in project monitor.png]] | ||
Revision as of 08:10, 30 July 2017
Мониторы
Kdenlive uses 2 monitor widgets to display your videos: Clip Monitor and Project Monitor. A third monitor - the Record Monitor - previews video capture. These monitors can be selected by clicking the corresponding tabs which appear at the bottom of the monitor window.
Resizing the Monitors
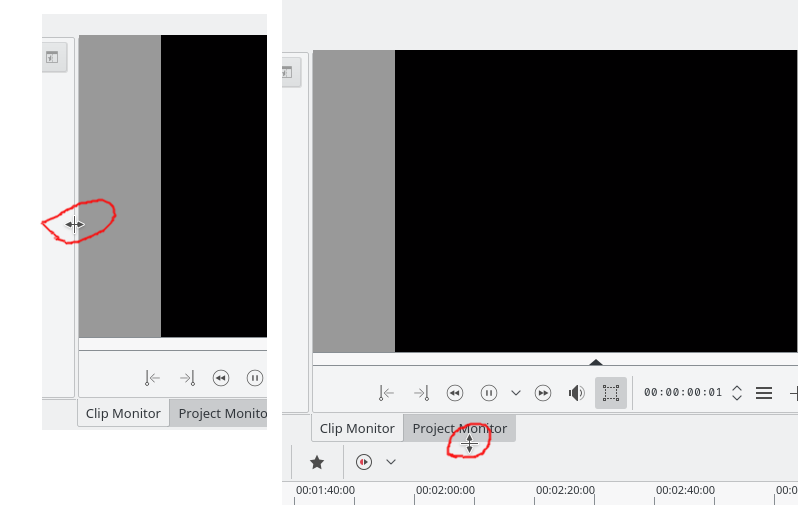
You can resize the monitors by dragging the sizing widget. It is a bit tricky to find the bottom widget. You need to hover just between the bottom of the monitor tab and the timeline

Монитор клипа
Монитор клипа (Clip monitor) отображает неотредактированный клип, который в данный момент выбран в Дереве проекта.

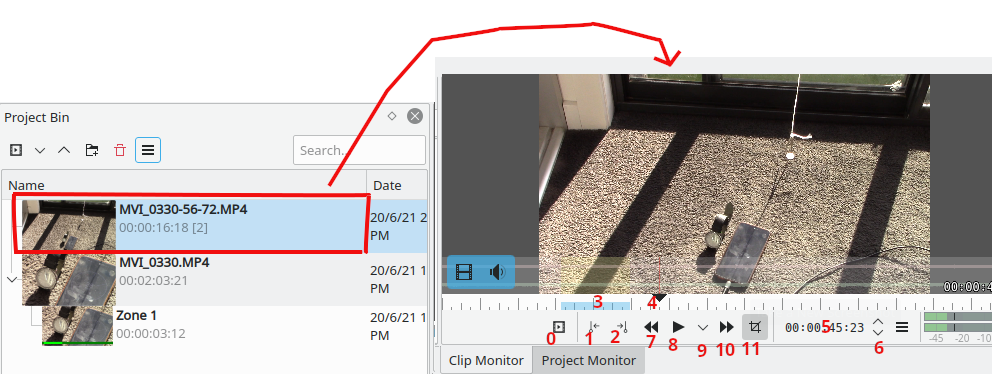
Виджеты монитора клипов
1) Set zone start button - click this to set an 'in' point.
2) Set zone end button - click this to set an 'out' point.
3) Zone duration indicator - selected by setting in and out points. Dragging the clip from the clip monitor to the timeline when there is a selected zone causes the selected zone, not the entire clip, to be copied to the timeline.
4) Position Caret - can be dragged in the clip. (In ver >=0.9.4 and with OpenGL turned on in Settings -> Configure Kdenlive -> Playback, audio will play as you drag this.)
5) Timecode widget - type a timecode here and hit Enter to go to an exact location in the clip. Timecode is in the format hours:minutes:seconds:frames (where frames will correspond to the number of frames per second in your project profile).
6) Timecode arrows - can be used to change the current position of the clip in the clip monitor.
Создание Зон в Мониторе клипа
Zones are defined regions of clips that are indictated by a colored section in the clip monitor's timeline - see item 3 above. The beginning of a zone is set by clicking [ (item 1 in the pic above). The end of a zone is set by clicking ] (item 2 in the pic above)
The Clip Monitor has a right-click (context) menu as described here.
Монитор проекта
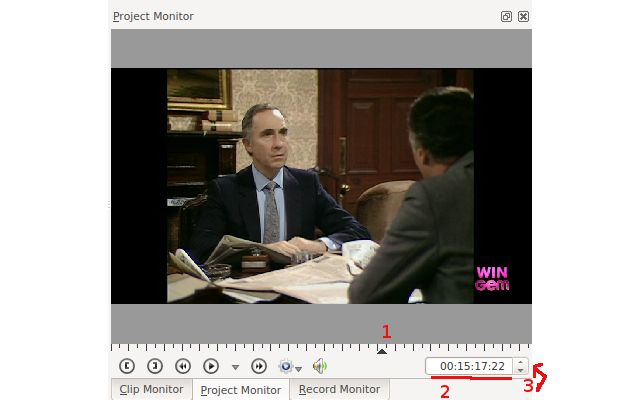
The Project Monitor displays your project's timeline - i.e. the edited version of your video.

Виджеты монитора проекта
1) The position caret. Shows the current location in the project relative to the whole project. You can click and drag this to move the position in the project.
2) The timecode widget. You can type a timecode here and press Enter to bring the Project Monitor to an exact location.
3) Timecode widget control arrows. You can move the Project Monitor one frame at a time with these.
Создание зон на мониторе проекта
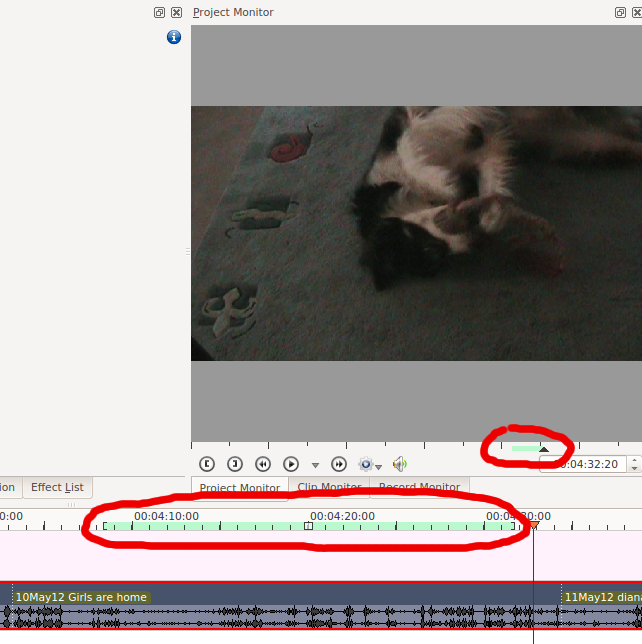
You can use the [ and ] buttons to create a zone in the Project Monitor the same way you make zones in the clip monitor. The zone will be indicated by a colored bar both on the timeline and underneath the Project Monitor.
Вы можете указать Kdenlive выполнить Cборку проекта (Рендеринг) только выбранной зоны - см. Использование функции Выбранный участок для рендеринга
Контекстное меню монитора проекта
В программе предусмотрено контекстное меню монитора проекта (вызывается щелчком правой кнопки мыши). Его описание можно найти здесь.
Монитор записи
Существует так же Монитор записи который может быть использован для предпросмотра захвата с Firewire, Blackmagic cards или через FFmpeg / video4linux

