Digikam/Exif: Difference between revisions
mNo edit summary |
(Marked this version for translation) |
||
| Line 1: | Line 1: | ||
<languages /> | <languages /> | ||
<translate> | <translate> | ||
== Apply EXIF Metadata to Multiple Photos in digiKam == | == Apply EXIF Metadata to Multiple Photos in digiKam == <!--T:1--> | ||
Transcribed from Dmitri Popov's blog, 7th August 2013 | Transcribed from Dmitri Popov's blog, 7th August 2013 | ||
<!--T:2--> | |||
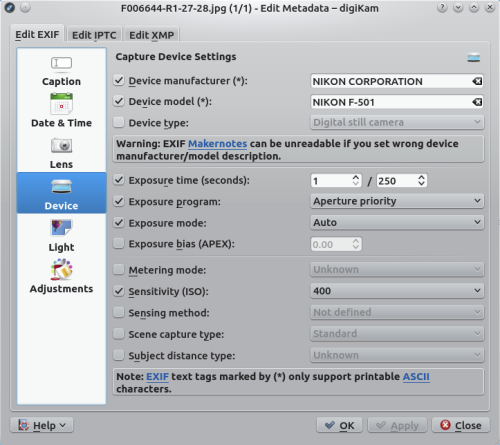
If you happen to use digiKam for managing photos scanned from negatives, you’ll appreciate the application’s capabilities to add and edit EXIF metadata. Using '''digiKam’s''' dedicated interface for managing metadata, you can add key EXIF values, such as maker, device model, aperture, shutter speed, ISO, focal length, etc., to the scanned photos (provided you have these data handy). | If you happen to use digiKam for managing photos scanned from negatives, you’ll appreciate the application’s capabilities to add and edit EXIF metadata. Using '''digiKam’s''' dedicated interface for managing metadata, you can add key EXIF values, such as maker, device model, aperture, shutter speed, ISO, focal length, etc., to the scanned photos (provided you have these data handy). | ||
<!--T:3--> | |||
[[Image:Digikam-exif.png |center|500px|thumb]] | [[Image:Digikam-exif.png |center|500px|thumb]] | ||
<!--T:4--> | |||
However, '''digiKam''' doesn’t allow you to apply the same EXIF data to multiple photos in a single operation. Adding the same maker, device, ISO, and focal length to a set of photos one-by-one can be a bit of a nuisance, but you can use a simple trick to work around this limitation. Start with adding EXIF values to a single photo. Select then the rest of the photos, choose <menuchoice>Tools -> Metadata -> Import EXIF</menuchoice>, pick the processed photo, and press <menuchoice>OK</menuchoice>. This will apply EXIF data from the processed photo to the selected images. | However, '''digiKam''' doesn’t allow you to apply the same EXIF data to multiple photos in a single operation. Adding the same maker, device, ISO, and focal length to a set of photos one-by-one can be a bit of a nuisance, but you can use a simple trick to work around this limitation. Start with adding EXIF values to a single photo. Select then the rest of the photos, choose <menuchoice>Tools -> Metadata -> Import EXIF</menuchoice>, pick the processed photo, and press <menuchoice>OK</menuchoice>. This will apply EXIF data from the processed photo to the selected images. | ||
<!--T:5--> | |||
[[Category: Graphics]] | [[Category: Graphics]] | ||
[[Category:Photography]] | [[Category:Photography]] | ||
[[Category:Tutorials]] | [[Category:Tutorials]] | ||
</translate> | </translate> | ||
Revision as of 10:13, 10 August 2013
Apply EXIF Metadata to Multiple Photos in digiKam
Transcribed from Dmitri Popov's blog, 7th August 2013
If you happen to use digiKam for managing photos scanned from negatives, you’ll appreciate the application’s capabilities to add and edit EXIF metadata. Using digiKam’s dedicated interface for managing metadata, you can add key EXIF values, such as maker, device model, aperture, shutter speed, ISO, focal length, etc., to the scanned photos (provided you have these data handy).

However, digiKam doesn’t allow you to apply the same EXIF data to multiple photos in a single operation. Adding the same maker, device, ISO, and focal length to a set of photos one-by-one can be a bit of a nuisance, but you can use a simple trick to work around this limitation. Start with adding EXIF values to a single photo. Select then the rest of the photos, choose , pick the processed photo, and press . This will apply EXIF data from the processed photo to the selected images.
