Digikam/Exposure Blending/ro
Amestecul de expunere cu digiKam
Acest articol original apărut pe Scribbles and Snaps este reprodus cu permisiunea lui Dmitri Popov.
Nu contează cât de bun este aparatul dvs. de fotografiat, a face o fotografie bine expusă cu contrastul ridicat care ar arăta o scenă cu o pasăre neagră pe zăpadă (de exemplu) poate fi foarte dificil. Chiar dacă aţi trecut la modul manual şi aţi facut setările de expunere, există încă riscul că veţi încheia un cadru cu zone sub- sau supraexpuse. O modalitate de a rezolva această problemă este de a utiliza aplicaţia Exposure Blending. Aceasta tehnica implică luarea a mai multor fotografii cu aceeaşi scenă sau subiect cu expuneri diferite şi apoi fuziunea acestor fotografii într-o singură fotografie perfect expusă.
While exposure blending sounds simple in theory, achieving usable results can be a rather laborious and time-consuming process. Fortunately, digiKam can do the donkey job for you thanks to an bundled with the Kipi plugins. The exposure blending tool relies on the hugin application for processing and fusing photos, so you must install it on your machine beforehand. On Ubuntu, this can be done using the command
sudo apt-get install hugin
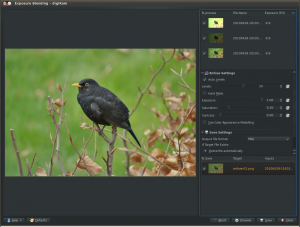
To keep things tidy, move the photos you want to blend into a separate album, select them using the Ctrl+A keyboard shortcut, and choose -> . This opens the Exposure Blending Import wizard that guides you through the entire process. In the window, add other photos if needed, and remove and rearrange the photos that are already in the list. Hit then the button to move to the next step. digiKam can align the selected photos before blending them. This feature can come in handy if you took the photos without a tripod. If this is the case, tick the check box, and press to start the pre-processing. Once digiKam is done, press , and you will be automatically dropped into the Exposure Blending editor.

Hit the button to see the blended photo in the preview pane. If you are not satisfied with the result, you can tweak the available options, including exposure, saturation, and contrast. You can also exclude individual photos from the stack to improve the blending result. The clever part is that every time you tweak the settings and press the button, digiKam generates a preview image which you can compare with the previous versions. You can then save all the generated versions, or save only the one you like most.
Deşi instrumentul Exposure Blending furnizat de digiKam nu este cea mai puternică sau flexibilă soluţie, el este capabil să producă rezultate destul de impresionante, mai ales dacă nu vă este frică de a vă murdari mâinile retuşînd manual rezultatele finale .
