Digikam/Exposure Blending/tr: Difference between revisions
No edit summary |
(Created page with "İşi düzenli tutmak için harmanlamak istediğiniz fotoğrafları ayrı bir albume koyun ve <keycap>Ctrl+A</keycap> klavye kısayolu ile bu fotoğrafları seçin. Ardından <me...") |
||
| Line 9: | Line 9: | ||
{{Input|1=sudo apt-get install hugin}} | {{Input|1=sudo apt-get install hugin}} | ||
İşi düzenli tutmak için harmanlamak istediğiniz fotoğrafları ayrı bir albume koyun ve <keycap>Ctrl+A</keycap> klavye kısayolu ile bu fotoğrafları seçin. Ardından <menuchoice>Araçlar</menuchoice> -> <menuchoice>Blend bracketed images</menuchoice> öğesini açın. Bu size tüm süreç boyunca rehberlik edecek olan '''Exposure Blending Import wizard''' aracını açacaktır. <menuchoice>Set Bracketed Images</menuchoice> penceresinde eğer kullanmak istediğiniz başka fotoğraflar varsa bunları ekleyin ve daha önce seçmiş olduğunuz fotoğrafları istediğiniz gibi düzenleyin. Ardından <menuchoice>Sonraki</menuchoice> düğmesine tıklayarak bir sonraki adıma geçin. '''digiKam''' fotoğrafları harmanlamadan önce hizalayabilir. Bu özellik fotoğrafları tripodsuz çektiyseniz kullanışlı olacaktır. Böyle bir durumda <menuchoice>Align bracketed images</menuchoice> yazısının başındaki kutucuğu işaretleyin ve <menuchoice>Sonraki</menuchoice> düğmesine basarak ön işleme sürecini başlatın. '''digiKam''' işini bitirince <menuchoice>Bitir</menuchoice> düğmesine bastığınızda '''Exposure Blending''' düzenleyicisine erişeceksiniz. | |||
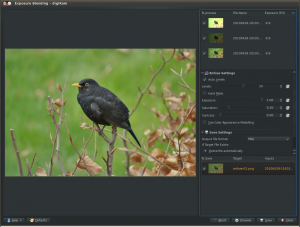
[[Image:Digikam_exposureblending.png|thumb|300px|center]] | [[Image:Digikam_exposureblending.png|thumb|300px|center]] | ||
Revision as of 11:28, 31 December 2010
digiKam ile Pozlama Harmanı (Exposure Blending)
Bu yazı aslen Scribbles and Snaps'te yer almış ve Dmitri Popov'un izni ile kullanılmıştır.
Fotoğraf makineniz ne kadar iyi olursa olsun, karın üzerindeki siyah bir kuş gibi yüksek kontrastlı görüntüleri iyi pozlanmış bir biçimde çekmek gerçekten zor olabilir. Manuel moda geçseniz ve pozlama ayarlarıyla oynasanız bile fotoğrafınızda fazla karanlık veya fazla aydınlık alanların olması riski vardır. Bu sorunu çözmenin bir yolu pozlama harmanı, yani İngilizcesiyle "exposure blending"dir. Bu teknik aynı görüntüyü farklı pozlamalarla birkaç kere çekmeye ve bu fotoğrafları kaynaştırarak mükemmel bir biçimde pozlanmış bir fotoğraf elde etmeye dayalıdır.
Harmanlama teoride basit görünse de işe yarar sonuçlara ulaşmak görece zahmetli ve zaman harcayan bir süreç gerektirebiliyor. Bereket versin digiKam Kipi eklentileriyle desteklenen bir sayesinde işin yorucu kısmını yapabiliyor. Pozlama harmanı eklentisi fotoğrafları işleme ve kaynaştırmada hugin isimli bir uygulamaya dayandığı için öncelikle bilgisayarınıza bu uygulamayı kurmanız gerekiyor. Ubuntu'da bu şu komutla yapılabilir:
sudo apt-get install hugin
İşi düzenli tutmak için harmanlamak istediğiniz fotoğrafları ayrı bir albume koyun ve Ctrl+A klavye kısayolu ile bu fotoğrafları seçin. Ardından -> öğesini açın. Bu size tüm süreç boyunca rehberlik edecek olan Exposure Blending Import wizard aracını açacaktır. penceresinde eğer kullanmak istediğiniz başka fotoğraflar varsa bunları ekleyin ve daha önce seçmiş olduğunuz fotoğrafları istediğiniz gibi düzenleyin. Ardından düğmesine tıklayarak bir sonraki adıma geçin. digiKam fotoğrafları harmanlamadan önce hizalayabilir. Bu özellik fotoğrafları tripodsuz çektiyseniz kullanışlı olacaktır. Böyle bir durumda yazısının başındaki kutucuğu işaretleyin ve düğmesine basarak ön işleme sürecini başlatın. digiKam işini bitirince düğmesine bastığınızda Exposure Blending düzenleyicisine erişeceksiniz.

Hit the button to see the blended photo in the preview pane. If you are not satisfied with the result, you can tweak the available options, including exposure, saturation, and contrast. You can also exclude individual photos from the stack to improve the blending result. The clever part is that every time you tweak the settings and press the button, digiKam generates a preview image which you can compare with the previous versions. You can then save all the generated versions, or save only the one you like most.
Although digiKam’s exposure blending tool is not the most powerful or flexible solution out there, it is capable of producing rather impressive results, especially if you are not afraid of getting your hands dirty with manually tweaking the final results.
