Digikam/Lens Distortion/da: Difference between revisions
(Created page with 'Gengivet fra [http://scribblesandsnaps.wordpress.com/2010/08/30/correct-lens-distortion-with-digikam/ Scribbles and Snaps] med Dimitri Popovs tilladelse.') |
(Created page with 'Linseforvrængning er uundgåelig. Du kan lindre problemet, men du kan ikke undgå det helt (med mindre du er villig til at investere i virkelig dyre professionelle linser). Held...') |
||
| Line 4: | Line 4: | ||
Gengivet fra [http://scribblesandsnaps.wordpress.com/2010/08/30/correct-lens-distortion-with-digikam/ Scribbles and Snaps] med Dimitri Popovs tilladelse. | Gengivet fra [http://scribblesandsnaps.wordpress.com/2010/08/30/correct-lens-distortion-with-digikam/ Scribbles and Snaps] med Dimitri Popovs tilladelse. | ||
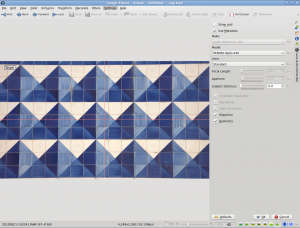
Linseforvrængning er uundgåelig. Du kan lindre problemet, men du kan ikke undgå det helt (med mindre du er villig til at investere i virkelig dyre professionelle linser). Heldigvis har digiKam en række værktøjer, som gør det ret let for dig at korrigere linseforvrængning. Faktisk har applikationen en funktion til automatisk korrektion, som prøver at rette linseforvrængning med et minimum af finindstilling. Hvis du har et foto, som lider af tøndeforvrængning [1] eller pudeforvrængning [2], så kan du måske rette det hurtigt ved brug af værktøjet til automatisk korrektion. For at gøre dette åbner du billerredigeringen (højreklik på billedet og vælg <menuchoice>Redigér</menuchoice> eller tast <keycap>F4</keycap>) og vælg <menuchoice>Forbedr</menuchoice>-><menuchoice>Linse</menuchoice>-><menuchoice>Automatisk korrektion</menuchoice>. Nu vil digiKam trække relevante oplysninger om blandt andet kamera og linse fra billedets metadata og prøve at rette forvrængningen baseret på de indhentede informationer. Funktionen til automatisk korrektion kan klare flere problemer end linsekorrektion, herunder kromatisk aberration og vignettering. Hvis dit billede udviser nogle af disse problemer, så kan du løse dem ved at markere de relevante afkrydsningsfelter. | |||
[[Image:Digikam lensdistortion.png|center]] | [[Image:Digikam lensdistortion.png|center]] | ||
Revision as of 08:29, 5 September 2010
Korrigér for linseforvrængning med digiKam
Gengivet fra Scribbles and Snaps med Dimitri Popovs tilladelse.
Linseforvrængning er uundgåelig. Du kan lindre problemet, men du kan ikke undgå det helt (med mindre du er villig til at investere i virkelig dyre professionelle linser). Heldigvis har digiKam en række værktøjer, som gør det ret let for dig at korrigere linseforvrængning. Faktisk har applikationen en funktion til automatisk korrektion, som prøver at rette linseforvrængning med et minimum af finindstilling. Hvis du har et foto, som lider af tøndeforvrængning [1] eller pudeforvrængning [2], så kan du måske rette det hurtigt ved brug af værktøjet til automatisk korrektion. For at gøre dette åbner du billerredigeringen (højreklik på billedet og vælg eller tast F4) og vælg ->->. Nu vil digiKam trække relevante oplysninger om blandt andet kamera og linse fra billedets metadata og prøve at rette forvrængningen baseret på de indhentede informationer. Funktionen til automatisk korrektion kan klare flere problemer end linsekorrektion, herunder kromatisk aberration og vignettering. Hvis dit billede udviser nogle af disse problemer, så kan du løse dem ved at markere de relevante afkrydsningsfelter.

Usually the Auto-Correction tool does a decent job of fixing lens distortion, but if it fails to do the job, you can try to fix the problem manually. To do this, choose -> -> and adjust the and sliders to correct lens distortion.
[1] Barrel distortion is a lens effect which causes images to be spherised or “inflated”. Barrel distortion is associated with wide angle lenses and typically occurs at the wide end of a zoom lens. The use of converters often amplifies the effect. It is most visible in images with perfectly straight lines, especially when they are close to the edge of the image frame. (Source: Digital Photography Review)
[2] Pincushion distortion is a lens effect which causes images to be pinched at their center. Pincushion distortion is associated with tele lenses and typically occurs at the tele end of a zoom lens. The use of converters often amplifies the effect. It is most visible in images with perfectly straight lines, especially when they are close to the edge of the image frame. (Source: Digital Photography Review)
