Digikam/Windows: Difference between revisions
(Prepared for translation) |
(Added link, formatted another) |
||
| (2 intermediate revisions by 2 users not shown) | |||
| Line 1: | Line 1: | ||
<languages /> | <languages /> | ||
<translate> | <translate> | ||
==Install digiKam on Windows== | ==Install digiKam on Windows== <!--T:1--> | ||
''Reproduced from the blog by Dmitri Popov, 2010/11/21'' | ''Reproduced from the blog by Dmitri Popov, 2010/11/21'' | ||
<!--T:2--> | |||
If you want to install '''digiKam''' on Windows, you have two options: you can either compile the application from the source code or you can use the '''KDE Windows installer'''. The latter approach is by far the easiest one, but there is a drawback: the installer usually includes an older version of '''digiKam'''. If you can live with that, and you don’t feel like getting your hands dirty with compiling '''digiKam''' from the source, then the KDE installer is the way to go. | If you want to install '''digiKam''' on Windows, you have two options: you can either compile the application from the source code or you can use the '''KDE Windows installer'''. The latter approach is by far the easiest one, but there is a drawback: the installer usually includes an older version of '''digiKam'''. If you can live with that, and you don’t feel like getting your hands dirty with compiling '''digiKam''' from the source, then the KDE installer is the way to go. | ||
First off, create a new KDE directory on your hard disk, grab then the KDE installer from the | <!--T:3--> | ||
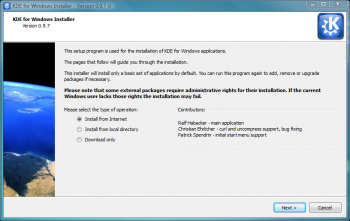
First off, create a new KDE directory on your hard disk, grab then the KDE installer from the [http://windows.kde.org/ KDE on Windows] project’s Web site, and move it into the created directory. Launch the installer, select the <menuchoice>Install from Internet</menuchoice> option, and press <menuchoice>Next</menuchoice>. | |||
<!--T:4--> | |||
[[Image:Kdewin-installer 01.png|center|350px]] | [[Image:Kdewin-installer 01.png|center|350px]] | ||
In the <menuchoice>Installation Directory</menuchoice> field, enter the path to the ''KDE directory'', and press <menuchoice>Next</menuchoice>. Select the <menuchoice>End User</menuchoice> option in the <menuchoice>Install Mode</menuchoice> section, and <menuchoice>MSVC 32Bit</menuchoice> from the | <!--T:5--> | ||
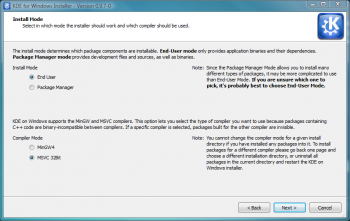
In the <menuchoice>Installation Directory</menuchoice> field, enter the path to the ''KDE directory'', and press <menuchoice>Next</menuchoice>. Select the <menuchoice>End User</menuchoice> option in the <menuchoice>Install Mode</menuchoice> section, and <menuchoice>MSVC 32Bit</menuchoice> from the <menuchoice>Compiler Mode</menuchoice> section. | |||
<!--T:6--> | |||
[[Image:Kdewin-installer 02.png|center|350px]] | [[Image:Kdewin-installer 02.png|center|350px]] | ||
<!--T:7--> | |||
Keep the settings in the next several screens at their defaults. When you reach the <menuchoice>Download Server Settings</menuchoice> screen, choose the ''www.winkde.org'' server, since it offers the newest as well as older versions of the KDE bundle. Press <menuchoice>Next</menuchoice> and find the version of KDE that contains the '''digiKam''' and '''kipi-plugins''' packages. Select then both packages, and press <menuchoice>Next</menuchoice>. Hit the <menuchoice>Next</menuchoice> button once again, and the installer does the rest. Wait till the installer has finished downloading and installing the software, press the <menuchoice>Finish</menuchoice> button, and you are done. Now you can launch and use '''digiKam''' as any other Windows application. | Keep the settings in the next several screens at their defaults. When you reach the <menuchoice>Download Server Settings</menuchoice> screen, choose the ''www.winkde.org'' server, since it offers the newest as well as older versions of the KDE bundle. Press <menuchoice>Next</menuchoice> and find the version of KDE that contains the '''digiKam''' and '''kipi-plugins''' packages. Select then both packages, and press <menuchoice>Next</menuchoice>. Hit the <menuchoice>Next</menuchoice> button once again, and the installer does the rest. Wait till the installer has finished downloading and installing the software, press the <menuchoice>Finish</menuchoice> button, and you are done. Now you can launch and use '''digiKam''' as any other Windows application. | ||
<!--T:8--> | |||
Here is a [http://www.digikam.org/drupal/node/525 tutorial for compiling digiKam from source] | |||
<!--T:9--> | |||
[[Category:Graphics]] | [[Category:Graphics]] | ||
[[Category:Photography]] | [[Category:Photography]] | ||
Latest revision as of 14:41, 24 November 2010
Install digiKam on Windows
Reproduced from the blog by Dmitri Popov, 2010/11/21
If you want to install digiKam on Windows, you have two options: you can either compile the application from the source code or you can use the KDE Windows installer. The latter approach is by far the easiest one, but there is a drawback: the installer usually includes an older version of digiKam. If you can live with that, and you don’t feel like getting your hands dirty with compiling digiKam from the source, then the KDE installer is the way to go.
First off, create a new KDE directory on your hard disk, grab then the KDE installer from the KDE on Windows project’s Web site, and move it into the created directory. Launch the installer, select the option, and press .

In the field, enter the path to the KDE directory, and press . Select the option in the section, and from the section.

Keep the settings in the next several screens at their defaults. When you reach the screen, choose the www.winkde.org server, since it offers the newest as well as older versions of the KDE bundle. Press and find the version of KDE that contains the digiKam and kipi-plugins packages. Select then both packages, and press . Hit the button once again, and the installer does the rest. Wait till the installer has finished downloading and installing the software, press the button, and you are done. Now you can launch and use digiKam as any other Windows application.
