Dolphin/File Management/it: Difference between revisions
(Created page with "== Pannelli ==") |
(Created page with "'''Dolphin''' contiene parecchi pannelli che possono essere attivati tramite il menu <menuchoice>Visualizza -> Pannelli</menuchoice>. Ogni pannello può essere posizionato nella ...") |
||
| Line 122: | Line 122: | ||
== Pannelli == | == Pannelli == | ||
'''Dolphin''' | '''Dolphin''' contiene parecchi pannelli che possono essere attivati tramite il menu <menuchoice>Visualizza -> Pannelli</menuchoice>. Ogni pannello può essere posizionato nella area di aggancio a sinistra o a destra. Per spostare un pannello devi fare clic sull'intestazione e ''trascinarlo''. L'area dove il pannello verrà posizionato al rilascio del mouse è evidenziata. È possibile impilare i pannelli uno sull'altro. In questo caso i pannelli sono organizzati in schede. | ||
In the header of each panel there are two buttons. The button near to the caption undocks the panel. This makes the panel an independent window which "floats" above '''Dolphin'''. The window is still combined with '''Dolphin''' and cannot be displayed without '''Dolphin''' and cannot for example be minimized like normal windows. By clicking the button again the panel is docked again. The second button will close the panel. | In the header of each panel there are two buttons. The button near to the caption undocks the panel. This makes the panel an independent window which "floats" above '''Dolphin'''. The window is still combined with '''Dolphin''' and cannot be displayed without '''Dolphin''' and cannot for example be minimized like normal windows. By clicking the button again the panel is docked again. The second button will close the panel. | ||
Revision as of 13:48, 27 October 2010
Scopri Dolphin
La prima sezione ti accompagna in una visita guidata di Dolphin. La seconda sezione riguarda i concetti relativi a diversi tipi di segnalibri. La terza sezione illustra la gestione degli archivi. Infine diamo un'occhiata ad 'altre cose interessanti'. Puoi fare clic sulle immagini per vederle ingrandite.
Informazioni generali
Dolphin o Konqueror?
Questa guida descrive Dolphin in KDE SC 4. Konqueror era il gestore dei file standard in KDE 2 e 3. Puoi anche utilizzare Konqueror come gestore dei file predefinito in KDE SC 4. Per far questo, da KDE SC 4.2 in poi, apri Impostazioni di sistema e vai al modulo . Puoi selezionare Konqueror o una gamma di altre applicazioni da utilizzare come gestore dei file predefinito.
- D3lphin è un fork di Dolphin per KDE 3. Manca di alcune funzionalità di Dolphin in KDE SC 4. È anche meno noto perché il gestore dei file predefinito per KDE 3 era Konqueror. Questo fork non è supportato dalla comunità e non è più gestito dal suo autore.
Introduzione a Dolphin
Dolphin è il gestore dei file della KDE Software Compilation.
Ti mostrerò come utilizzare Dolphin per le comuni attività di gestione dei file e come personalizzarlo sulla base delle tue esigenze.
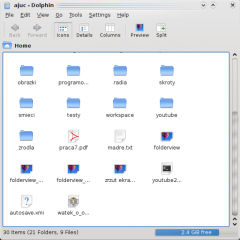
Quando apriamo Dolphin dal menu Kickoff, esso mostra la tua cartella di partenza, in modo predefinito è la tua cartella Home.
Per aprire un file o per andare in una cartella è sufficiente fare clic su di essa. (Questo può essere cambiato in un doppio clic in , se lo preferisci. Alcune distribuzioni impostano il doppio clic in modo predefinito). In KDE 4.5 questo diventa .
Per selezionare e deselezionare i file e le cartelle passa il cursore del mouse sull'icona e fai clic sul segno più che appare per selezionare e sul segno meno per deselezionare. Come questo:
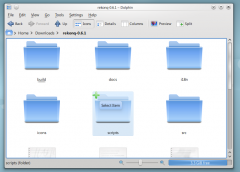
Quando fai clic sul segno più, questo file o cartella viene aggiunto alla tua selezione. Puoi selezionare più file nello stesso modo. La selezione può essere fatta anche trascinando un rettangolo (talvolta chiamato metodo "rubber band") e con la selezione e deselezione con Ctrl + clic per un elemento alla volta e Shift + clic per una serie consecutiva.
Molti file selezionati appaiono simili a questo:

Creazione di una nuova cartella: puoi creare una nuova cartella in quella attiva utilizzando o la scorciatoia F10.
Schede: Dolphin supporta la navigazione a schede. Una nuova scheda può essere aperta per esempio tramite , tramite Ctrl + T o facendo clic con il tasto centrale del mouse sull'icona della cartella e sui pulsanti di navigazione.
Dolphin si apre in modo predefinito quando facciamo clic su una qualsiasi cartella. Può essere avviato anche dal menu Kickoff.
Dolphin integra un nuovo concetto di utilizzo della barra di navigazione in un modo più veloce e preciso: pertanto viene utilizzata una barra di navigazione "breadcrumb". Invece di visualizzare il percorso completo sono visualizzati come pulsanti solo i punti di navigazione a partire da una delle risorse. Facendo clic su uno di questi pulsanti vai direttamente nella cartella corrispondente. In questo modo puoi raggiungere una cartella genitore da una sotto-cartella in modo molto veloce.
Tra i pulsanti che rappresentano una cartella c'è una piccola freccia, anch'essa è un pulsante. Facendo clic su questa freccia puoi vedere un elenco di tutte le sotto-cartelle sullo stesso livello di quella attuale, dandoti un modo rapido per cambiare cartella.
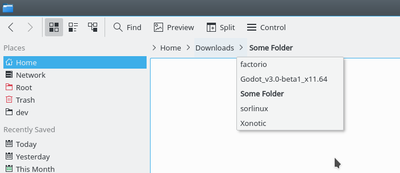
È anche disponibile una classica barra di navigazione che visualizza il percorso completo. Per utilizzarla puoi selezionare o utilizzare la combinazione di tastiera Ctrl+L. Facendo clic sulla spazio libero di fianco all'ultima cartella visualizzata nello stile "breadcrumb", puoi anche passare allo stile classico. Se lo stile classico è selezionato, viene mostrato un segno di spunta alla fine della barra di navigazione. Questo segno di spunta è un pulsante che può essere utilizzato per tornare allo stile "breadcrumb". Naturalmente possono essere utilizzati anche il menu e la scorciatoia da tastiera.
Vista divisa
Dolphin offre la possibilità di dividere la vista della cartella attuale così che vengano visualizzate due viste cartella una di fianco all'altra come noto in Midnight Commander. Questa è una vista molto comoda per copiare o spostare file da una cartella ad un'altra.
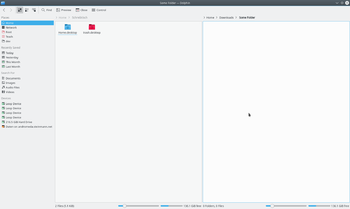
Puoi dividere la vista con (scorciatoia da tastiera F3). Per tornare alla vista con una sola cartella, puoi utilizzare . Il simbolo ti mostrerà quale vista verrà chiusa. A seconda della vista attualmente attiva, il segno meno verrà mostrato nella parte sinistra o destra del simbolo. La vista attiva verrà chiusa. Questo è importante da sapere se vuoi utilizzare la scorciatoia da tastiera. C'è anche un pulsante per dividere e chiudere la vista che si trova nella barra degli strumenti. Pure questo pulsante visualizza il segno meno così che sia facile sapere quale vista verrà chiusa.
Naturalmente ogni vista ha la sua barra di navigazione e ognuna può utilizzare una modalità di visualizzazione differente.
Modalità di visualizzazione
Dolphin supporta tre differenti modalità di visualizzazione: "Icone", "Dettagli" e "Colonne". Queste possono essere cambiate tramite il menu o tramite le scorciatoie da tastiera Ctrl+1 (Icone), Ctrl+2 (Dettagli) e Ctrl+3 (Colonne). C'è anche un pulsante per ogni modalità di visualizzazione nella barra degli strumenti e il menu contestuale della vista della cartella offre un sotto-menu per cambiare la modalità di visualizzazione.
Icone
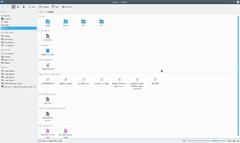
Ogni file e ogni cartella è rappresentato da un'icona nella modalità di visualizzazione "Icone". Invece di visualizzare un'icona, può essere mostrata un'anteprima del file. Questo comportamento può essere attivato/disattivato tramite il menu o tramite un pulsante della barra degli strumenti. C'è un limite di dimensione per le anteprime dei file. Questa limitazione alla dimensione può essere configurata tramite opzione . C'è anche un'opzione per utilizzare le anteprime integrate nei file. In KDE 4.5 le anteprime sono attivate (e la dimensione massima è definita) tramite .
I file nella cartella attualmente selezionata sono ordinati in ordine alfabetico in modo predefinito. La modalità di ordinamento può essere cambiata tramite il menu . Sono disponibili i seguenti criteri di ordinamento:
- Nome
- Dimensione
- Data
- Permessi
- Proprietario
- Gruppo
- Tipo
In aggiunta la sequenza di ordinamento può essere definita tramite .
C'è la possibilità di visualizzare informazioni aggiuntive sotto alle icone. Queste possono essere attivate/disattivate tramite . In linea di principio possono essere selezionati gli stessi criteri che sono disponibili per la ricerca.
Puoi raggruppare le icone per ottenere una migliore panoramica. Questo comportamento è attivato tramite . Ora le icone sono raggruppate e i gruppi sono divisi da una linea orizzontale contenente il nome del gruppo come titolo. Il raggruppamento è legato al criterio di ricerca selezionato.
Dettagli
Nella modalità di visualizzazione "Dettagli" le informazioni aggiuntive sono visualizzate in modo predefinito a differenza della modalità di visualizzazione "Icone". Tutti i file sono elencati in una tabella. Il menu contestuale delle intestazioni della tabella offre la possibilità di aggiungere colonne aggiuntive. Sono disponibili le seguenti colonne:
- Dimensione
- Data
- Permessi
- Proprietario
- Gruppo
- Tipo
La colonna "Nome" è sempre visualizzata. Facendo clic sull'intestazione di una delle colonne, la tabella verrà ordinata a seconda di questa colonna. Facendo clic sull'intestazione della stessa colonna, la sequenza di ordinamento viene invertita.
A partire da KDE 4.1 è possibile visualizzare le cartelle ad albero. In questa modalità viene mostrato un segno più di fianco alla cartella. Facendo clic su questo segno, la cartella viene espansa e anche tutte le sotto-cartelle e i file contenuti vengono mostrati nella tabella, ma sono attenuati. Facendo clic sul segno, che ora mostra un meno, l'espansione viene chiusa. Naturalmente la struttura ad albero può essere utilizzata per tutte le cartelle che vuoi. La visualizzazione ad albero è disattivata in modo predefinito, ma può essere attivata tramite e l'opzione .
Colonne
La modalità di visualizzazione "Colonne" è ispirata al gestore di file Finder di Mac OS X. L'accesso a una sotto-cartella non comporta la sostituzione della vista della cartella attuale, ma il contenuto della sotto-cartella viene elencato in una colonna aggiuntiva di fianco a quella della cartella genitore. Questo può essere utilizzato per molti livelli gerarchici così che tu possa navigare in modo facile e veloce nel filesystem.
Definire le impostazioni predefinite per tutte le cartelle
Sotto la voce del menu puoi impostare una qualsiasi di queste modalità come predefinita per tutte le viste delle cartelle.
Pannelli
Dolphin contiene parecchi pannelli che possono essere attivati tramite il menu . Ogni pannello può essere posizionato nella area di aggancio a sinistra o a destra. Per spostare un pannello devi fare clic sull'intestazione e trascinarlo. L'area dove il pannello verrà posizionato al rilascio del mouse è evidenziata. È possibile impilare i pannelli uno sull'altro. In questo caso i pannelli sono organizzati in schede.
In the header of each panel there are two buttons. The button near to the caption undocks the panel. This makes the panel an independent window which "floats" above Dolphin. The window is still combined with Dolphin and cannot be displayed without Dolphin and cannot for example be minimized like normal windows. By clicking the button again the panel is docked again. The second button will close the panel.
Non Modal Dialogs
When Moving, Copying or Deleting files/directories the dialog disappears even when the operation has not yet completed. A progress bar then appears in the bottom right of the screen, this then disappears also, if you want see the progress you need to click a small (i) information icon in the system tray.
Places
Dolphin contains a new kind of bookmarks Places. These are displayed in a panel which can be activated via (keyboard shortcut F9). The default Places are identical to the one shown in the category System of the K-Menu Kickoff.
By clicking one of these places it will be opened in the current folder view. The context menu offers the possibility to edit the places or to remove them again. It is also possible to hide entries temporarily.
The context menu of a folder can be used to add this folder an another entry to the Places panel. Therefore there is a menu item . You can also Drag&Drop a folder to the Places panel.
The places panel also contains entries to connected removable devices like USB-keys or CDs. A small plug icon indicates if the device is mounted. The context menu offers the possibility to unmount the device.
The places are used as the basis in the breadcrumb navigation bar. Each address is shown in relation to the nearest parent folder which is one of the places.
Information
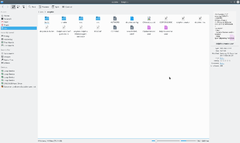
The information panel can be activated via (keyboard shortcut F11). This panel displays a preview or an icon of the currently selected file/folder or of the file/folder below the mouse cursor. Some additional information like change date or size to the file/folder is displayed as well.
The information panel offers the possibility to rate files, add a comment or tag a file. This is one of the interfaces to the semantic Desktop Nepomuk which provides the advantages of the semantic web for the desktop. Starting from KDE 4.2 it is possible to search for the semantic links given by the tags.
Folders
A panel providing a tree structure for the file system can be displayed via (keyboard shortcut F7). The tree structure offers the possibility by clicking the + and - signs to expand/collapse sub folders. By clicking on one of the folders the content will be displayed in the current view.
Terminal
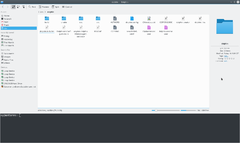
The terminal emulator Konsole can be displayed directly in Dolphin via (keyboard shortcut F4). This makes it possible to use shell commands directly in Dolphin. The terminal is opened in the folder which is displayed in the current view. Shift + F4 opens Konsole in new window.
Collegamenti esterni
Road to KDE 4: Dolphin e Konqueror
Ars Technica: un primo sguardo a Dolphin
Youtube - KDE 4 rev 680445 - Dolphin
Introducing KDE 4 Blog - Dolphin ==File System Navigation==
Bookmarks and Places
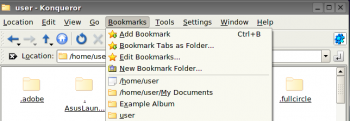
In KDE3 you could create bookmarks in Konqueror, but they were not available to any other application. KDE SC 4.x opens up a great deal more flexibility - but that inevitably means more complication. In fact KDE SC 4 has three classes of Bookmarks, which need to be differentiated. They reside in different files, and have different functions.
Three kinds of bookmark
First, there is the set of bookmarks available only to Konqueror - web bookmarks. These are stored in ~/.kde/share/apps/konqueror/bookmarks.xml. Then there is a set which Dolphin calls Places. This set is available to all applications as well as the Dolphin file manager. Every time you use you will see this set. The third set of bookmarks are Application Bookmarks. These share one file, regardless of the application that set them, and are available to all applications, unless you restrain them to a specific application. More of that later.
Enable bookmarks
In most distros Bookmarks are not enabled by default. In order to use bookmarks we first have to enable them. Open a in most KDE applications and you will see, at the right-hand edge of the icon panel, a spanner or wrench. From the drop-down list, choose .
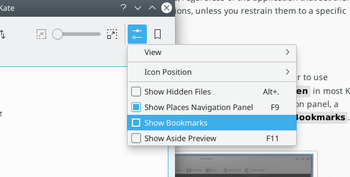
There is a default set of Places -
- Home
- Network
- Root
- Trash
but you can add other places. In Dolphin, right-click on a folder and select "Add to Places", or just drag a folder onto Places.
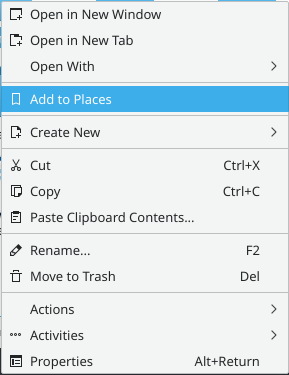
By default this "Place" will be visible in all applications. If you want to keep it constrained to Dolphin, you need to right-click on the new name in the Places list, where you will find the option to Edit it. There is a check-box for .
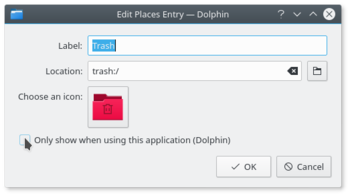
You can see the result of that command if you read ~/.kde4/share/apps/kfileplaces/bookmarks.xml.
In some applications too there is an option in the File menu to add a folder to Places. At this stage, however, applications vary in which features are available. The important thing to remember is that the default is for Places items to be available to all applications in the dialogue.
Bookmarks in applications
This is the second class of bookmarks. Remember opening and using the spanner/wrench? Next to it is a yellow star. This is the bookmark management menu.
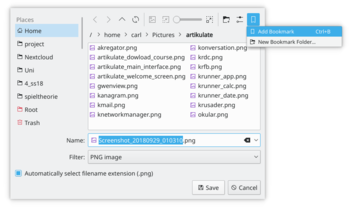
Here you can define bookmarks that will be visible in the same menu on any application. They are stored in one file, ~/.kde4/share/apps/kfile/bookmarks.xml, which is used by all applications having that menu.
Constraining to one application
Some applications allow you to edit items in the Places menu. For instance, if in Gwenview you right click on a folder in Places you can set an option to "Only show when using this application (Gwenview)".
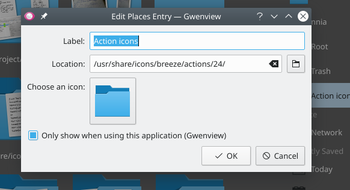
If you need to constrain to an application that does not yet allow you to do that, the only way left is to edit the file ~/.kde/share/apps/kfile/bookmarks.xml. Immediately before the </metadata> tag you will need to add the line
<OnlyInApp>appname</OnlyInApp>
Archive Management in Dolphin
Managing archives now becomes simple. In any directory in Dolphin, highlight the files that you want to compress, and right-click. Here, using the Compress option, you can elect to create a RAR archive, a Gzipped tar archive, or define another compression mode that you have already set up.
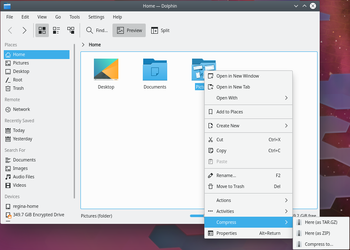
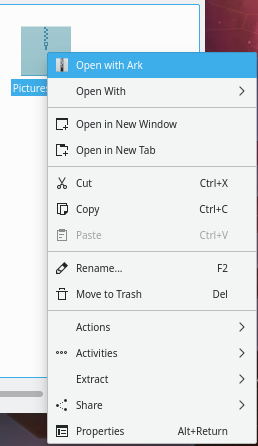
Similarly, if you right-click on an existing archived file you get a range of actions added to the right-click menu. You can extract the archive to the current folder, to an autodetected subfolder or to another place of your choosing.
Should you wish to add files to an existing archive, you can choose .
More Cool Actions
Change a File Association on-the-fly
Have you ever wanted to open a file, only to find that it is associated with an application that is not of your choice? You can, of course, alter this in . But Dolphin and Konqueror offer you a quick and cool method for changing a single association.
Right-click on the file and select . The first line there is descriptive, something like:
Type: XML document
At the same level, on the right, there is a spanner (wrench). Click on that and you can add or change an association.
Similarly, by working on a folder, you can change the default file manager to/from Konqueror, if you choose, or add another image browser to the possible associations.
The sub-menu opens up a whole lot more cool things to do from Dolphin. Some possibilities only appear when applicable to the file you have selected. Some of the options are
- Convert an image file to a different format
- Preview the file
- Download a remote file with KGet
- Sign and/or encrypt the file, according to the encryption software installed
Encode and copy audio CD tracks
- Insert an audio CD
- Navigate to this CD in Dolphin: it must appear as "Volume" in your Dolphin 'Places' or you can reach it by typing audiocd:/ in the address bar.
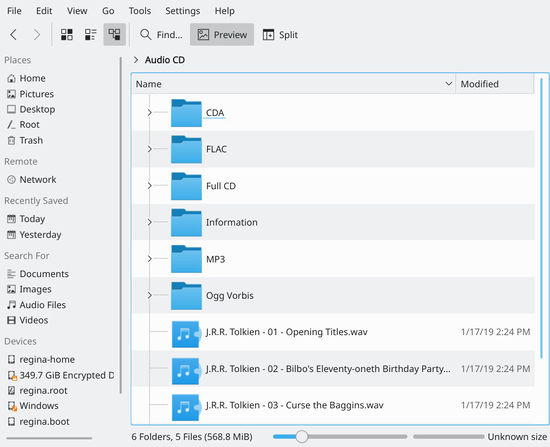
You now notice that Dolphin is proposing a WAV file for each track, plus:
- a CDA folder containing indexing information in the usual CDA format.
- a Whole CD folder, containing one file for each format (.cda, .flac, .mp3, .ogg, .wav) holding all the tracks
- a FLAC folder, containing the tracks encoded into FLAC format (lossless information format)
- an Information folder containing the CDDB informations
- an MP3 folder, containing all the tracks in MP3 format
- a Ogg Vorbis folder, containing the tracks encoded in OGG format
You then just have to copy the folder of your choice, in your preferred format to obtain the relative encoded version of your CD!


