Revision as of 17:58, 26 June 2011 by Yurchor(talk | contribs)(Created page with "Зауважте, що ви можете клацнути на панелі підказки, щоб отримати більше даних щодо функції, окрім ...")
Окрім зневаджування, читання та написання коду є найважливішими завданнями під час розробки програмного забезпечення. З метою полегшення навігації кодом та його написання у KDevelop передбачено багато різних інструментів. Як буде докладніше показано у наступних розділах, KDevelop не просто редактор коду, — це скоріше система керування кодом, яка може подавати різні дані, отримані на основі аналізу загальної сукупності коду всього вашого сеансу роботи.
Інструменти та панелі перегляду
Для роботи з проектами у KDevelop передбачено інструменти. Інструмент надає певні дані щодо коду або виконує з ним певну дію. Інструментам відповідають кнопки вздовж периметра вікна програми (з вертикальним текстом на полях ліворуч і праворуч та горизонтальним вздовж нижнього поля). Якщо ви натиснете таку кнопку, у головному вікні буде відкрито підвікно — панель перегляду; якщо кнопку буде натиснуто ще раз, відповідне підвікно буде закрито.
Зауваження
Закрити панель можна також натисканням кнопки x, розташованої у верхньому правому куті панелі; але, принаймні у випусках KDevelop 4.2.x, подібний спосіб закриття призводить до вилучення кнопки інструмента з бічної панелі, за допомогою якої можна було б знову відкрити панель. Нижче наведено настанови з повернення кнопки на панель, а також додавання будь-яких інших кнопок інструментів. Про ваду, пов’язану зі зниканням кнопок, повідомлено на цій сторінці (№ 270018)
На наведеному вище зображенні ви можете бачити певний набір інструментів, вирівняних за лівим і правим полем. Ліворуч відкрито панель інструмента Класи, праворуч — Фрагменти. Посередині можна бачити панель редактора. З практичних міркувань, переважну частину часу розробки варто працювати лише з редактором та панеллю Класи чи Перегляд коду, відкритою ліворуч. На час використання певного інструмента можна відкрити його панель, яку після використання варто закрити з метою збільшення простору для панелі редактора.
Після першого запуску KDevelop ви вже зможете скористатися кнопкою інструмента Проекти. Натисніть цю кнопку: у відповідь буде відкрито панель зі списком проектів, які було додано до сеансу у нижній частині вікна та панель перегляду файлової системи вашого проекту у верхній його частині.
У KDevelop ви можете скористатися багатьма іншими інструментами, не всі з них представлено кнопками вздовж периметра вікна у початковому стані. Щоб додати кнопку, скористайтеся пунктом меню Вікна -> Додати панель інструмента. Ось перелік можливих корисних інструментів:
Класи: повний список всіх класів, які визначено у одному з проектів або у вашому сеансі з усіма вбудованими функціями та змінними. Натискання пункту елемента класу відкриє вікно редактора з місцем оголошення елемента, пункт якого було натиснуто.
Документи: містить список нещодавно відкритих файлів за типами (наприклад, файли з кодом, файли латок, звичайні текстові документи).
Перегляд коду: залежно від розташування курсора у редакторі файла, на цій панелі буде показано пов’язані з кодом дані. Наприклад, якщо курсор перебуває у рядку з #include, на панелі буде показано дані щодо файла, який включено до коду, зокрема дані щодо оголошених у файлі класів. Якщо курсор перебуває на порожньому рядку у файлі, на панелі буде показано класи і функції, оголошені і визначені у поточному файлі (всі як посилання: натискання відповідного пункту відкриватиме файл з оголошенням або визначенням класу чи функції). Якщо курсор перебуває на визначенні функції, на панелі буде показано місце оголошення та список місць, у яких використано функцію.
Файлова система: показує ієрархічну структуру файлової системи.
Документація: надає вам змогу виконувати пошук даних на сторінках довідника (man) та у інших довідкових документах.
Фрагменти: на цій панелі буде наведено фрагменти тексту, які використовують вами регулярно, і які ви не хочете повторно вводити кожного разу. Наприклад, на основі якого було створено знімок екрана, була потреба часто використовувати фрагмент коду
Вираз доволі незграбний, але використовується майже у такій формі кожного разу, коли вам потрібен цикл, — чудовий кандидат на включення до списку фрагментів.
Konsole: відкриває панель командного рядка у головному вікні KDevelop, щоб ви могли віддати потрібну вам команду оболонки (наприклад, виконати ./configure).
З повним списком інструментів та панелей перегляду можна ознайомитися тут.
Для багатьох програмістів найважливішою є економія вертикального місця на екрані. Щоб досягти такої економії, ви можете розташувати панелі інструментів вздовж лівої та правої межі вікна програми. Щоб пересунути панель, клацніть на заголовку правою кнопкою миші і виберіть нове її розташування.
Огляд роботи з кодом
Локальні дані
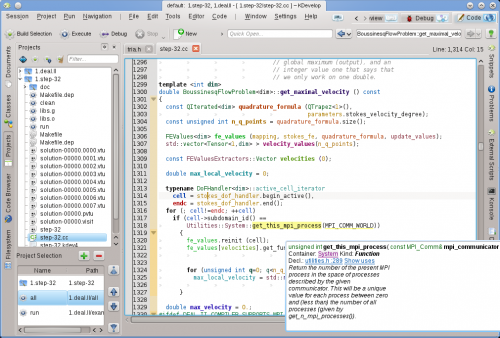
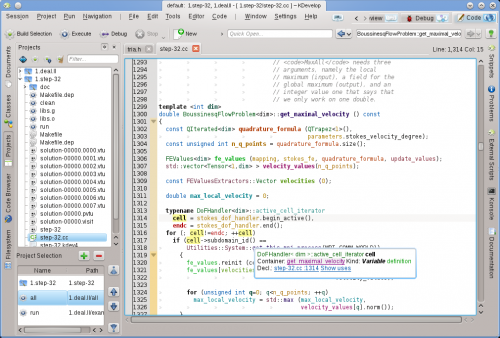
KDevelopрозуміє код програми, тому це середовище може надавати вам дані щодо змінних або функцій вашої програми. Наприклад, у цьому підручнику наведено знімок роботи з фрагментом коду, де вказівник миші наведено на символ cell у рядку 1316 (якщо ви надаєте перевагу роботі за допомогою клавіатури, того самого ефекту можна досягти утримуванням певний час натиснутою клавіші Alt):
KDevelop показує підказку, зокрема тип змінної (тут: DoFHandler<dim&rt;active_cell_iterator), де цю змінну оголошено (контейнер, яким тут є функція-обгортка get_maximal_velocity, оскільки це локальна змінна), тип даних (змінна, не функція, клас або простір назв) та місце оголошення (у рядку 1314, декілька рядків коду).
У поточному контексті з символом, на який наведено вказівник миші, не пов’язано жодної документації. У нашому прикладі, де вказівник миші наведено на символ get_this_mpi_process у рядку 1318, буде показано такі дані:
Тут KDevelop показано оголошення зі стороннього файла (utilities.h, який є частиною зовсім іншого проекту того самого сеансу) разом з коментарем у форматі doxygen, який супроводжує цей оголошення.
Ще кориснішими підказки робить те, що вони є динамічними: можна натиснути пункт контейнера, щоб отримати дані щодо контексту, у якому оголошено змінну (тобто дані щодо простору назв System, зокрема місця його оголошення, визначення, використання та документації), і можна натиснути сині посилання, які повернуть курсор на позицію оголошення символу (наприклад, у utilities.h, рядок 289) або покажуть список місць, у яких використано символ у поточному файлі або усіх проектах поточного сеансу. Остання можливість буде корисною, якщо вам потрібно визначити, як, наприклад, певну функцію використано у об’ємному коді.
Зауваження
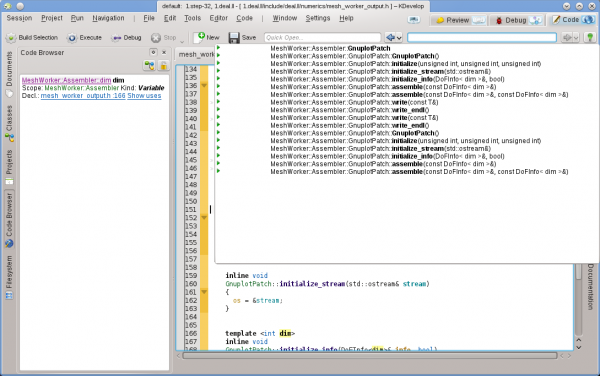
Панель підказки з часом зникатиме: щоб її знову відкрити доведеться знов утримувати натиснутою клавішу Alt або наводити вказівник миші на фрагменти коду. Якщо вам потрібно зафіксувати дані з цієї панелі, відкрийте панель інструмента Перегляд коду. У нашому прикладі курсор перебуває у тій самій функції, що і раніше, а на панелі інструмента ліворуч показано той самий набір даних, що і на панелі підказки раніше:
Пересування курсора у правій частині вікна призводитиме до зміни даних у його лівій частині. Натискання кнопки Заблокувати поточний перегляд у верхній правій частині надасть вам змогу зафіксувати дані, убезпечивши їх від зміни розташування курсора на час перегляду.
Зауваження
Доступ до контекстних даних такого типу можна отримати з багатьох частин KDevelop, не лише з панелі редактора коду. Наприклад, утримування натиснутою клавіші Alt у списку автоматичного доповнення (наприклад, під час пришвидшеного відкриття якогось файла) також призводитиме до показу контекстних даних щодо поточного рядка.
Дані щодо окремих файлів
Наступним рівнем є отримання даних щодо всього файла коду, над яким ви працюєте. Щоб переглянути її, розташуйте курсор на початку поточного файла і подивіться на дані, які буде показано на панелі інструмента Перегляд коду:
Тут середовищем показано список просторів назв, класів та функцій, оголошених або визначених у поточному файлі. За допомогою цього списку ви можете ознайомитися з загальними даними щодо дій, які виконуються у файлі, та безпосередньо перейти до будь-якого з оголошень або визначень без потреби у гортанні коду файла або пошуку певного фрагмента.
Зауваження
Дані, які показано для всього файла, є тими самими, які буде показано у режимі «Огляд», обговорення якого у контексті навігації кодом викладено далі. Відмінність полягає у тому, що у режимі огляду ці дані буде показано лише на тимчасовій панелі підказки.
Дані щодо проектів та сеансів
Існує багато способів отримати загальні дані щодо проекту (або, фактично, всіх проектів сеансу). Такі дані, зазвичай, можна знайти на панелях перегляду різноманітних інструментів середовища. Наприклад, на панелі інструмента Класи показано ієрархічну структуру всіх класів і зовнішніх просторів назв для всіх проектів сеансу, разом з вбудованими функціями та змінними кожного з цих класів:
Знову ж таки, за допомогою наведення вказівника миші на запис у списку можна отримати дані щодо відповідного символу, розташування його оголошення та визначення і випадків використання. Подвійним клацанням на пункті цього ієрархічного списку можна відкрити вікно редактора на позиції, де оголошено або визначено символ.
Але ви можете скористатися і іншими способами перегляду загальних даних. Наприклад, за допомогою інструмента Документи можна поглянути на проект з точки зору типів файлів або інших документів, з яких складається проект:
Пересування між фрагментами коду
У попередньому розділі ми обговорювали вивчення коду програми, тобто отримання даних щодо символів, файлів та проектів. Наступним кроком є перехід між компонентами коду, тобто навігація кодом. Знову ж таки, існує декілька рівнів, на яких можна здійснювати подібну навігацію: локально, у межах файла і у межах проекту.
Зауваження
Доступ до багатьох засобів навігації можна отримати за допомогою меню Навігація головного вікна KDevelop.
Пересування поточним фрагментом
KDevelop — набагато більше, ніж просто редактор, — це також редактор коду. Тому, звичайно ж, ви можете пересувати курсор текстом за допомогою звичайних клавіш зі стрілочками. Ви також можете скористатися натисканням клавіш PageUp та PageDown і всіма іншими командами, якими можна скористатися у звичайному текстовому редакторі.
Пересування файлами та режим огляду
На рівні окремого файла у KDevelop передбачено багато способів навігації кодом програми. Приклад:
Огляд: відкрити панель з оглядом вмісту поточного файла можна у принаймні три різних способи:
Натисканням кнопки Огляд у верхній правій частині головного вікна або натисканням комбінації клавіш Alt + Ctrl + N. У відповідь буде відкрито спадне меню зі списком всіх функцій та оголошень класів: Після цього ви можете вибрати пункт, до якого слід перейти, або — якщо таких пунктів багато, — почніть вводити текст, який може бути частиною потрібного пункту. У такому разі, введення символів у текстове поле скорочуватиме список, оскільки з нього виключатимуться пункти, які не відповідають введеним вами даним, доки список не буде скорочено до прийнятних розмірів.
Розташуванням курсора у області файла (тобто поза межами оголошень та визначень функцій або класів) з відкритою панеллю інструмента Перегляд коду: За показаною панеллю ви зможете стежити з даними поточного файла і надасть вам змогу вибрати пункт, до якого ви хочете перейти.
Наведенням вказівника миші на вкладку одного з відкритих файлів. У відповідь буде показано панель з оглядом даних файла у відповідній вкладці.
Файли коду впорядковано у список оголошень та визначень. За допомогою натискання комбінацій клавіш Alt + Ctrl + PgUp і Alt + Ctrl + PgDown можна переходити до визначення попередньої або наступної функції у файлі.
Пересування проектами та сеансами: семантичне пересування
Як ми вже згадували раніше, зазвичай KDevelop не працює з окремими файлами коду, замість цього середовище працює з цілими проектами (або, точніше, з усіма проектами, які є частиною поточного сеансу). Внаслідок цього середовище надає можливість навігації у межах цілих проектів. Частина цих можливостей є наслідком можливостей, які ми вже обговорювали у розділі щодо навігації кодом, інші ж є абсолютно відмінними від них. Основною особливістю цих можливостей навігації є те, що їх засновано на семантичному розумінні коду, тобто для роботи з ними потрібна певна обробка цілих проектів та пов’язаних з ними даних. У наведеному нижче списку показано декілька способів навігації кодом, який може зберігатися у великій кількості окремих файлів:
Як ми вже бачили з розділу щодо навігації кодом, ви можете отримати панель з поясненнями щодо окремого простору назв, класу, функції або змінної наведенням вказівника миші на відповідний запис у коді або утримуванням натиснутою клавіші Alt. Ось приклад: Натискання посилань на оголошення символу або розгортання списку використань надає вам змогу перейти до відповідних місць коду. Подібного ефекту можна досягти за допомогою панелі перегляду Перегляд коду, яку ми вже обговорювали.
Quick open: A very powerful way of jumping to other files or locations is to use the various quick open methods in KDevelop. There are four versions of these:
Quick open class (Navigate -> Quick open class or Alt + Ctrl + C): You will get a list of all classes in this session. Start typing (a part of) the name of a class and the list will continue to whittle down to only those that actually match what you've typed so far. If the list is short enough, select an element using the up and down keys and KDevelop will get you to the place where the class is declared.
Quick open function (Navigate -> Quick open function or Alt + Ctrl + M): You will get a list of all (member) functions that are part of the projects in the current session, and you can select from it in the same way as above. Note that this list may include both function declarations and definitions.
Quick open file (Navigate -> Quick open file or Alt + Ctrl + O): You will get a list of all files that are part of the projects in the current session, and you can select from it in the same way as above.
Universal quick open (Navigate -> Quick open or Alt + Ctrl + Q): If you forget which key combination is bound to which of the above commands, this is the universal swiss army knife — it simply presents you with a combined list of all files, functions, classes, and other things from which you can select.
Jump to declaration/definition: When implementing a (member) function, one often needs to switch back to the point where a function is declared, for example to keep the list of function arguments synchronised between declaration and definition, or to update the documentation. To do so, place the cursor onto the function name and select Navigation -> Jump to declaration (or hit Ctrl + .) to get to the place where the function is declared. There are multiple ways to get back to the original place:
Selecting Navigation -> Previous visited context (or hit Meta + Left), as described below.
Note
Jumping to the declaration of a symbol is something that does not only work when placing the cursor on the name of the function you are currently implementing. Rather, it also works for other symbols: Putting the cursor on a (local, global, or member) variable and jumping to its declaration also transports you to its location of declaration. Similarly, you can place the cursor on the name of a class, for example in a variable of function declaration, and jump to the location of its declaration.
Switch between declaration/definition: In the example above, to jump to the site of the declaration of the current function, you need to first place the cursor on the function name. To avoid this step, you can select Navigation -> Switch definition/declaration (or hit Shift + Ctrl + C) to jump to the declaration of the function within which the cursor currently is. Selecting the same menu entry a second time transports you back to the place where the function is defined.
Previous/Next use: Placing the cursor on the name of a local variable and selecting Navigation -> Next use (or hitting Meta + Shift + Right) transports you to the next use of this variable in the code. (Note that this doesn't just search for the next occurrence of the variable name but in fact takes into account that variables with the same name but in different scopes are different.) The same works for the use of function names. Selecting Navigation -> Previous use (or hitting Meta + Shift + Left) transports you to the previous use of a symbol.
Note
To see the list of all uses of a name through which these commands cycle, place the cursor onto it and open the Code Browser tool view or press and hold the Alt button. This is explained in more detail in the section on Exploring code.
The context list: Web browsers have this feature where you can go backward and forward in the list of most recently visited web pages. KDevelop has the same kind of features, except that instead of web pages you visit contexts. A context is the current location of the cursor, and you change it by navigating away from it using anything but cursor commands — for example, by clicking on a location provided by a tooltip, in the Code Browser tool view, one of the options given in the Navigation menu, or any other navigation command. Using the Navigation -> Previous Visited Context (Meta + Left) and Navigation -> Next Visited Context (Meta + Right) transports you along this list of visited contexts just like the back and forward buttons of a browser transports you to the previous or next webpage in the list of visited pages.
Finally, there are tool views that allow you to navigate to different places in your code base. For example, the Classes tool provides you with a list of all namespaces and classes in all projects of the current session, and allows you to expand it to see member functions and variables of each of these classes: Double-clicking on an item (or going through the context menu using the right mouse button) allows you to jump to the location of the declaration of the item. Other tools allow similar things; for example, the Projects tool view provides a list of files that are part of a session: Again, double-clicking on a file opens it.
Введення коду
Оскільки KDevelop «розуміє» код ваших проектів, це середовище може допомогти вам у написанні коду. Нижче наведено огляд деяких з цих допоміжних можливостей.
Автозавершення
Ймовірно, найкориснішою можливістю є можливість з автоматичного завершення фрагментів коду. Розглянемо, наприклад, такий фрагмент коду:
classCar{// ...public:std::stringget_color()const;};voidfoo(){Carmy_ride;// ...якісь дії з цією змінною...std::stringcolor=my_ride.ge
In the last line, KDevelop will remember that the variable my_ride is of type Car, and will automatically offer to complete the name of the member function ge as get_color. In fact, all you have to do is to keep typing until the auto-completion feature has reduced the number of matches to one, and then hit the Enter key:
Зауважте, що ви можете клацнути на панелі підказки, щоб отримати більше даних щодо функції, окрім типу даних, які вона повертає, і те, чи є ця функція відкритою (public):
Auto-completion can save you a lot of typing if your project uses long variable and function names; furthermore, it avoids mis-spelling names (and the resulting compiler errors) and it makes it much simpler to remember the exact names of functions; for example, if all of your getters start with get_, then the auto-completion feature will be able to only present you a list of possible getters when you have typed the first four letters, likely reminding you in the process which of the functions is the correct one. Note that for auto-completion to work, neither the declaration of the Car class nor of the my_ride variable need to be in the same file as where you are currently writing code. KDevelop simply has to know that these classes and variables are connected, i.e. the files in which these connections are made need to be part of the project you are currently working on.
Note
KDevelop doesn't always know when to assist you in completing code. If the auto-completion tooltip doesn't automatically open, hit Ctrl + Space to open a list of completions manually. In general, in order for auto-completion to work, KDevelop needs to parse your source files. This happens in the background for all files that are part of the projects of the current session after you start KDevelop, as well as while after you stop typing for a fraction of a second (the delay can be configured).
Note
KDevelop only parses files that it considers source code, as determined by the MIME-type of the file. This type isn't set before the first time a file is saved; consequently, creating a new file and starting to write code in it will not trigger parsing for auto-completion until after it is saved for the first time.
Note
As in the previous note, for auto-completion to work, KDevelop must be able to find declarations in header files. For this, in searches in a number of default paths. If it doesn't automatically find a header file, it will underline the name of a header file in red; in that case, right click on it to tell KDevelop explicitly where to find these files and the information they provide.
Додавання нових класів та реалізація вкладених функцій
KDevelop has a wizard for adding new classes. To add a new class, select Code -> Create New Class to get the following dialog box:
Here, we have entered the new class's name Bus (you can also enter here which other classes this class should be derived from). The next page of the dialog allows us to select the standard member functions we will need:
Here, we want a default constructor, a copy constructor, and a destructor. After the following pages of the dialog that allow you to select a license header and the location for the new files, KDevelop will generate two new tabs with the header and source files:
The header file already has include guards and the new class has all the member functions we selected. The next two steps would be to document the class and its member functions and to implement them. We will discuss aids for documenting classes and functions below. To implement the special functions already added, simply go to the bus.cpp tab where the skeleton of functions are already provided:
To add new member functions, go back to the bus.h tab and add the name of a function. For example, let us add this:
Note how I have already started with the implementation. However, in many coding styles, the function shouldn't be implemented in the header file but rather in the corresponding .cpp file. To this end, locate the cursor on the name of the function and select Code -> Move to source or hit Ctrl + Alt + S. This remove the code between curly braces from the header file (and replaces it by a semicolon as necessary to terminate the function declaration) and moves it into the source file:
Note how I have just started typing and that I meant to imply that the students variable should probably be a member variable of class Bus but that I haven't yet added it. Note also how KDevelop underlines it to make clear that it doesn't know anything about the variable. But this problem can be solved: Clicking on the variable name yields the following tooltip:
(The same can be achieved by right clicking on it and selecting Solve: Declare As.) Let me select "3 - private unsigned int" (either by mouse, or by hitting Alt + 3) and then see how it comes out in the header file:
It is worth noting that KDevelop extracts the type of the variable to be declared from the expression used to initialize it. For example, if we had written the addition in the following rather dubious way, it would had suggested to declare the variable as type double:
As a final point: The method using Code -> Move to source does not always insert the new member function where you may want it. For example, you may want it to be marked as inline and place it at the bottom of the header file. In a case like this, write the declaration and the start writing the definition of the function like this:
KDevelop automatically offers all possible completions of what might come here. Selecting one of the two add_students entries yields the following code that already fills in the complete argument list:
Note
The fact that the tooltip shows the same function twice is fixed in KDevelop 4.2.2 and later.
Note
In the example, accepting one of the choices the auto-completion tool offers yields the correct signature but unfortunately deletes the inline marker already written. This has been reported as KDevelop Bug 274245.
Оголошення для документування
Good code is well documented, both at the level of the implementation of algorithms within in functions as well as at the level of the interface — i.e., classes, (member and global) functions, and (member or global) variables need to be documented to explain their intent, possible values of arguments, pre- and postconditions, etc. As far as documenting the interface is concerned, doxygen has become the de facto standard for formatting comments that can then be extracted and displayed on searchable webpages.
KDevelop supports this style of comments by providing a short cut to generate the framework of comments that document a class or member function. For example, assume you have already written this code:
classCar{public:std::stringget_color()const;};
You now want to add documentation to both the class and the member function. To this end, move the cursor onto the first line and select Code -> Document Declaration or hit Alt + Shift + D. KDevelop will respond with the following:
The cursor is already in the grayed out area for you to fill in the short description (after the doxygen keyword @brief) of this class. You can then continue to add documentation to this comment that gives a more detailed overview of what the class does:
While the editor is inside the comment, the comment text is highlighted in green (the highlighting disappears once you move the cursor out of the comment). When you get to the end of a line, hit Enter and KDevelop will automatically start a new line that starts with an asterisk and place the cursor one character indented.
Now let's document the member function, again by putting the cursor on the line of the declaration and selecting Code -> Document Declaration or hitting Alt + Shift + D:
Again, KDevelop automatically generates the skeleton of a comment, including documentation for the function itself, as well as its return type. In the current case, the name of the function is pretty much self-explanatory, but oftentimes function arguments may not be and should be documented individually. To illustrate this, let's consider a slightly more interesting function and the comment KDevelop automatically generates:
У нашому прикладі у запропонованому коментарі вже містяться всі поля Doxygen для окремих параметрів.
Перейменування змінних, функцій і класів
Іноді виникає потреба у перейменуванні функції, класу або змінної. Наприклад, нехай маємо такий код:
We then realize that we're unhappy with the name remove_students and would have rather called it, say, throw_out_students. We could do a search-replace for the name, but this has two drawbacks:
Функцію може бути використано у декількох файлах.
Нам потрібно перейменувати лише цю функцію і не чіпати функції, які можуть мати ту саму назву, але які оголошено у інших класах або просторах назв.
Both these problems can be solved by moving the cursor on any of the occurrences of the name of the function and selecting Code -> Rename declaration (or right clicking on the name and selecting Rename Bus::remove_students). This brings up a dialog box where you can enter the new name of the function and where you can also see all the places where the function is actually used:
Фрагменти коду
Most projects have pieces of code that one frequently has to write in source code. Examples are: for compiler writers, a loop over all instructions; for user interface writers, checks that user input is valid and if not to open an error box; in the project of the author of these lines, it would be code of the kind
Rather than typing this kind of text over and over again (with all the concomitant typos one introduces), the Snippets tool of KDevelop can help here. To this end, open the tool view (see Tools and views if the corresponding button isn't already on the perimeter of your window). Then click on the "Add repository" button (a slight misnomer — it allows you to create a named collection of snippets for source codes of a particular kind, e.g. C++ sources) and create an empty repository. Then click to add a snippet, to get a dialog like the following:
Note
The name of a snippet may not have spaces or other special characters because it must look like a normal function or variable name (for reasons that will become clear in the next paragraph). If the name of the snippet does contain spaces, the OK button will become inactive without any further explanation. This has been reported as KDevelop bug 274299.
To use a snippet so defined, when you are editing code, you can just type the name of the snippet like you would any other function or variable name. This name will become available for auto-completion — which means that there is no harm in using a long and descriptive name for a snippet such as the one above — and when you accept the suggestion of the auto-completion tooltip (for example by just hitting Enter), the already entered part of the snippets' name will be replaced by the full expansion of the snippet and will be properly indented:
Note that for this to work, the Snippets tool view need not be open or visible: you only ever need the tool view to define new snippets. An alternative, if less convenient, way to expand a snippet is to simply click on it in the respective tool view.
If you've gotten this far, take a look at the upper right of the KDevelop main window: As shown in the picture, you will see that there are three modesKDevelop can be in: Code (the mode we discuss in the current chapter on working with source code), Debug (see Debugging programs) and Review (see Working with version control systems).
Each mode has its own set of tools that are stacked around the perimeter, and each mode also has a working set of currently open files and documents. Furthermore, each such working set is associated with a current session, i.e. we have the relationship shown above. Note that the files in the working set come from the same session, but they may come from different projects that are part of the same session.
If you open KDevelop the first time, the working set is empty — there are no open files. But as you open files for editing (or debugging, or reviewing in the other modes) your working set grows. The fact that your working set is non-empty is indicated by a symbol in the tab, as shown below. You will notice that whenever you close KDevelop and later start it again, the working set is saved and restored, i.e. you get the same set of open files.
If you hover your mouse over the symbol for the working set, you get a tooltip that shows you which files are currently open in this working set (here: the step-32.cc and step-1.cc files). Clicking on the red minus sign closes the tab for the corresponding file. Maybe more importantly, clicking on the correspondingly named button allows you to close the entire working set at once (i.e. to close all currently open files). The point about closing a working set, however, is that it doesn't just close all files, it actually saves the working set and opens a new, still empty one. You can see this here:
Note the two symbols to the left of the three mode tabs (the heart and the unidentifiable symbol to its left). Each of these two symbols represents a saved working set, in addition to the currently open working set. If you hover your mouse over the heart symbol, you'll get something like this:
It shows you that the corresponding working set contains two files and their corresponding project names: Makefile and changes.h. Clicking Load will close and save the current working set (which as shown here has the files tria.h and tria.cc open) and instead open the selected working set. You can also permanently delete a working set, which removes it from the set of saved working sets.
Деякі корисні клавіатурні скорочення
KDevelop's editor follows the standard keyboard shortcuts for all usual editing operations. However, it also supports a number of more advanced operations when editing source code, some of which are bound to particular key combinations. The following are frequently particularly helpful:
Пересування кодом
Ctrl+Alt+O
Пришвидшене відкриття файла: вкажіть частину назви файла і виберіть той з них у каталозі проектів поточного сеансу, який вам потрібен; цей файл і буде відкрито.
Ctrl+Alt+C
Пришвидшене відкриття класу: вкажіть частину назви класу і виберіть ту з назв класів, яка вам потрібна; курсор буде переведено до рядка оголошення класу.
Ctrl+Alt+M
Пришвидшене відкриття функції: вкажіть частину назви функції (частини класу) і виберіть з запропонованих варіантів той, який вам потрібен; зауважте, що у списку буде показано оголошення і визначення, а курсор буде переведено до вибраного вами пункту.
Ctrl+Alt+Q
Універсальне пришвидшення відкриття: вкажіть будь-які дані (назву файла, назву класу, назву функції), і вам буде показано список всіх частин проекту, які відповідають критерію пошуку.
Ctrl+Alt+N
Огляд: показує список всіх дій, які виконуються у файлі, наприклад, оголошень класів та визначень функцій.
Ctrl+,
Перейти до визначення функції, якщо курсор перебуває у місці її оголошення.
Ctrl+.
Перейти до оголошення функції або змінної, якщо курсор перебуває у позиції визначення функції.
Ctrl+Alt+PageDown
Перейти до наступної функції
Ctrl+Alt+PageUp
Перейти до попередньої функції
Ctrl+G
Перейти до рядка
Пошук і заміна
Ctrl+F
Знайти
F3
Знайти далі
Ctrl+R
Замінити
Ctrl+Alt+F
Знайти і замінити у декількох файлах
Інші команди
Ctrl+_
Згорнути один рівень: вилучити блок з перегляду, наприклад, якщо ви бажаєте зосередитися на загальнішій картині у функції.
Ctrl++
Розгорнути один рівень: скасувати згортання.
Ctrl+D
Знякти коментування з позначеного фрагмента тексту або поточного рядка.
Ctrl+Shift+D
Додати позначки коментаря до позначеного тексту або поточного рядка.
Alt+Shift+D
Документувати поточну функцію. Якщо курсор перебуває на оголошенні функції або класу, натискання цієї комбінації клавіш призведе до створення коментаря у форматі doxygen зі списком параметрів, значень, які повертаються, тощо.
Ctrl+T
Поміняти місцями поточний і попередній символи
Ctrl+K
Вилучити поточний рядок (зауваження: ця дія не збігається за результатом з дією «вилучити звідси до кінця рядка» у emacs)