Karbon/Tutorials/Artistic Text Shape: Difference between revisions
m (fix formatting 2) |
No edit summary |
||
| (3 intermediate revisions by 2 users not shown) | |||
| Line 2: | Line 2: | ||
<translate> | <translate> | ||
<!--T:1--> | <!--T:1--> | ||
This tutorial will present you what you can do with the <menuchoice>Artistic Text Shape</menuchoice>. While this tutorial was done using '''Karbon''', the shape is available in other ''' | This tutorial will present you what you can do with the <menuchoice>Artistic Text Shape</menuchoice>. While this tutorial was done using '''Karbon''', the shape is available in other '''Calligra''' applications, and will work in a similar way. | ||
<!--T:2--> | <!--T:2--> | ||
| Line 20: | Line 20: | ||
<!--T:6--> | <!--T:6--> | ||
After adding the shape, you might want to edit the text and display something more interesting. To do this, you need to activate the <menuchoice>artistic text shape tool</menuchoice>, either by double clicking on the newly created shape, or selecting [[Image:Artistictext-tool.png]] in the toolbox. Then you can change the text to something like this. | After adding the shape, you might want to edit the text and display something more interesting. To do this, you need to activate the <menuchoice>artistic text shape tool</menuchoice>, either by double clicking on the newly created shape, or selecting [[Image:Artistictext-tool.png|16px]] in the toolbox. Then you can change the text to something like this. | ||
<!--T:7--> | <!--T:7--> | ||
| Line 46: | Line 46: | ||
<!--T:14--> | <!--T:14--> | ||
To associate the text with the curve, you need to activate the <menuchoice>artistic text tool</menuchoice> by double clicking on the text, or selecting [[Image:Artistictext-tool.png]]. | To associate the text with the curve, you need to activate the <menuchoice>artistic text tool</menuchoice> by double clicking on the text, or selecting [[Image:Artistictext-tool.png|16px]]. | ||
<!--T:15--> | <!--T:15--> | ||
Then, if you move the mouse on top of the curve you will see the cursor changing to a hand, you will need to | Then, if you move the mouse on top of the curve you will see the cursor changing to a hand, you will need to doubleclick on the curve<!--. In the | ||
<menuchoice>Tool options</menuchoice> docker, the <menuchoice>Attach path</menuchoice> icon [[Image:Artistictext-attach-path.png]] is now enabled, and you need to click on it to attach the path. Using the offset in the <menuchoice>Shape properties</menuchoice> docker, you can adjust the text to get the following result: | <menuchoice>Tool options</menuchoice> docker, the <menuchoice>Attach path</menuchoice> icon [[Image:Artistictext-attach-path.png]] is now enabled, and you need to click on it--> to attach the path. Using the offset in the <menuchoice>Shape properties</menuchoice> docker, you can adjust the text to get the following result: | ||
<!--T:16--> | <!--T:16--> | ||
Latest revision as of 12:00, 30 December 2018
This tutorial will present you what you can do with the . While this tutorial was done using Karbon, the shape is available in other Calligra applications, and will work in a similar way.
In this lesson you will
- create a text shape
- associate a text shape with a path
First step with a text shape
 |
To add an artistic text shape, go to the docker, click on the icon, and drag it to the canvas. |
After adding the shape, you might want to edit the text and display something more interesting. To do this, you need to activate the , either by double clicking on the newly created shape, or selecting ![]() in the toolbox. Then you can change the text to something like this.
in the toolbox. Then you can change the text to something like this.

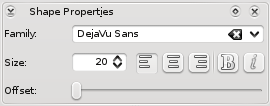
After changing the to "Steve", the to 30pt, and setting , you can have the following shape in your canvas:

Path follower
This is still a very straight, flat text. Now we want a curvy text. To do this, we will need to create a path, for instance, using the ![]() .
.
You should have something like this:

To associate the text with the curve, you need to activate the by double clicking on the text, or selecting ![]() .
.
Then, if you move the mouse on top of the curve you will see the cursor changing to a hand, you will need to doubleclick on the curve to attach the path. Using the offset in the docker, you can adjust the text to get the following result:

You can detach the path by clicking on ![]() . You can , and the text. If you change the curve, then the text will be updated.
. You can , and the text. If you change the curve, then the text will be updated.


