Archive:Kdenlive/Manual/Effects/Blur and hide/Auto Mask: Difference between revisions
| Line 15: | Line 15: | ||
==== Motion Tracking ==== | ==== Motion Tracking ==== | ||
The Auto Mask effect can also be used to track motion of an object and use it later as keyframes for an effect / transition. To use this feature, first add the clip you want to analyse in timeline, and add the "Auto Mask" effect to it - Figure 1. | The Auto Mask effect can also be used to track motion of an object and use it later as keyframes for an effect / transition. | ||
Note: This method described here is a re-purposing of the motion tracking data that the Auto Mask effect calculates. You do not need to follow the method described below to generate an Auto Mask that will obscure faces. The instructions in the above video should be enough. Nor can you use the method describe below to improve the tracking of the mask created by the Auto Mask effect. If the automask is not working for you then try the Obscure effect with keyframes. | |||
To use this feature, first add the clip you want to analyse in timeline, and add the "Auto Mask" effect to it - Figure 1. | |||
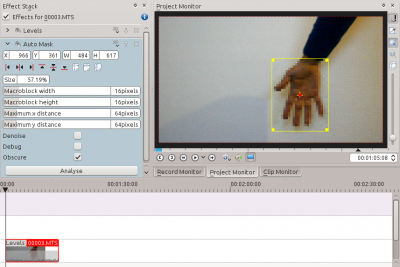
[[File:Tracking01.png|400px|thumb|right|Figure 1.]]Go to the first frame where your object is visible, and adjust the yellow rectangle so that is surrounds the object, like the hand in Figure 1. | [[File:Tracking01.png|400px|thumb|right|Figure 1.]]Go to the first frame where your object is visible, and adjust the yellow rectangle so that is surrounds the object, like the hand in Figure 1. | ||
Revision as of 01:44, 12 August 2014
Auto Mask
This effect can be used to mask peoples faces. It uses motion estimation to track subjects and mask faces. It is the MLT filter autotrack_rectangle
Demo
How to apply Auto Mask
See video below on how to use this effect. Warning: The effect is not 100% reliable.
Motion Tracking
The Auto Mask effect can also be used to track motion of an object and use it later as keyframes for an effect / transition.
Note: This method described here is a re-purposing of the motion tracking data that the Auto Mask effect calculates. You do not need to follow the method described below to generate an Auto Mask that will obscure faces. The instructions in the above video should be enough. Nor can you use the method describe below to improve the tracking of the mask created by the Auto Mask effect. If the automask is not working for you then try the Obscure effect with keyframes.
To use this feature, first add the clip you want to analyse in timeline, and add the "Auto Mask" effect to it - Figure 1.

Go to the first frame where your object is visible, and adjust the yellow rectangle so that is surrounds the object, like the hand in Figure 1.
Then click on the button in the effect options. This will start an analysis of the clip (you can follow its progress in the Project Tree view).

When the job is finished, the motion tracking data is stored in the clip properties. To use this data, you can for example add a title clip over the clip you just analysed, like in the screenshot in Figure 2..

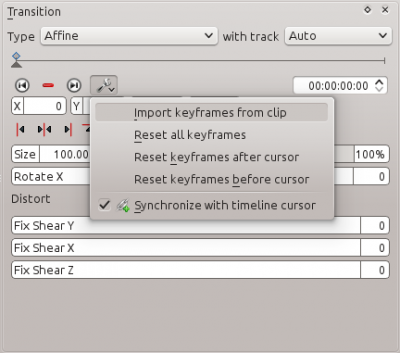
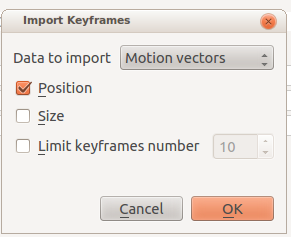
Next step is to import the motion data in the transition. To do this, first select the clip you have analysed, then select the transition using the CTRL key so that both items are selected. Finally, go in the transitions's config menu ![]() and select . You can now delete the "Auto Mask" effect from the clip in timeline and play the project to see your title clip following the object.
and select . You can now delete the "Auto Mask" effect from the clip in timeline and play the project to see your title clip following the object.

Deleting Motion Tracking Data
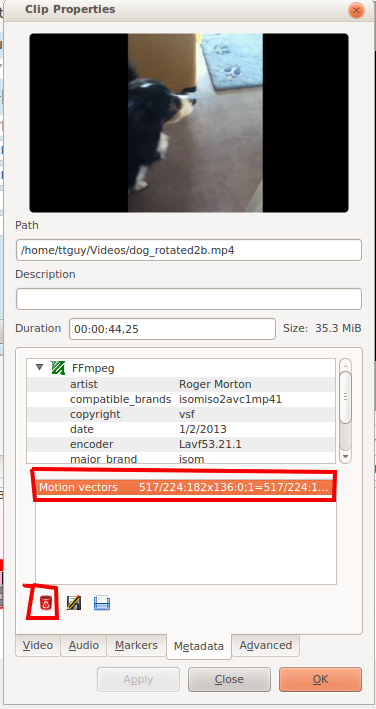
The motion tracking data is saved with the clip properties. You can view this data and delete it from the clip properties dialog - Figure 5.

