Kdenlive/Manual/Effects/el
Effects
Effects in Kdenlive can be used to modify the audio and video properties of the source material.
You add effects to clips by choosing them from the Effects Tab and dragging them onto a clip in the timeline. Or by selecting a clip in the timeline and choosing from the Timeline menu or from Clip in Timeline right click menu . For more detail see QuickStart - Effects
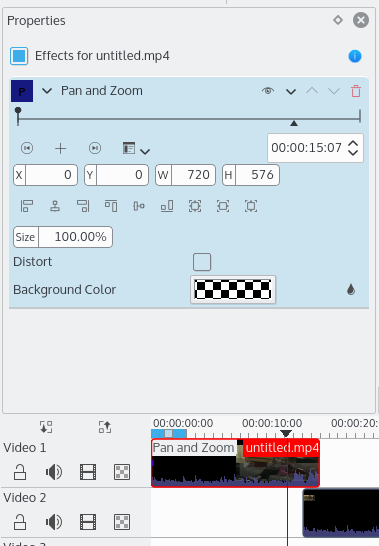
The effects that are in play on a given clip can be viewed and edited via the Properties Tab that displays when the clip in question is selected in the timeline.
You can also apply effects to an entire track. This is achieved by dragging an effect from the Effect Tab to the Track Header. Or you can click on the track header and chose from the Timeline menu . Tracks which have effects added in this fashion will have a gold star icon in the track header.

Καρτέλα εφέ
Εμφανίστε την καρτέλα των εφέ από το μενού ()
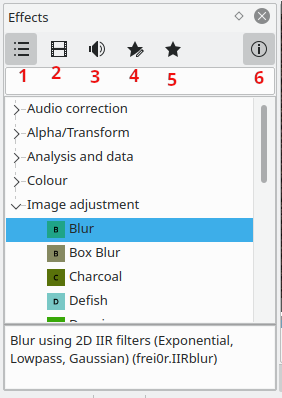
The effects tab has 5 different icons that cause the application to show and hide different categories of effects.
By default the effects tab displays the "Main Effects" (Icon 1 selected). These are the Audio Correction, Alpha/Transform, Analysis and data, Colour and the Image adjustment categories.
Icon 2 makes it display all the video effects categories (This option hides the Audio Correction category that is in the "Main Effects" and adds the Misc and Motion categories).
Icon 3 makes it display all the Audio effects categories
Icon 4 is Custom effects
Icon 5 is Favorite Effects. This is the same list that appears in the "Insert an Effect ..." context sensitive menu obtained on a clip in the timeline. An effect gets in this list by choosing Add to Favorites from the context sensitive menu on each of the effects.
Icon 6 toggles the information display which - when on - shows a description of what the effect does.
If you find that you are missing some effects or effects categories that you know and love it is probably because you need to choose to display the hidden effects by choosing an Icon other that Icon 1 - "Main Effects"
Για να προσθέσετε ένα εφέ σε κάποιο κλιπ, απλώς τραβήξτε το από την καρτέλα των εφέ πάνω στο κλιπ στην γραμμή του χρόνου.
Η καρτέλα ιδιοτήτων και τα μενού της
Καρτέλα ιδιοτήτων
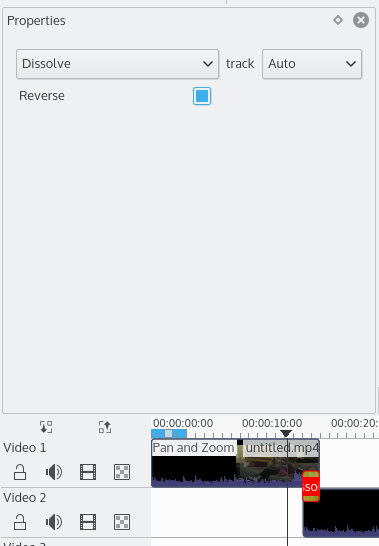
Η καρτέλα ιδιοτήτων εμφανίζει τις ρυθμίσεις για τα εφέ στο επιλεγμένο κλιπ (Σχήμα 3) ή τις ρυθμίσεις για την επιλεγμένη μετάβαση (Σχήμα 4) ανάλογα με το αν έχει επιλεγεί ένα κλιπ ή μία μετάβαση.
 |
 |
Με κλικ στο εικονίδιο με το μάτι απενεργοποιείτε προσωρινά το εφέ και αλλάζει το κουμπί στην κατάσταση που φαίνεται στο 1. Με κλικ στο εικονίδιο με το άδειο μάτι του 1 επαναφέρετε ένα απενεργοποιημένο εφέ και αλλάζει το κουμπί στην κατάσταση που φαίνεται στο 2.
Για να αφαιρέσετε ένα εφέ από το κλιπ, κάντε κλικ στο εικονίδιο του κάδου με τον αριθμό 3 της παρακάτω εικόνας. Το βέλος 1 ελαχιστοποιεί το εφέ στο παράθυρο ιδιοτήτων. Το εικονίδιο 2 ανοίγει την καρτέλα ιδιοτήτων.
Επαναφορά εφέ
Επαναφέρει όλες τις ρυθμίσεις του εφέ πίσω στις προεπιλεγμένες τιμές.
Αποθήκευση εφέ
Σας επιτρέπει να σώσετε το τρέχον εφέ και όλες τις ρυθμίσεις του. Το αποθηκευμένο εφέ θα εμφανίζεται στη λίστα των εφέ στην κατηγορία των προσαρμοσμένων εφέ.
Δημιουργία ομάδας
Δημιουργεί μια ομάδα εφέ. Μια ομάδα εφέ είναι μια ονομασία για πολλαπλά εφέ. Μπορείτε να σώσετε μια ομάδα από εφέ. Θα εμφανίζονται στη λίστα των εφέ στο τμήμα των προσαρμοσμένων εφέ. Μπορείτε έπειτα να εφαρμόσετε ολόκληρη την ομάδα των εφέ σε άλλα σημεία της γραμμής του χρόνο.
Για να προσθέσετε εφέ σε μία ομάδα, προσθέστε πρώτα το εν λόγω εφέ σε ένα κλιπ, έπειτα τραβήξτε αυτό το εφέ και εναποθέστε το στην ομάδα εφέ στην καρτέλα ιδιοτήτων.
Δημιουργία περιοχής
Η «Δημιουργία περιοχής» επιτρέπει στον χρήστη να εφαρμόσει ένα εφέ μόνο σε ένα μέρος του κλιπ. Είναι ένα πολύ ισχυρό προσόν, δυστυχώς το υπάρχον περιβάλλον χρήστη δεν είναι εντελώς έτοιμο για να σας δώσει το πλήρες δυναμικό της.
Πρακτικά, προσθέτετε ένα εφέ σε ένα κλιπ -για παράδειγμα, «Σέπια»- έπειτα πηγαίνετε στο μενού των εφέ και επιλέγετε «Δημιουργία περιοχής». Θα σας ανοίξει έναν διάλογο αρχείου.
Σε αυτόν τον διάλογο, πρέπει να βρείτε ένα κλιπ MLT με διαφάνεια άλφα. Εδώ το Kdenlive δεν είναι 100% έτοιμο, επειδή υπάρχουν πολλοί τρόποι που θα μπορούσαμε να δημιουργήσουμε τέτοια κλιπ, χρησιμοποιώντας για παράδειγμα ένα φίλτρο κατωφλίου ή rotoscoping. Για αρχή, ας πούμε ότι μπορείτε να ανοίξετε οποιαδήποτε εικόνα με διαφάνεια άλφα ή κλιπ τίτλου που δημιουργήθηκε με το Kdenlive. Τότε, το εφέ «σέπια» θα εφαρμοστεί μόνο στην αδιαφανή επιφάνεια αυτού του κλιπ «περιοχής».
Keyframes in effects
Many effects use the concept of "Keyframes". Keyframes are user-defined points in your clip where you want an effect to start, stop or change. You can set the parameters for your effects to different values at different keyframes and Kdenlive will then gradually change the parameters between the two keyframes so that by the time the video has arrived at the next keyframe it will have adjusted the parameter to match that key frame. It interpolates between keyframes.
See QuickStart - Effects for an example on keyframing the RGB adjustment effect.
Since Version 20.08.0
Effect panels get zoom bars. Adjusting keyframes just get easier.
Working with keyframes in the effect stack
Since Version 21.04.0
The effect’s keyframe panel has new icons, improved keyframe grabbing and new functions like:
- Select the keyframe you want to move
- Move the cursor to the position where you want to move the keyframe to
- Click on
- Select the keyframe you want to duplicate
- Move the cursor to the position where you want to insert the new keyframe
- Click on
- Select all keyframes you want to apply the value on
- Go to one of the selected keyframes and change the value(s) as you want
- Click on
- Select the parameters you want to apply and click on
Exchange keyframes across effects
You can import and export keyframes from/to the clipboard. This feature is not only useful to copy keyframes from one clip to another, it can e.g. also be used to copy the results of the motion tracker to a transform effect.
To export the keyframes the clipboard click on ![]() inside the keyframe widget and choose
inside the keyframe widget and choose
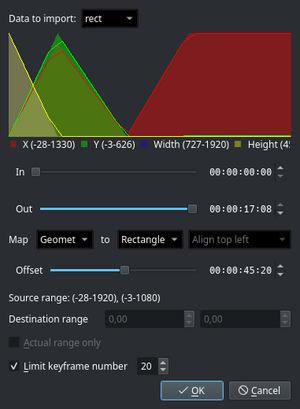
To import keyframes from the clipboard click on ![]() inside the keyframe widget and choose . If you have valid data on your clipboard you should see a dialog similar to the screenshot where you can adjust the mapping of the data.
inside the keyframe widget and choose . If you have valid data on your clipboard you should see a dialog similar to the screenshot where you can adjust the mapping of the data.
Effect Zones
Since Version 21.04.0
The new Effect Zones allow you to apply effects to specific regions of tracks or the timeline. Zones can be set from the effect zone bar in the timeline or from the interface in the effect panel.
Track Effect Zone
Master Effect Zone
Seek To Active Frame
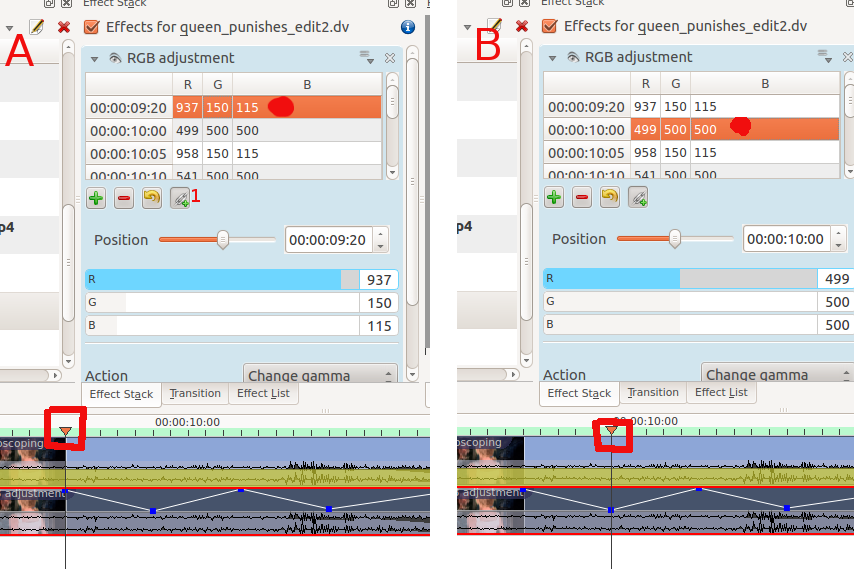
Some keyframe controls have a seek to active frame button ![]() (labeled 1 in screenshot A below). When seek to active frame is toggled on and you click on one of the keyframes in the keyframe list, Kdenlive will scroll the preview window to that keyframe. In the example of the screenshot, we have selected the keyframe at 9:20 in A and the clip position caret (highlighted in red box) shows the location of this keyframe. Clicking the keyframe at 10:00 in B shows how the clip position has moved.
(labeled 1 in screenshot A below). When seek to active frame is toggled on and you click on one of the keyframes in the keyframe list, Kdenlive will scroll the preview window to that keyframe. In the example of the screenshot, we have selected the keyframe at 9:20 in A and the clip position caret (highlighted in red box) shows the location of this keyframe. Clicking the keyframe at 10:00 in B shows how the clip position has moved.
Effects Demos
The following three YouTube videos display the results of a number of the video effects available in Kdenlive (Spanish captioning).
Another YouTube video (English Captions).
See also this YouTube play list from Franz M.P.
Κατηγορίες εφέ
Βλέπε επίσης Εφέ και μεταβάσεις για μια αλφαβητική λίστα των εφέ και των μεταβάσεων.
Τα εφέ χωρίζονται στις παρακάτω κατηγορίες:
- Χειρισμού άλφα
- Ανάλυσης και δεδομένων
- Καλλιτεχνικά
- Ήχου
- Κανάλια ήχου
- Επιδιόρθωση ήχου
- Blur and hide
- Χρώμα
- Διόρθωση χρώματος
- Crop and transform
- Προσαρμοσμένα
- Παραμόρφωση
- Βελτίωση
- Fade
- Διάφορα
- Κίνηση
Τα διαθέσιμα εφέ ορίζονται από τα αρχεία .xml που βρίσκονται στο $KDEDIR/share/kde4/apps/kdenlive/effects (π.χ. /usr/share/kde4/apps/kdenlive/effects).
ή στο /usr/share/kdenlive/effects για την έκδοση 15.n.
Αυτά τα αρχεία .xml περιέχουν τις προεπιλεγμένες τιμές των παραμέτρων των εφέ. Οπότε, εάν δεν σας αρέσουν οι προεπιλεγμένες τιμές των εφέ του Kdenlive, μπορείτε να της προσαρμόσετε αλλάζοντας αυτά τα αρχεία .xml.
Συχνές ερωτήσεις
Ερ: Πως διπλασιάζουμε ένα εφέ ώστε να χρησιμοποιεί τις συγκεκριμένες ρυθμίσεις κάπου αλλού;
Απ: Επιλέξτε το εφέ στη γραμμή του χρόνου. Στην καρτέλα ιδιοτήτων επιλέξτε (από το Καρτέλα μενού ιδιοτήτων). Πλέον θα βρείτε διαθέσιμο το εφέ στην λίστα των εφέ .
A: Other solution: select a strip containing the effect, , then, where you want to apply it again, right-click and select instead of .
Ερ: Πως εφαρμόζουμε ένα εφέ σε πολλαπλά κλιπ με την μία;
Απ: Μπορείτε να επιλέξετε πολλαπλά κλιπ με το Shift + τράβηγμα (αριστερό κουμπί του ποντικιού) γύρω τους. Έπειτα κάντε δεξί κλικ και ομαδοποιήστε τα κλιπ (ή Ctrl + G).

