Kdenlive/Manual/Projects and Files/Árbol de proyecto
El árbol de proyecto
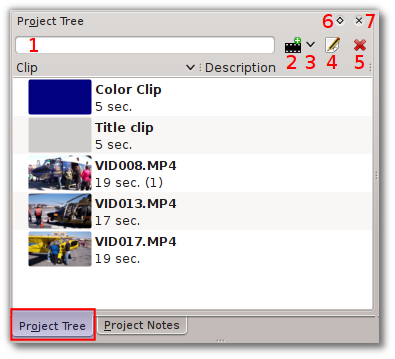
El árbol de proyecto es un pánel en el que Kdenlive enlista todos los clips que se encuentran asociados al proyecto.
Los clips se pueden arrastrar desde al árbol de proyecto hacia la Línea de tiempo.

El cuadro de texto etiquetado como 1 es un filtro que selecciona por nombre los clips visibles en el árbol..
El ícono etiquetado con 2 es el botón para Agregar clips (para añadir clips de audio o video al árbol de proyecto).
El menú desplegable etiquetado con 3 es una lista desplegable para que permite añadir otros tipos de clip al árbol de proyecto.
El icono identificado con el número 4 muestra las propiedades del clip que se encuentra seleccionado en el árbol de proyecto.
El icono etiquetado con el número 5 borra el clip seleccionado en el árbol (pero no borra el archivo del sistema).
Icon labeled 6 toggles docking of the Project Tree.
Icon labeled 7 closes the Project Tree. The Project Tree can be made visible again from the menu.
The number in brackets after the length of the clip is the number of times this clip appears in the timeline. In the screenshot, the VID008.MP4 clip is 19 seconds long and appears in the timeline one time.
Project Tree - Right-Click Menu
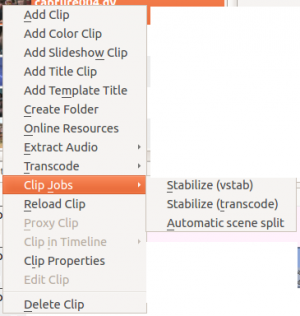
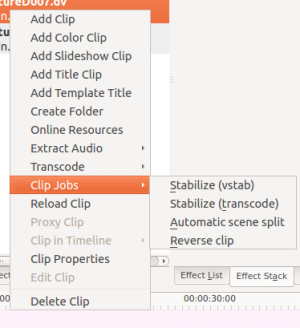
The images below show the menu items available when you right-click a clip in the Project Tree. The images show the 0.9.3 and the 0.9.6 versions of the menu. In version 0.9.3 of Kdenlive, the Stabilize submenu item was replaced by a Clip Jobs submenu item. In 0.9.6 the Reverse Clip job was added to the Clip Jobs menu group.
 |
 |
| ver 0.9.3 of Kdenlive | ver 0.9.6 of Kdenlive |
The menu items which appear when you right-click on an item in the Project Tree are also available from the Project Menu.
- Add Clip
- Add Color Clip
- Add Slideshow Clip
- Add Title Clip
- Add Template Title
- Create Folder
- Online Resources
- Extract Audio
- Transcode
- Stabilize (ver 0.9.2)
- Clip Jobs > Stabilize (ver 0.9.3)
- Clip Jobs > Automatic Scene Split (ver 0.9.3)
- Clip Jobs > Reverse Clip (ver 0.9.6)
- Reload Clip
- Proxy Clip
- Clip in Timeline
- Clip Properties
- Edit Clip
- Delete Clip
