Plan/Manual/Schedules Editor: Difference between revisions
m (Fix minor typos) |
m (Fix minor typo) |
||
| (6 intermediate revisions by the same user not shown) | |||
| Line 1: | Line 1: | ||
==Description== | ==Schedules Editor== | ||
===Description=== | |||
{| | {| | ||
| The Schedule Editor is used to create, edit, calculate and delete schedules. | | The Schedule Editor is used to create, edit, calculate and delete schedules. | ||
|[[Image:Plan_scheduleeditor.png|350px]] | | [[Image:Plan_scheduleeditor.png|350px]] | ||
|} | |} | ||
| Line 19: | Line 22: | ||
[[Image:Plan_schedulinglog.png|350px]] | [[Image:Plan_schedulinglog.png|350px]] | ||
==Toolbar== | ===Toolbar=== | ||
The toolbar provides the means to create, delete and calculate schedules: | The toolbar provides the means to create, delete and calculate schedules: | ||
{| border="1" cellpadding="5" cellspacing="0" | {| border="1" cellpadding="5" cellspacing="0" | ||
| Line 30: | Line 30: | ||
| style="background:#efefef;" | '''Description''' | | style="background:#efefef;" | '''Description''' | ||
|- | |- | ||
|{{Plan/Icon|view-time-schedule-insert}} Add Schedule | | {{Plan/Icon|view-time-schedule-insert}} Add Schedule | ||
| <keycap>Ctrl+I</keycap> | | <keycap>Ctrl+I</keycap> | ||
| Button to create a resource group. The new group is appended at the end of the groups. | | Button to create a resource group. The new group is appended at the end of the groups. | ||
|- | |- | ||
|{{Plan/Icon|view-time-schedule-child-insert}} Add Subschedule | | {{Plan/Icon|view-time-schedule-child-insert}} Add Subschedule | ||
| <keycap>Ctrl+Shift+I</keycap> | | <keycap>Ctrl+Shift+I</keycap> | ||
| Button to create a sub-schedule. The new schedule is appended as a child to the currently selected schedule. | | Button to create a sub-schedule. The new schedule is appended as a child to the currently selected schedule. | ||
|- | |- | ||
|{{Plan/Icon|edit-delete}} Delete || <keycap>Delete</keycap> || Deletes the selected schedule. | | {{Plan/Icon|edit-delete}} Delete || <keycap>Delete</keycap> || Deletes the selected schedule. | ||
|- | |- | ||
|{{Plan/Icon|view-time-schedule-calculus}} Calculate || || Calculates the selected schedule. | | {{Plan/Icon|view-time-schedule-calculus}} Calculate || || Calculates the selected schedule. | ||
|- | |- | ||
|{{Plan/Icon|view-time-schedule-baselined-add}} Baseline || || Baselines the selected schedule. Prevents the schedule from being re-calculated or deleted. | | {{Plan/Icon|view-time-schedule-baselined-add}} Baseline || || Baselines the selected schedule. Prevents the schedule from being re-calculated or deleted. | ||
|- | |- | ||
|{{Plan/Icon|go-first}} Detach || || Make the selected sub-schedule a top schedule | | {{Plan/Icon|go-first}} Detach || || Make the selected sub-schedule a top schedule | ||
|} | |} | ||
===Editing data=== | |||
Data can be edited in-line as described [[Special:myLanguage/Plan/Manual/Using the Views|here]]. | |||
Data can be edited in-line as described [[Plan/Manual/Using the Views|here]]. | |||
The following columns are displayed as default: | The following columns are displayed as default: | ||
| Line 59: | Line 58: | ||
|- | |- | ||
| Name | | Name | ||
|The name of the schedule. | | The name of the schedule. | ||
|- | |- | ||
| State | | State | ||
| Line 66: | Line 65: | ||
| Direction | | Direction | ||
| The scheduling direction. | | The scheduling direction. | ||
If the direction is Forward, the project is scheduled starting at the project's earliest start time specified in the main project dialog. If the direction is Backward, the project is scheduled starting at the project's latest finish time specified in the main project dialog. | If the direction is Forward, the project is scheduled starting at the project's earliest start time specified in the main project dialog. If the direction is Backward, the project is scheduled starting at the project's latest finish time specified in the main project dialog. | ||
|- | |- | ||
| Overbooking | | Overbooking | ||
| Line 92: | Line 91: | ||
|} | |} | ||
==Configuration== | ===Configuration=== | ||
{| | {| | ||
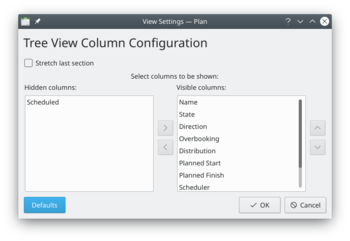
| Using the context menu, the view can be configured to split/unsplit the tree view or it can be configured using the configure dialog. | | Using the context menu, the view can be configured to split/unsplit the tree view or it can be configured using the configure dialog. | ||
The configure dialog enables you to tailor the amount of information the view displays to fit your needs. | The configure dialog enables you to tailor the amount of information the view displays to fit your needs. | ||
|[[Image:Plan_scheduleeditor_config.png|350px]] | | [[Image:Plan_scheduleeditor_config.png|350px]] | ||
|} | |} | ||
{{Plan/Prevnext|prevpage=Task Dependency Editor (List)|indextext=Contents|nextpage=Project Performance View}} | {{Plan/Prevnext|prevpage=Task Dependency Editor (List)|indextext=Contents|nextpage=Project Performance View}} | ||
[[Category:Office]] | [[Category:Office]] | ||
Latest revision as of 07:38, 29 February 2020
Schedules Editor
Description
| The Schedule Editor is used to create, edit, calculate and delete schedules. | 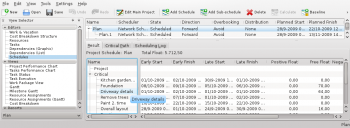
|
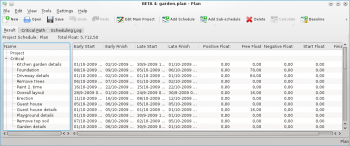
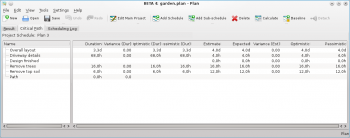
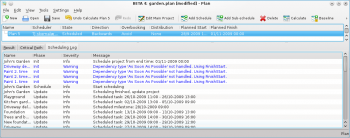
The Schedule Editor has three sub-views that show the results of the scheduling.
The Result sub-view shows the values needed for PERT analysis including early start and -finish, late start and -finish along with different types of float.
The Critical Path sub-view shows the tasks that belong to the critical path.
The Scheduling Log sub-view shows a list of messages produced during scheduling.
Toolbar
The toolbar provides the means to create, delete and calculate schedules:
| Button | Shortcut | Description |
| Ctrl+I | Button to create a resource group. The new group is appended at the end of the groups. | |
| Ctrl+Shift+I | Button to create a sub-schedule. The new schedule is appended as a child to the currently selected schedule. | |
| Delete | Deletes the selected schedule. | |
| Calculates the selected schedule. | ||
| Baselines the selected schedule. Prevents the schedule from being re-calculated or deleted. | ||
| Make the selected sub-schedule a top schedule |
Editing data
Data can be edited in-line as described here.
The following columns are displayed as default:
| Column | Description |
| Name | The name of the schedule. |
| State | The schedules state. Shows a progress bar during scheduling. |
| Direction | The scheduling direction.
If the direction is Forward, the project is scheduled starting at the project's earliest start time specified in the main project dialog. If the direction is Backward, the project is scheduled starting at the project's latest finish time specified in the main project dialog. |
| Overbooking | Controls resource overbooking when scheduling.
If overbooking is allowed, a resource may be booked (on working days) to work more than it is available. This can happen if the resource is allocated to multiple tasks or are booked on other projects. If overbooking is to be avoided, resources will not be booked more than they are available. On resource conflict, tasks will be delayed until the resource is available. |
| Distribution | The distribution to be used during scheduling.
If the distribution is 'None', the estimate of the task is used as-is during scheduling. If the distribution is 'PERT', the estimate (E) used is calculated based on the entered optimistic- (O), pessimistic-(P) and most likely (M) estimate. The formula used for this is: E = (O + 4 * M + P) / 6. |
| Planned Start | The scheduled start time. |
| Planned Finish | The scheduled finish time. |
| Scheduler | The scheduler used for calculating the project schedule.
The default built-in scheduler is the Network Scheduler. Another scheduler presently available is RCPS if libRCPS is installed on your system. RCPS is a genetics-based resource-constrained project scheduler |

