Plasma
Template:I18n/Language Navigation Bar
Una introducción: qué es Plasma, y qué hace
Plasma es la interfaz de escritorio de KDE Software Compilation 4, e incluye un lanzador de aplicaciones (menú de inicio), el escritorio y el panel del escritorio (normalmente conocido únicamente como la barra de tareas, aunque ese no sea el único componente del panel).
Plasma de un vistazo
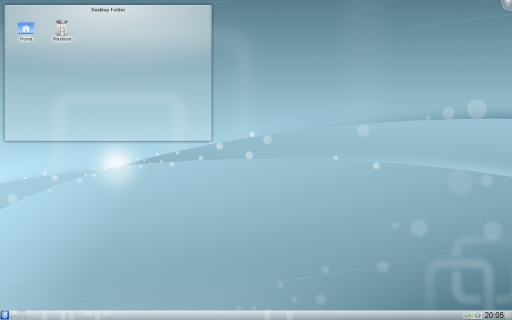
Un escritorio Plasma típico tiene el siguiente aspecto:

Los tres componentes principales de un escritorio Plasma son:
- El panel, más conocido como la barra de tareas, que proporciona espacio para el lanzador de aplicaciones, la lista de tareas (programas), el reloj y la bandeja del sistema;
- El escritorio, la zona donde están los iconos y los elementos gráficos;
- La caja de herramientas de Plasma, se encuentra en la parte superior derecha de la pantalla. También hay una a la derecha del panel.
Encuentra tu camino en Plasma
Puedes usar Plasma del mismo modo que usarías el escritorio de cualquier otro sistema operativo: accediendo al menú de aplicaciones (K Menú), viendo los programas activos en la barra de tareas, accediendo a los iconos en la bandeja del sistema, y así sucesivamente.
Una parte importante de Plasma son los llamados elementos gráficos. Los Elementos gráficos son las unidades individuales del escritorio e incluyen (aunque no se limitan a) al menú de aplicaciones, iconos, la bandeja del sistema, el reloj... Los Elementos gráficos pueden existir en el propio escritorio, o pueden ser introducidos en el panel. Los paneles y escritorios realmente son tipos especiales de elementos gráficos, que pueden contener a otros elementos gráficos (en términos de Plasma, se llaman "Contenedores").
¿Cómo se relaciona esto con el uso del escritorio? Plasma también tiene algunas nuevas características con respecto a los escritorios tradicionales. Ya hemos mencionado las cajas de herramientas de Plasma, a veces llamadas "cashews": son el camino para empezar a interactuar y personalizar Plasma. Haciendo clic en ellas, se abrirá un menú en la pantalla con unas opciones: desde ahí puedes añadir elementos gráficos a tu panel o escritorio, redimensionar, añadir o eliminar paneles, y otras operaciones.
Escritorio e iconos
Como puedes observar en la captura de pantalla, no hay iconos colocados directamente en el escritorio. En su lugar, están situados en un contenedor, más conocido como Vista de Carpeta. Aunque hay una serie de razones técnicas para hacerlo así, la Vista de Carpeta se puede comportar perfectamente como reemplazo de un escritorio (de hecho, muestra la carpeta Escritorio por defecto). Puedes arrastrar iconos sobre él, cortar, copiar, pegar, renombrar archivos e incluso crear nuevos archivos y carpetas.
Hay dos diferencias principales respecto de un escritorio habitual:
- Puedes tener más de una Vista de Carpeta en el escritorio;
- Puedes hacer que en la Vista de Carpeta se muestran diferentes escritorios (tanto locales como de red).
Aparte de la Vista de Carpeta, puedes poner en el escritorio todo tipo de elementos gráficos, como elementos con información sobre el tiempo, elementos de notas, observadores de archivos... No hay límites en lo que se puede personalizar.
Elementos gráficos por todas partes
En KDE SC 4.x Plasma es compatible no solo con los elementos gráficos escritos específicamente para Plasma (también conocidos como Plasmoides) sino también de otras fuentes como Google Gadgets y Dashboard Widgets de Mac OSX. Puedes encontrar e instalar fácilmente elementos gráficos usando Get Hot New Stuff.
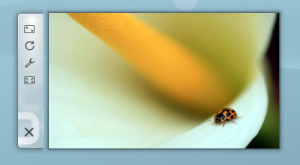
Los elementos gráficos que se acoplan en el panel normalmente tienen un menú de Opciones, mientras que los del escritorio tienen las opciones de configuración en el 'asa', el área sombreada que aparece a veces a la derecha y a veces a la izquierda del elemento gráfico. Haciendo clic y manteniendo el botón pulsado en la parte libre del asa te permitirá mover el elemento gráfico a la posición deseada.

Tienes cuatro herramientas en esta asa. La de arriba es para redimensionar. Haz clic y mantén pulsado el botón en la herramienta y podrás cambiar el tamaño al arrastrar.
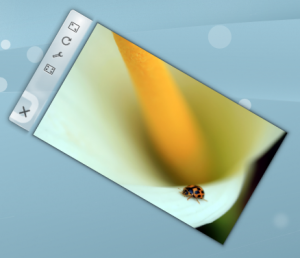
La segunda herramienta es la herramienta de giro. De nuevo, mantén pulsado el botón sobre la herramienta mientras lo giras el ángulo deseado.

La tercera es la llave inglesa que te permite configurar las opciones particulares de ese elemento gráfico.
Finalmente, la cuarta herramienta es usada en algunos elementos gráficos como el Marco de imágenes. Si usas el elemento Marco de imágenes por ejemplo, abrirá un visor de imágenes.
Puedes ver algunos de nuestros elementos gráficos favoritos en la página de elementos gráficos de Plasma
Start menus etc.
The Panel

The panel can be configured by clicking on the toolbox on the right of the panel which puts the panel into configure mode. This lets you configure the panel to fit your needs.
Panel Alignment: Allows the alignment of the panel to be set in three pre-set positions.
Always Visible: Keeps the panel visible at all times, even when windows are maximised.
Auto Hide: Hides the panel off screen until the mouse is placed near the screen edge.
Windows can cover: This allows windows to cover the panel and if maximised, will cover the panel.
Windows go below: This allows windows to go below the panel, even when maximised.
Maximise Panel: Makes the panel fit to the screen edges, if it has been resized.
Remove this panel: Removes the current panel.
Lock Widgets: Locks the panel and widgets in position.
Add Spacer: Allows you to add a spacer into the panel giving space between the items in it.
Add Widgets: Allows widgets to be added to the panel.
Height: Allows the panel height to be adjusted.
Screen Edge: Allows you to drag the panel to any of the four edges of the screen.

The arrows on the edge, just below the main settings allow the panel's size to be adjusted. Dragging the arrow makes the panel smaller or larger. Dragging the arrow pointing down, moves the panel's position.
Advanced usage
Special cases not covered here
Activities and the Zooming User Interface (ZUI)
KDE Plasma has brought a lot of new features to the modern linux desktop, however many people are only using a fraction of the desktop's full potential. One of the most useful and underused features is the plasma activities. The basic idea behind is that your desktop space is limited to how many widgets it can hold. A user will want to use a lot of widgets but doesn't want their desktop to be cluttered. The answer to this problem is activities; they allow you to specialize each desktop to whatever task you need to accomplish. To make a new activity you have to click on the toolbox in the upper right hand corner, from there click zoom out. The desktop will zoom out then click add new activity under the small desktop. It will make a new desktop right next to it. Now go click the zoom in button under the new desktop. With this desktop you can add whatever widgets to this desktop and it will not affect the other desktop.
Activities and Virtual Desktops
Virtual desktops, the ability to have a separate sets of windows on separate desktops, can tie in with Activities. You can have a different activity on each virtual desktop. In Plasma Desktop 4.4, this can be configured by entering System Settings and navigating to Desktop -> Multiple Desktops, and checking "Different Activity for Each Desktop".
In Plasma Desktop 4.3, You configure this by zooming out and choosing "configure Plasma". Then select "use a different activity on each desktop" and zoom in again.
Use Cases
A user likes web comics so they add their favorite web comics via the comics widget. The user now has a full desktop activity dedicated to their favorite web comics. Now the user is happy with the web comics, but the user now has to go to work, so the user creates a activity with the folder view widgets set to the folders of the projects the user is currently working on. After work the user goes home and works on a side project of writing romance novels. The user always gains inspiration by looking at pictures of the user's significant other. The user now creates a new Activity but now puts pictures frame widgets with pictures of the user's significant other. The user also has a folder view of the romance novel project folder. Now no matter what the user is doing the user has a custom tailored activity to match it.
Go to this blog to read a few tips on using activities.
Hints and Tips
The Taskbar
Accessing the Taskbar Settings Menu: Click the panel toolbox (aka cashew), then right-click on the taskbar. From there you can access the Taskbar Settings dialog. The following settings are particularly useful:
- Grouping and Sorting: Grouping can be by program name, manually, or not at all. (You can also choose to only enable grouping if the taskbar is full.) Similarly, Sorting defaults to alphabetically, but it can also be by desktop, manually, or not sorted.
- Only Show Tasks from the Current Desktop: A checkbox on the Filters section.
- Have More than One Row on the Taskbar: If you use many applications at one time you may find it advantageous to set Maximum Rows and then Force Row Settings.
- Showing or Hiding Tooltips: A simple checkbox in the Appearance section of the General page.
Tweaking Plasma
- Learn how to add a sidebar with clock and news
- Customize your Plasma by mixing multiple Plasma themes
Further information
- The Plasma FAQ
- Plasma HowTo - short screencasts
- Glossary
- Some of our favourite plamoids - why not add yours?
- Here's how to install more Plasmas widgets
- Learn the versatility of KRunner
| Volver a la página de introducción |

