Taking Screenshots/fr: Difference between revisions
(Updating to match new version of source page) |
(Updating to match new version of source page) |
||
| Line 42: | Line 42: | ||
# Click on <menuchoice>Save As...</menuchoice> (4). | # Click on <menuchoice>Save As...</menuchoice> (4). | ||
# Browse to the location you want to save the image, give it a name ('''''name.png''''') and click on <menuchoice>Save</menuchoice> | # Browse to the location you want to save the image, give it a name ('''''name.png''''') and click on <menuchoice>Save</menuchoice> | ||
To upload the image: | |||
* If you are making a new version of an existing image, see [[Special:myLanguage/Update_an_Image|Update an Image]] | |||
* If you are making a new image go to [[Special:Upload|Upload File]] under '''Tools''' in the right margin. That brings you to a page, where you can upload the image file. | |||
== Trucs et Astuces == | == Trucs et Astuces == | ||
Revision as of 12:30, 7 February 2018
Introduction
L'objectif de la publication de captures d'écrans logicielles est de plonger les utilisateurs potentiels dans l'apparence du logiciel et de leur donner une idée de ce à quoi ils peuvent s'attendre une fois qu'il fonctionne. De fait, les captures d'écrans devraient documenter l'utilisation classique de l'environnement et des applications, disponibles pour des utilisateurs ayant une configuration matérielle standard.
Lignes directrices
- Mettez la langue en Anglais, à moins que ce ne soit une capture d'écran traduite.
- Enregistrez l'image au format PNG.
- De préférence, utilisez les options par défaut (icônes, jeux de couleurs, styles, décorations de fenêtre, configurations d'applications, ...).
- De préférence, utilisez la (module Effets du bureau dans la Configuration du système), mais ne vous inquiétez pas si votre carte graphique ne gère pas la composition.
- De préférence, utilisez la police "Liberation Sans" en 9pt.
- Si la capture d'écran affiche une partie de votre bureau, utilisez de préférence le fond d'écran par défaut de plasma. Incluez une marge (d'environ 20 pixels) si possible, afin d'être sur que les ombres des fenêtres n'aient pas l'air coupées.
- Si vous préparez une capture d'écran traduite, utilisez le même nom que l'originale en Anglais, avec le code de la langue (le même que celui que vous voyez sur l'adresse de la page) ajouté.
- Si la capture d'écran doit mettre à jour une image existante, utilisez exactement le même nom pour que la mise à jour se fasse automatiquement (voir Mettre à Jour une Image).
Processus
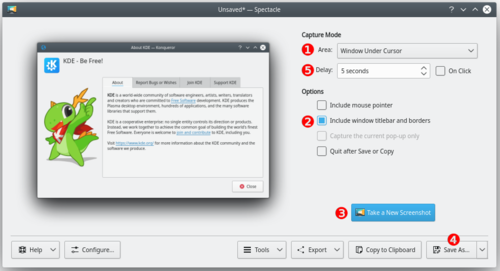
In this example Spectacle is used, but other screen capture applications work as well.

- Start Spectacle
- Choose a Capture mode (1) from the following:
- Current Screen (only visible on a multi-screen environment)
- Everything on the single screen is captured, usually used for desktop screenshots.
- Full Screen
- This works differently, depending on whether you have a single screen or a multi-screen environment. For single screen users it captures everything currently on the screen. Multi-screen users will see it capture all screens into a single window.
- Window Under Cursor
- The content of an applications or dialog window is captured. usually used for application screenshots. Preferably, check the Include window decorations option (2).
- Region
- Only a region to be defined later is captured.
- Click on (3).
- Full Screen
- Current Screen
- Window Under Cursor
- Click anywhere on the screen to take the snapshot.
- Region
-
- Use the mouse to draw a rectangle around the region to be captured (for example around a window).
- Strike the Enter key or double click in the region to take the snapshot.
- Click on (4).
- Browse to the location you want to save the image, give it a name (name.png) and click on
To upload the image:
- If you are making a new version of an existing image, see Update an Image
- If you are making a new image go to Upload File under Tools in the right margin. That brings you to a page, where you can upload the image file.
Trucs et Astuces
- The option (5) makes Spectacle wait a given amount of time (given in seconds) before taking the snapshot. This can be useful in many situations, for example when taking screenshots of drop-down menus
- It's often useful to create a separate user for taking screenshots to ensure a standard look with the default settings.
- Use in the wallpaper settings to get a white background.
