User:IulianB/KMailSetup: Difference between revisions
No edit summary |
No edit summary |
||
| Line 19: | Line 19: | ||
When you've completed this step, you'll have to go to the Settings menu at the top and select Configure Kmail like in the image bellow: | When you've completed this step, you'll have to go to the Settings menu at the top and select Configure Kmail like in the image bellow: | ||
[[File:Kmail inter3.png|480px|link=http://userbase.kde.org/File:Kmail_inter3.png]] | [[File:Kmail inter3.png|480px|center|link=http://userbase.kde.org/File:Kmail_inter3.png]] | ||
The default Kmail configuration window will appear: | The default Kmail configuration window will appear: | ||
[[File:Kmail interface2.png|480px|link=http://userbase.kde.org/File:Kmail_interface2.png]] | [[File:Kmail interface2.png|480px|center|link=http://userbase.kde.org/File:Kmail_interface2.png]] | ||
| Line 40: | Line 40: | ||
Bellow you have an image: | Bellow you have an image: | ||
[[File:Kmail identitycre.png|480px|link=http://userbase.kde.org/File:Kmail_identitycre.png]] | [[File:Kmail identitycre.png|480px|center|link=http://userbase.kde.org/File:Kmail_identitycre.png]] | ||
When clicking on the "Identities" icon on the left you should see one default identity, so you | When clicking on the "Identities" icon on the left you should see one default identity, so you | ||
| Line 48: | Line 48: | ||
Now you can fill out the '''Identities''' window with your name, organization, and email address, just like in the image below: | Now you can fill out the '''Identities''' window with your name, organization, and email address, just like in the image below: | ||
[[File:Kmail identities.png|500px|link=http://userbase.kde.org/File:Kmail_identities.png]] | [[File:Kmail identities.png|500px|center|link=http://userbase.kde.org/File:Kmail_identities.png]] | ||
Lets say that you have a @gmail.com and a @yahoo.com address.No matter what address you're sending | Lets say that you have a @gmail.com and a @yahoo.com address.No matter what address you're sending | ||
| Line 58: | Line 58: | ||
you want to receive your messages. | you want to receive your messages. | ||
[[File:Kmail identities2.png|480px|link=http://userbase.kde.org/File:Kmail_identities2.png]] | [[File:Kmail identities2.png|480px|center|link=http://userbase.kde.org/File:Kmail_identities2.png]] | ||
| Line 67: | Line 67: | ||
You want to select the '''Accounts''' icon on the left of the Kmail configuration window, and then click on the "Add" button. | You want to select the '''Accounts''' icon on the left of the Kmail configuration window, and then click on the "Add" button. | ||
You are in the '''Receiving''' tab, which means that you are creating accounts that receive messages. | |||
{{Note|You are in the '''Receiving''' tab, which means that you are creating accounts that receive messages.}} | |||
'''I'll show you some examples of how i've set up my account.''' | '''I'll show you some examples of how i've set up my account.''' | ||
| Line 82: | Line 83: | ||
[[File:Kmail loginacc.png|420px|left|link=http://userbase.kde.org/File:Kmail_loginacc.png]] [[File:Kmail account.png|420px|right|link=http://userbase.kde.org/File:Kmail_account.png]] | [[File:Kmail loginacc.png|420px|left|link=http://userbase.kde.org/File:Kmail_loginacc.png]] [[File:Kmail account.png|420px|right|link=http://userbase.kde.org/File:Kmail_account.png]] | ||
Regarding the '''Sending''' tab, it is similar to the '''Receiving''' tab. You can '''Add''' a new account that you would like to send messages from or use the existing one. | |||
The image bellow should give a better description: | |||
[[File:Kmail sendtab.png|480px|center|link=http://userbase.kde.org/File:Kmail_sendtab.png]] | |||
| Line 96: | Line 103: | ||
Here you have an image: | Here you have an image: | ||
[[File:Kmail appearance.png|480px|link=http://userbase.kde.org/File:Kmail_appearance.png]] | [[File:Kmail appearance.png|480px|center|link=http://userbase.kde.org/File:Kmail_appearance.png]] | ||
| Line 121: | Line 128: | ||
To compose an email, you simply go to '''Message -> New Message''', right before you open your KMail. | To compose an email, you simply go to '''Message -> New Message''', right before you open your KMail. | ||
[[File:Kmail compose.png|480px|link=http://userbase.kde.org/File:Kmail_compose.png]] | [[File:Kmail compose.png|480px|center|link=http://userbase.kde.org/File:Kmail_compose.png]] | ||
If you have 2 or more identities, go to '''View''' and check the '''Identity''' box. | If you have 2 or more identities, go to '''View''' and check the '''Identity''' box. | ||
| Line 127: | Line 134: | ||
Look at the image bellow: | Look at the image bellow: | ||
[[File:Kmail compose2.png|480px|link=http://userbase.kde.org/File:Kmail_compose2.png]] | [[File:Kmail compose2.png|480px|center|link=http://userbase.kde.org/File:Kmail_compose2.png]] | ||
Revision as of 17:10, 2 December 2011
We know that KDE has an email client called KMail.
The most popular platform that it can be used on is Linux.
Introduction
On this guide, we are going to learn about the use of KMail , more precisely, we are going to learn about identities,how to send a mail and how to receive messages.
KMail 4.7.2 is the version that we are going to discuss about on this page.
How to set up Kmail
First of all, you have to open the email client.
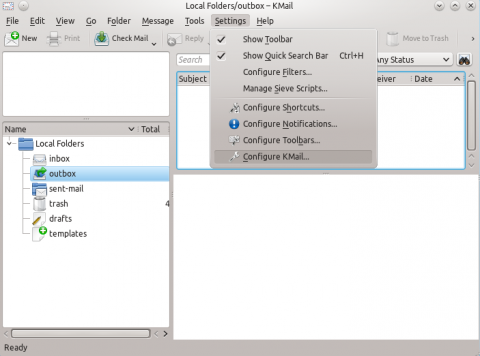
When you've completed this step, you'll have to go to the Settings menu at the top and select Configure Kmail like in the image bellow:
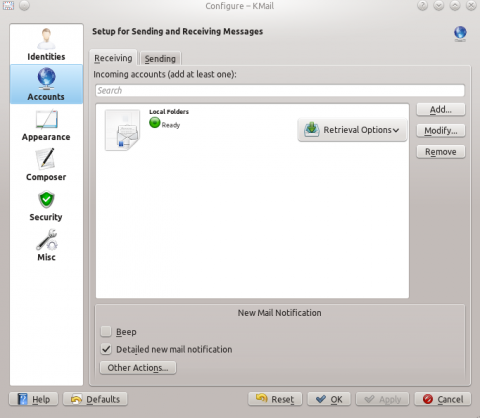
The default Kmail configuration window will appear:
Identities
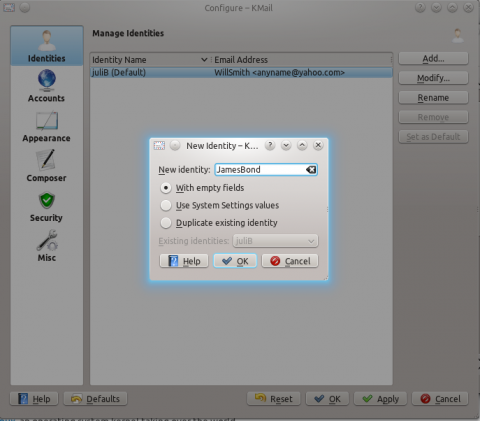
To create an identity, you need to go to the Identities icon and then click on the ,,Add"
button.Fill in the name of your new identity, click Ok, and voila, there you have it.
Bellow you have an image:
When clicking on the "Identities" icon on the left you should see one default identity, so you
can choose to Modify this identity with the button you'll see on the right.
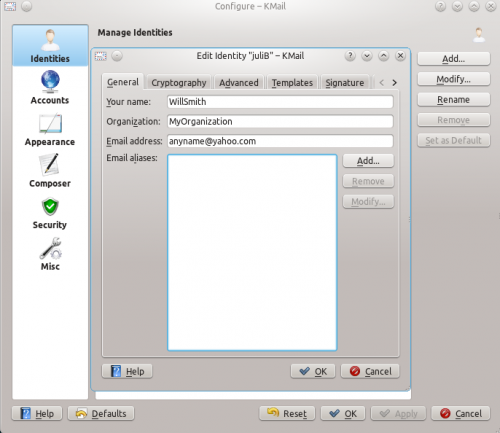
Now you can fill out the Identities window with your name, organization, and email address, just like in the image below:
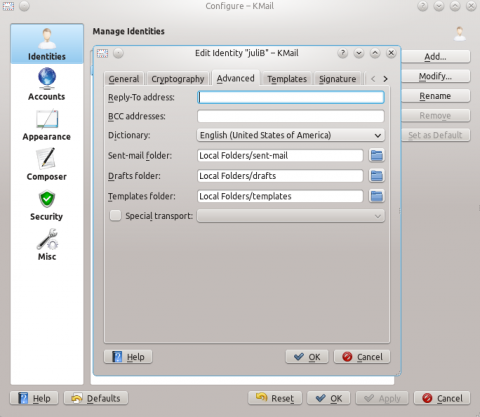
Lets say that you have a @gmail.com and a @yahoo.com address.No matter what address you're sending
email from, you can receive your messages to a selected email address by going to
Identities -> Modify-> Advanced and at Reply-To address you can write the address where
you want to receive your messages.
Account
After you have completed creating an Identity, you need to add an Account .
You want to select the Accounts icon on the left of the Kmail configuration window, and then click on the "Add" button.
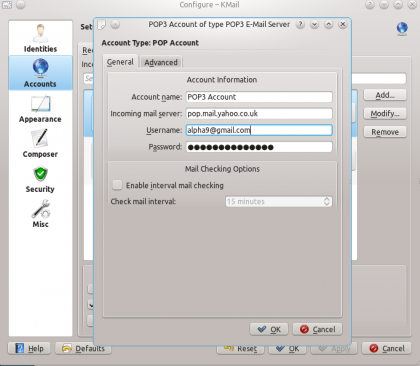
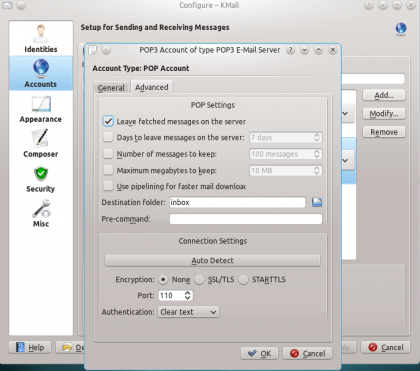
I'll show you some examples of how i've set up my account.
First of all, you got to decide which protocol you wish to use to receive your messages.KMail supports the following accounts : IMAP , POP3 , Maildir, Mbox and Nepomuk Tags.
Lets presume that you have chosen POP3 protocol. You need to keep in mind that you'll need to
look out for the protocol's host name first to fill in all the corresponding lines. Bellow you'll see
two pictures of my setup:
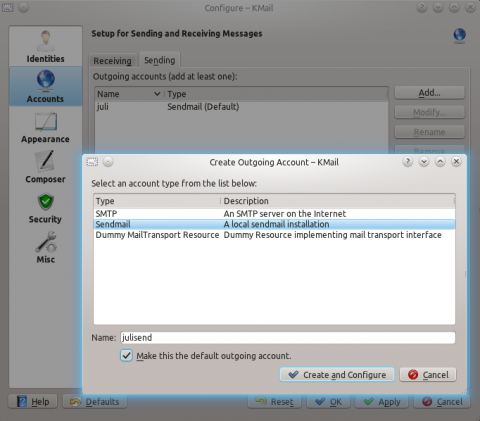
Regarding the Sending tab, it is similar to the Receiving tab. You can Add a new account that you would like to send messages from or use the existing one.
The image bellow should give a better description:
Appearance
After you've finished with the Accounts icon, you can choose to select the Appearance icon.
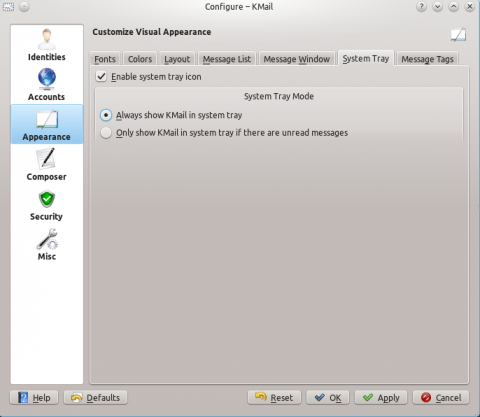
There's not much to say here, just be sure that you have the Always show KMail in system tray
option checked if you want Kmail to remain in your system tray. You can do that by going to
Appearance-> System Tray and then check the bracket with the option mentioned above.
Here you have an image:
Composer
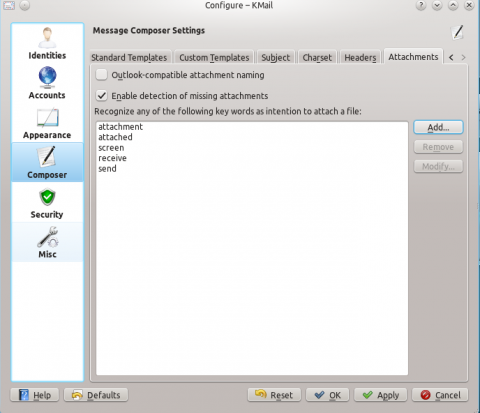
In the Composer icon, there's a feature that notices if you mention the word "attach" or
attached" in the body of your email but are not attaching anything to that message.You can write as
many keywords as you like in the Attachments tab. You can look at the picture bellow as an
example:
Security
In the Security icon, you can choose to set the options as you wish to.
How to send a mail
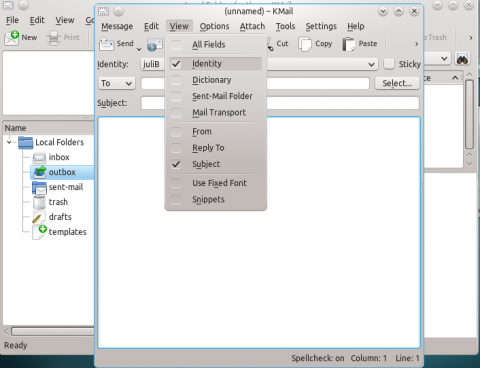
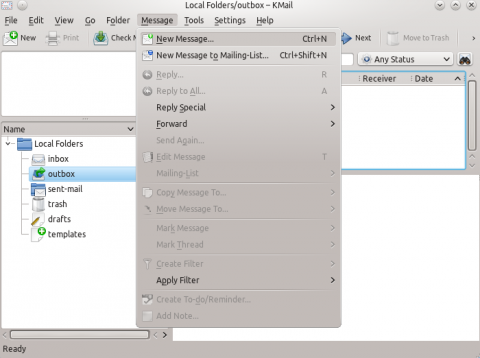
To compose an email, you simply go to Message -> New Message, right before you open your KMail.
If you have 2 or more identities, go to View and check the Identity box.
Look at the image bellow:
