Kdenlive/使用手册/快速上手
快速上手
创建一个新项目
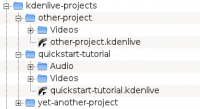
要创建新项目,我们首先应新建一个(空的)文件夹。在这篇教程里我把文件夹命名为 quickstart-tutorial/ 。然后去找一些视频剪辑,或者你也可以从这里下载:File:Kdenlive-tutorial-videos-2011-avi.zip (7 MB)[1],然后把它们解压缩到项目文件夹的一个子文件夹中,比如 quickstart-tutorial/Videos/。
左侧的图片展示了建议的文件夹结构:每个项目有自己的文件夹,并且视频文件放在 Videos 子文件夹,音频文件放在 Audio 子文件夹,以此类推的安排其他文件。阅读更多……
(这个教程假设你使用我们提供的示例视频,但对于其他任何视频也有效。)
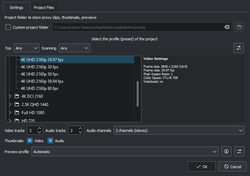
打开Kdenlive,然后创建一个新项目: 。
选择之前创建的项目文件夹(quickstart-tutorial/)并选择一个合适的项目预设。上面提供的视频文件是720p,23.98 fps。[2]如果您使用了自定义文件并且不知道如何选择预设,Kdenlive将在你加入第一段剪辑时向您推荐一个合适的预设[3],所以您可以放心的结束对预设配置的选择。
如果您乐意的话,可以切换到暗色主题: i.e Breeze 微风暗色
添加剪辑
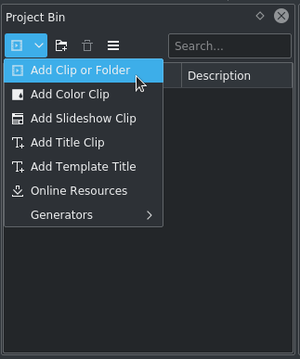
现在项目的准备工作已经完成,让我们开始加入一些剪辑(例如使用您刚才下载的视频)。这个动作通过项目箱 完成;点击图标![]() 就能直接打开文件对话框,点击小箭头可以显示更多的剪辑类型。视频剪辑、音频剪辑、图片以及其他的Kdenlive项目都能通过默认的对话框添加。
就能直接打开文件对话框,点击小箭头可以显示更多的剪辑类型。视频剪辑、音频剪辑、图片以及其他的Kdenlive项目都能通过默认的对话框添加。
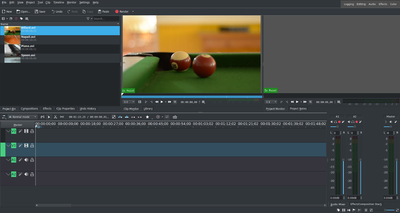
在加载完素材后,Kdenlive将会像这样显示。左上角部分是目前已知的项目树。它的右侧是用来显示视频的监视器:素材监视器显示原有素材的视频,项目监视器则显示视频的输出效果,包括着所有的特效、过渡以及其他。第三个同样重要的是时间轴(在监视器下方):这里是视频剪辑将会被编辑的地方。时间轴上的轨道分为两种不同类型:视频轨道和音频轨道。视频轨道可以包含任意类型的剪辑,音频轨道也一样——但当您将视频拖放到音频轨道上时,只有它的音频部分被用到。
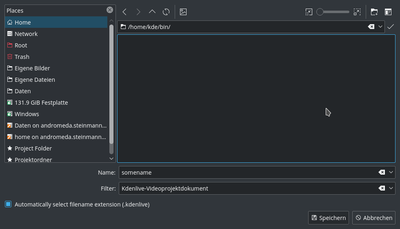
现在让我们通过来保存我们目前的工作。这将会保存我们的项目,包括我们在时间轴的何处放置了何种剪辑,应用了何种效果,以及其他内容。保存的项目文件是不能 被播放的。[4]得出最终视频的过程被称为渲染 。
时间轴
参考: 时间轴使用手册
现在来进行真正的编辑。项目剪辑将会在时间轴内被组合成最终的成品。通过拖放即可将它们加入时间轴:先按住项目箱中的Napoli.avi(假设你正使用上面提供的文件,下同),然后将其拖动到时间轴内,松开鼠标,这样它就被加入了。在这里我们把它放在了轨道V2。
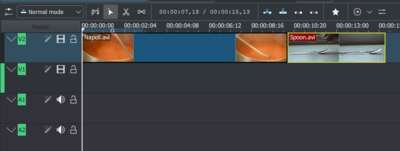
由于我们还需要一些餐具,我们再按住spoon剪辑然后把它拖放到第一条轨道(轨道V2)上面去。然后将napoli拖动到时间轴的最开始(否则渲染出来的视频的前几秒将会是一片黑色),spoon紧跟在napoli后面,如同左边的图所展示的一样。(我已经先通过Ctrl + 滚轮把时间轴放大了一些)

按下空格(或者在项目监视器中按下按钮)即可预览结果。您将看到napoli之后紧跟着spoon。如果时间指示线不在最开始的话,项目监视器将会在视频中间的某处开始播放;您可以通过拖动来移动它。如果您更喜欢用快捷键的话,Ctrl + Home将会把监视器对应的时间指示线调整至开头。(这里在使用快捷键之前,请确保您已选中项目监视器)

在之前放置的剪辑正常播放之后,我们再来加入billiards。请将其拖入时间轴中(轨道V1)。对于这个剪辑而言,前1.5秒什么也没做,所以我们应该把这1.5秒剪掉 。为了实现这样的操作,一个简单的方法[5]是先把时间指示线移动到我们想要的位置(例如你想要剪切视频的位置),然后把鼠标指针移动到素材的左侧的边缘直到鼠标指针变成像左图那样子。此时拖动鼠标即可达到剪辑的目的。
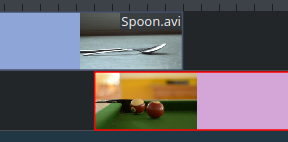
为了在餐具(spoon)和billiards之间加入过渡 ,这两个剪辑需要先重叠一部分。准确地说:将第二个剪辑放在第一个剪辑的上方或下方。第一个剪辑应该在第二个开始几帧后再结束。在这里建议放大时间轴直到出现单帧的刻度线,这样就可以轻松指定相同的过渡时间,这里我们设置为5帧。
您可以通过Kdenlive窗口右下角处的进行时间轴的缩放,也可以通过Ctrl + 滚轮。Kdenlive将会以时间指示线为中心进行时间轴缩放,所以请先将时间指示线调整到你想要仔细观察的部分,然后再进行缩放。
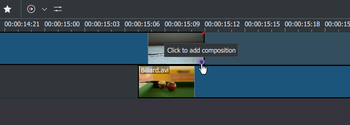
现在两个剪辑已经出现了重叠,可以添加过渡了。This is done either by right-clicking on the upper clip and choosing and choose or, easier, by hovering the mouse over the lower right corner of the Spoon clip until the pointing-finger pointer is shown and the message "Click to add composition" appears. The latter, by default, adds a wipe transition, which is in this case the best idea anyway since the Spoon is not required for playing.
The wipe transitions fades the first clip into the second one. See also Transition section of the manual.

Let’s now add the last clip, the Piano, and again apply a wipe transition. When adding it on the first track of the timeline (track V2), you need to click on the new clip’s lower left edge to add the transition to the previous clip.
特效
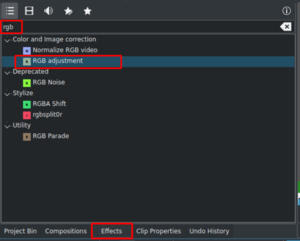
The Piano can be colourized by adding an effect to it. Click on the effect view (if effect view is not visible enable the view: ). Type rgb in the search field then double-click the effect.
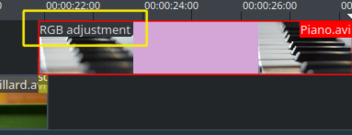
Once the effect has been added, click on an empty part in the timeline and you see its name on the timeline clip. It will also be shown in the widget.
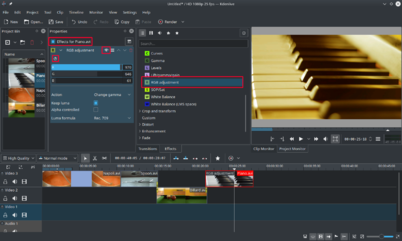
To get a warm yellow-orange tone on the image, fitting the comfortable evening, blue needs to be reduced and red and green improved.
The values in the Effect/Composition Stack widget can be changed by using the slider (middle mouse button resets it to the default value), or by entering a value directly by double-clicking the number to the right of the slider.
The Effect/Composition Stack widget always refers to the timeline clip that is currently selected. Each effect can be temporarily disabled by clicking the eye icon, or all effects for that clip can be disabled using the check box at the top of the Effect/Composition Stack widget (the settings are saved though), this is e.g. useful for effects that require a lot of computing power, so they can be disabled when editing and enabled again for rendering.
For some effects, like the one used there, it is possible to add keyframes. The framed watch icon indicates this. Keyframes are used for changing effect parameters over time. In our clip this allows us to fade the piano’s colour from a warm evening colour to a cold night colour.
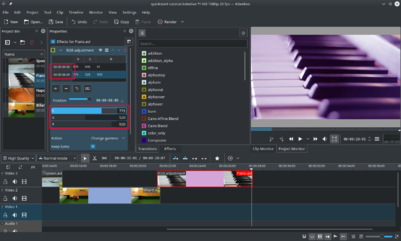
After clicking the icon (the clock icon framed in the previous image), the Properties widget will re-arrange. By default there will be two keyframes, one at the beginning of the timeline clip and one at the end. Move the timeline cursor to the end of the timeline clip, such that the project monitor actually shows the new colours when changing the parameters of the keyframe at the end.
Make sure the last keyframe is selected in the Properties list. Then you are ready to flood the piano with a deep blue.
Moving the timeline cursor to the beginning of the project and playing it (with Space, or the button in the ), the piano should now change the colour as desired.
Keyframing was the hardest part of this tutorial. If you managed to do it, you will master Kdenlive easily!
See also Effects section of the manual.
Music

Since the clips do not provide any audio, let’s search for some nice piece of music, from your local collection or on web pages like Jamendo. The audio clip should, after adding it, be dragged to an audio track on the timeline.
The audio clip can be resized on the timeline the same way as video clips are. The cursor will snap in at the end of the project automatically. To add a fade out effect at the end of the audio clip (except if you found a file with exactly the right length) you can hover the top right (or left) edge of the timeline clip and drag the red shaded triangle to the position where fading out should start.[6]
渲染
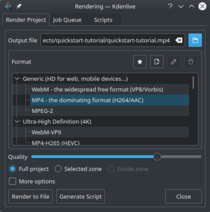
A few minutes left, and the project is finished! Click the Render button (or go to , or press Ctrl + Enter) to get the dialog shown on the left. Select the desired output file for our new video with all effects and transitions, choose MP4 (works nearly everywhere), select the output file location and press the button.
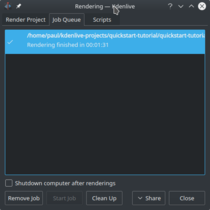
After some seconds rendering will be finished, and your first Kdenlive project completed. Congratulations!
完整的教程
关于当前版本 Kdenlive 的更多文档可以从 完整使用手册 中找到。
注解
- ↑ 如果你更喜欢Theora编码方式的视频的话(你可能不会喜欢,因为Ogg Video容易出问题),你也可以选择下载这个:kdenlive-tutorial-videos-2011-ogv.tar.bz2
- ↑ 720是视频的高度,p则代表逐行扫描,与隔行扫描相对应。fps数表示每秒钟内的完整帧数。
- ↑ 在 配置Kdenlive 的杂项中,检查第一个添加的剪辑是否与项目配置文件匹配 被默认打开。
- ↑ 为确保严谨,kdenlive项目文件其实是可以 被播放的,通过命令
melt yourproject.kdenlive,但这并不是您想要的最终结果,因为他(很可能)特别的慢。另外,这条命令只会在melt已经安装的情况下正常工作。 - ↑ 用这样的语句是为了表示剪切素材有好几种方法。确实如此。
- ↑ This shaded triangle is a shorthand for adding the effect . Both ways lead to the same result.
