Kubuntu/Installation/tr: Difference between revisions
Created page with "==Kurulum==" |
Updating to match new version of source page |
||
| (96 intermediate revisions by 2 users not shown) | |||
| Line 2: | Line 2: | ||
<languages /> | <languages /> | ||
== | ==Kubuntu'yu neden denemeliyim?== | ||
'''Kubuntu''''yu kurmak için birçok iyi neden var! | |||
Bazıları: | |||
*'''Kubuntu''' | *'''Kubuntu''' bilgisayarınızı özgür kılar. | ||
*'''Kubuntu''' | *'''Kubuntu''' dünyanın dört bir yanında bulunan uzman geliştiricileri tarafından oluşturulan bir işletim sistemidir. İhtiyaç duyduğunuz tüm uygulamaları içerir: bir web tarayıcısı, ofis takımı, çoklu ortam uygulamaları, anlık mesajlaşma istemcisi ve daha bir çoğu... Dahil edilen yazılımların tam bir listesi için [[Special:myLanguage/Kubuntu/Software|Yazılım]] sayfasına bakın. | ||
*'''Kubuntu''' | *'''Kubuntu''', Windows ve Mac OS X'e açık kaynaklı, ücretsiz bir alternatiftir. | ||
* | *Kolaylıkla Windows'un yanına veya yerine kurulum. | ||
== | ==Kurulum ortamını hazırlama== | ||
=== MD5SUM Doğrulama === | |||
[[Image: | Bunu yaparak, indirme işleminin başarılı olduğunu ve tamamen çalışan, önyüklenebilir bir ISO dosyası edindiğinizden emin kılar. | ||
==== Windows XP -> 7 -> 8 -> 10 sürümlerinden ==== | |||
Microsoft Windows does not have any built-in tools for MD5SUM but they do provide [https://support.microsoft.com/en-us/kb/841290 a tool] for checking the MD5SUM. How-To-Geek also provides some information regarding MD5SUM [http://www.howtogeek.com/67241/htg-explains-what-are-md5-sha-1-hashes-and-how-do-i-check-them reading material] or [https://cygwin.com/install.html Cygwin] can be installed and UNIX utilities used instead. | |||
==== From Mac OS X ==== | |||
Open the Terminal app, then navigate to the directory where the ISO is saved. Run: | |||
{{Input|1=<nowiki> md5 -r kubuntu-15.10-desktop-amd64.iso </nowiki>}} | |||
And compare the output to the hashes page for the ISO file. | |||
List of UbuntuHashes can be found here: https://help.ubuntu.com/community/UbuntuHashes | |||
==== From Ubuntu Linux ==== | |||
The first thing to do is to make sure you're in the directory with the .iso file (It will most likely be found in the Downloads directory). Then run the command 'md5sum': For more a more detailed explanation of MD5SUM: [https://help.ubuntu.com/community/HowToMD5SUM ] | |||
{{Input|1=<nowiki> md5sum kubuntu-15.10-desktop-amd64.iso </nowiki>}} | |||
===Windows 7/8=== | |||
====USB/Flash Drives==== | |||
For a GUI (Graphic User Interface) we use [https://unetbootin.github.io/ UNetBootin]. | |||
You can use UNetBootin to download the ISO(image file) automatically or it can be downloaded: [http://www.kubuntu.org/getkubuntu/ Get Kubuntu]. | |||
If you choose the 'Diskimage' option you use the <menuchoice>...</menuchoice> button to select your downloaded ISO. Then click <menuchoice>OK</menuchoice>. | |||
[[Image:unetbootin-win8.png|thumb|500px|center|UNetBootin Windows 8]] | |||
{{Warning| Pay special attention when selecting the right USB device under 'Drive'.}} | |||
====DVD==== | |||
The recommended tool for you to use is [http://www.imgburn.com/ ImgBurn]. | |||
There is an excellent tutorial written by the Admin on the ImgBurn forums. It can be found [http://forum.imgburn.com/index.php?/topic/61-how-to-write-an-image-file-to-a-disc-using-imgburn/ here]. | |||
===Existing Kubuntu Install=== | |||
====USB/Flash Drives==== | |||
For a GUI (Graphic User Interface) we use [https://unetbootin.github.io/ UNetBootin]. | |||
You can use UNetBootin to download the ISO(image file) automatically or it can be downloaded here: [http://www.kubuntu.org/getkubuntu/ Get Kubuntu]. | |||
Using the command line we use the 'dd' command. | |||
Insert your USB drive into your computer and find the corresponding drive using: | |||
<code>lsblk</code><br/> | |||
Then format the USB drive with the 'dd' command: <br/> | |||
<code> sudo dd if=Downloads/kubuntu-15.04-desktop-amd64.iso of=/dev/sd'''X''' </code><br/> | |||
{{Warning| Be extremely careful to set /dev/sd'''X''' to the right value, if you direct it to your hard drive you will wipe the disk.}} | |||
====DVD==== | |||
For making a DVD we recommend this KDE tool called k3b, which can be found [https://userbase.kde.org/K3b here.] | |||
[[Image:K3b.png|thumb|500px|center|K3b]] | |||
Look for <menuchoice>More actions...</menuchoice>, click it and then pick <menuchoice>Burn Image...</menuchoice> from the list of actions. | |||
[[Image:K3b-1.png|thumb|500px|center|K3b Image Selection]] | |||
Then you select the image (iso) that you want to burn to the DVD from your computer. | |||
{{Note| Most torrent clients and browsers store your downloads in the 'Download' directory.}} | |||
{{Note| Most of the default settings for K3b for DVD burning do not require any changes.}} | |||
===Other Linux Distributions=== | |||
====GNOME based==== | |||
=====USB/Flash Drives===== | |||
For a GUI (Graphic User Interface) we use [https://unetbootin.github.io/ UNetBootin]. | |||
You can use UNetBootin to download the ISO(image file) automatically or it can be downloaded through [http://www.kubuntu.org/getkubuntu/ Get Kubuntu]. | |||
=====DVD===== | |||
[[Image:UbuntuGNOMEBrasero.png|thumb|500px|center|Brasero]] | |||
====KDE based==== | |||
If you're using a Linux Distribution that uses KDE you can follow the [[Special:MyLanguage/Kubuntu/Installation#Existing_Kubuntu_Install|Kubuntu instructions]] as K3b is provided in every KDE based distribution. | |||
===Kurulum Süreci=== | |||
İlk olarak '''Kubuntu''''yu edinmelisiniz. Bunun için bkz. [http://www.kubuntu.org/getkubuntu/download Kubuntu İndir] | |||
{{Note/tr|Seçili kurulum ortamından önyükleme yapabilmek için klavye üzerinde özel bir tuşa basmanız gerekecektir. Örn.: Esc, F2, F10, F12 veya Del. Bu tuş üreticiye göre değişmektedir}} | |||
[[Image:Welcome_15-10_tr.png|thumb|500px|center|Kurulum Karşılama Ekranı]] | |||
<br clear=all> | <br clear=all> | ||
Yükleyici başladığında bu seçenekleri göreceksiniz: | |||
* | * Bilgisayarda herhangi bir değişiklik yapmadan '''Kubuntu''''yu Dene | ||
* | * Bilgisayara '''Kubuntu''''yu Kur | ||
==== | ====Hazırlık==== | ||
En iyi sonuçlar için şunlardan emin olun: | |||
* | * Bilgisayarınız '''Kubuntu''' ve kişisel verileriniz (şarkı, resim, video ve belgeler) için yeterince yere sahip. | ||
* | * Bilgisayarınız '''Kubuntu''' yüklenirken güncelleştirmeleri ve üçüncü parti yazılımları indirebilmek üzere İnternet'e bağlı. | ||
[[Image: | [[Image:Prepare-15_10_tr.png|thumb|600px|center|Kurulum Hazırlık Ekranı]] | ||
<br clear=all> | <br clear=all> | ||
<menuchoice> | <menuchoice>Bu üçüncü yazılımı dahil et</menuchoice> seçeneği, Açık Kaynak modeline veya [http://www.ubuntu.com/about/about-ubuntu/our-philosophy Ubuntu Felsefesi]'ne uymayan ancak sisteminizde kullanmak üzere güvenli olan yazılımları dahil edecektir. | ||
<menuchoice>Yükleme sırasında güncelleştirmeleri indir</menuchoice> seçeneği, yükleme tamamlandığında, dahil edilmiş en son hata ve güvenlik güncelleştirmelerine sahip olmanızı sağlayacaktır. | |||
====Disk Yapılandırması==== | |||
Burası sabit diskinizi nasıl düzenleyeceğinizi seçeceğiniz adımdır. Bu adım tüm kurulum sürecinin en karmaşık ve en önemli adımı olduğundan dikkatle izlemeniz önerilir. | |||
{{Tip/tr|<menuchoice>Şimdi Yükle</menuchoice> düğmesine basıncaya kadar geri gidip değişiklik yapmanız mümkündür.}} | |||
Aşağıdaki bölümler seçebileceğiniz senaryolardan birkaçıdır. Bu seçimlerin her biri bir sayfaya veya daha fazla ayrıntı içeren sayfa serisine götürür. Her seçenek için (El ile hariç), yükleyici kullanılacak sabit sürücüyü soracaktır. Seçimden sonra ilgili sabit diskte önceki ve sonraki yerleşimi göreceksiniz. | |||
=====Yeniden Boyutlandır===== | |||
Bu seçenek disk bölümlerini sizin için yeniden boyutlandıracak ve '''Kubuntu''''yu boş alana yüklemenizi sağlayacaktır. Bu seçenek ile başlangıçta hangi işletim sistemini seçmek istediğinizi soran ikili önyüklemeyi oluşturabilirsiniz. | |||
{{Note/tr|Bu seçenek sadece en az 25GB boşaltılabilirse kullanılabilir.}} | |||
{{ | |||
===== | =====Use entire disk===== | ||
Using this option the installer will create two partitions on your hard drive; one for most of the content, including the root and home directories, and one partition for the swap. | |||
[[Image: | [[Image:Disksetup-15_10_tr.png|thumb|600px|center|Tüm Disk seçeneği]] | ||
{{ | {{Warning/tr|Bu seçenek sabit diskinizi tamamıyla silecektir. İlgili sürücüdeki tüm işletim sistemlerini (Windows, Mac OS X, Linux, vb.) ve tüm verilerinizi kaybedeceksiniz.}} | ||
===== | =====Tüm diski kullan ve LVM ayarla===== | ||
[https://wiki.ubuntu.com/Lvm LVM] hakkında daha fazla bilgi | |||
=====Tüm diski kullan ve şifreli LVM ayarla===== | |||
[https://help.ubuntu.com/community/EncryptedFilesystems Şifrelenmiş dosya sistemleri] hakkında daha fazla bilgi | |||
===== | =====El ile===== | ||
<menuchoice>El ile</menuchoice> kullanarak sisteminizi kendi dilediğiniz gibi ayarlayabilmek için şunları aklınızda tutun: | |||
[[Image:Disksetup_part2-15_10_tr.png|thumb|600px|center|Sabit sürücünüzü el ile ayarlamak]] | |||
* The root ( '''/''' ) directory needs at least 25 GB of space. | |||
* The home ( '''/home''' ) directory needs as much space as you will need for your files, music, pictures, and documents. So it is best to use the remaining space for the home partition, unless you are going to have a dual boot. | |||
* Swap space of at least half of the available RAM is recommended. For instance, with 8 GB of RAM, you should make the swap have at least 4 GB. | |||
{{Note/tr|Makinenizde Windows 8 etiketi varsa, fat32 dsya sistemi ile ayrı bir EFI disk bölümü yapmanız gerekebilir.}} | |||
Bir Linux sistemininin Disk Yapılandırması hakkında daha ayrıntılı bilgi için [https://help.ubuntu.com/community/DiskSpace Disk Alanı] sayfasına bakabilirsiniz. | |||
==== | ==== Zaman Dilimi ==== | ||
Bu adımda yaşadığınız bölgeyi ve bu bölgedeki Zaman Dilimi'ni seçeceksiniz. Örneğin İstanbul'da yaşıyorsanız bu durumda bölge Türkiye, Zaman Dilimi de Türkiye Saati (GMT+2) olacaktır. | |||
[[Image: | [[Image:Timezone-15_10_tr.png|thumb|600px|center|Zaman Diliminizi ayarlama]] | ||
==== | ==== Klavye ==== | ||
Bu adım klavye dilini ve varsa bu dilin sürümlerini ayarlayacaktır. Örneğin Türkçe için Q veya F klavye seçimlerini bu adımdan yapabilirsiniz. '''Kubuntu''''yu herkes için kolay bir sistem yapmaya çalışıyoruz. | |||
[[Image: | [[Image:Keyboard-15_10_tr.png|thumb|600px|center|Klavye Ekranı]] | ||
==== | ==== Kullanıcı Bilgisi ==== | ||
Kurulumun bu adımında isim, kullanıcı adı ve parola gibi kullanıcı bilgilerini giriyor olacaksınız. Parolanız yeni kurulumunuzda oturum açmak için kullanılacağı gibi, aynı zamanda yeni yazılım kurulumu, sistemi güncelleme ve daha birçok şey için de kullanılacaktır. Bu yüzden bir yere yazmayı unutmayın! | |||
[[Image: | [[Image:Userinfo-15_10_tr.png|thumb|600px|center|Kullanıcı adı, parola ve makine adını girmek]] | ||
[[Special:myLanguage/Kubuntu| | [[Special:myLanguage/Kubuntu| Kubuntu Anasayfasına Dön]] | ||
[[Category:Kubuntu]] | [[Category:Kubuntu/tr]] | ||
Latest revision as of 16:10, 29 May 2019
Kubuntu'yu neden denemeliyim?
Kubuntu'yu kurmak için birçok iyi neden var! Bazıları:
- Kubuntu bilgisayarınızı özgür kılar.
- Kubuntu dünyanın dört bir yanında bulunan uzman geliştiricileri tarafından oluşturulan bir işletim sistemidir. İhtiyaç duyduğunuz tüm uygulamaları içerir: bir web tarayıcısı, ofis takımı, çoklu ortam uygulamaları, anlık mesajlaşma istemcisi ve daha bir çoğu... Dahil edilen yazılımların tam bir listesi için Yazılım sayfasına bakın.
- Kubuntu, Windows ve Mac OS X'e açık kaynaklı, ücretsiz bir alternatiftir.
- Kolaylıkla Windows'un yanına veya yerine kurulum.
Kurulum ortamını hazırlama
MD5SUM Doğrulama
Bunu yaparak, indirme işleminin başarılı olduğunu ve tamamen çalışan, önyüklenebilir bir ISO dosyası edindiğinizden emin kılar.
Windows XP -> 7 -> 8 -> 10 sürümlerinden
Microsoft Windows does not have any built-in tools for MD5SUM but they do provide a tool for checking the MD5SUM. How-To-Geek also provides some information regarding MD5SUM reading material or Cygwin can be installed and UNIX utilities used instead.
From Mac OS X
Open the Terminal app, then navigate to the directory where the ISO is saved. Run:
md5 -r kubuntu-15.10-desktop-amd64.iso
And compare the output to the hashes page for the ISO file.
List of UbuntuHashes can be found here: https://help.ubuntu.com/community/UbuntuHashes
From Ubuntu Linux
The first thing to do is to make sure you're in the directory with the .iso file (It will most likely be found in the Downloads directory). Then run the command 'md5sum': For more a more detailed explanation of MD5SUM: [1]
md5sum kubuntu-15.10-desktop-amd64.iso
Windows 7/8
USB/Flash Drives
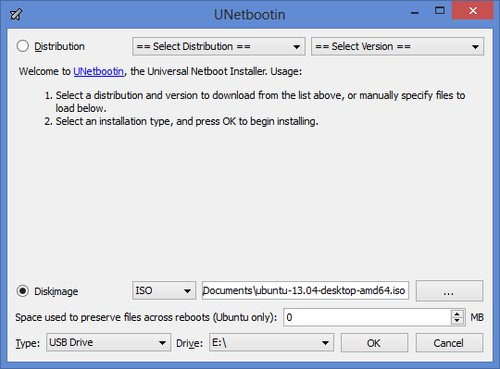
For a GUI (Graphic User Interface) we use UNetBootin.
You can use UNetBootin to download the ISO(image file) automatically or it can be downloaded: Get Kubuntu.
If you choose the 'Diskimage' option you use the button to select your downloaded ISO. Then click .
DVD
The recommended tool for you to use is ImgBurn. There is an excellent tutorial written by the Admin on the ImgBurn forums. It can be found here.
Existing Kubuntu Install
USB/Flash Drives
For a GUI (Graphic User Interface) we use UNetBootin.
You can use UNetBootin to download the ISO(image file) automatically or it can be downloaded here: Get Kubuntu.
Using the command line we use the 'dd' command.
Insert your USB drive into your computer and find the corresponding drive using:
lsblk
Then format the USB drive with the 'dd' command:
sudo dd if=Downloads/kubuntu-15.04-desktop-amd64.iso of=/dev/sdX
DVD
For making a DVD we recommend this KDE tool called k3b, which can be found here.

Look for , click it and then pick from the list of actions.
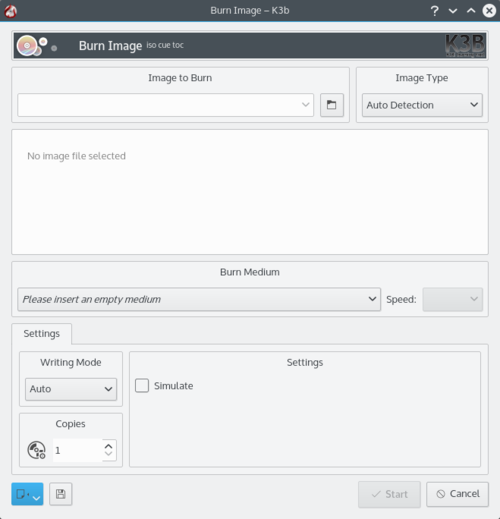
Then you select the image (iso) that you want to burn to the DVD from your computer.
Other Linux Distributions
GNOME based
USB/Flash Drives
For a GUI (Graphic User Interface) we use UNetBootin.
You can use UNetBootin to download the ISO(image file) automatically or it can be downloaded through Get Kubuntu.
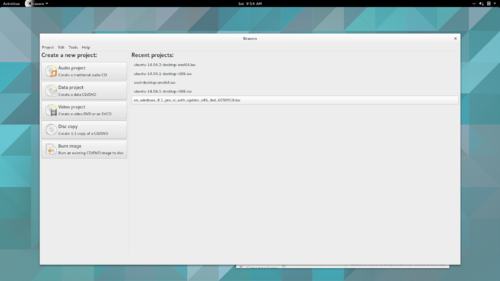
DVD
KDE based
If you're using a Linux Distribution that uses KDE you can follow the Kubuntu instructions as K3b is provided in every KDE based distribution.
Kurulum Süreci
İlk olarak Kubuntu'yu edinmelisiniz. Bunun için bkz. Kubuntu İndir
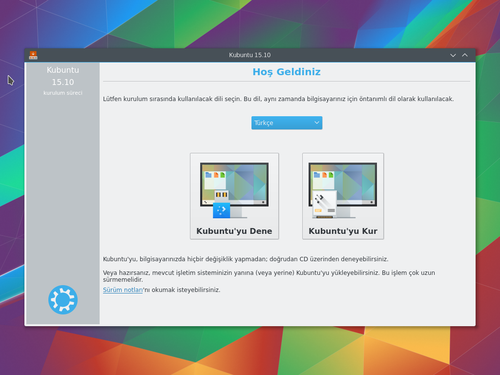
Yükleyici başladığında bu seçenekleri göreceksiniz:
- Bilgisayarda herhangi bir değişiklik yapmadan Kubuntu'yu Dene
- Bilgisayara Kubuntu'yu Kur
Hazırlık
En iyi sonuçlar için şunlardan emin olun:
- Bilgisayarınız Kubuntu ve kişisel verileriniz (şarkı, resim, video ve belgeler) için yeterince yere sahip.
- Bilgisayarınız Kubuntu yüklenirken güncelleştirmeleri ve üçüncü parti yazılımları indirebilmek üzere İnternet'e bağlı.
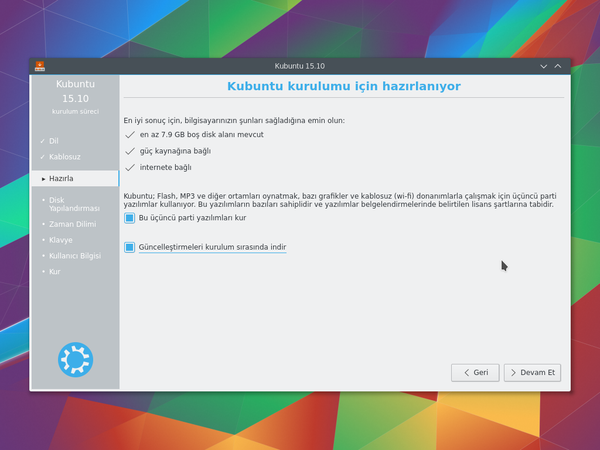
seçeneği, Açık Kaynak modeline veya Ubuntu Felsefesi'ne uymayan ancak sisteminizde kullanmak üzere güvenli olan yazılımları dahil edecektir.
seçeneği, yükleme tamamlandığında, dahil edilmiş en son hata ve güvenlik güncelleştirmelerine sahip olmanızı sağlayacaktır.
Disk Yapılandırması
Burası sabit diskinizi nasıl düzenleyeceğinizi seçeceğiniz adımdır. Bu adım tüm kurulum sürecinin en karmaşık ve en önemli adımı olduğundan dikkatle izlemeniz önerilir.
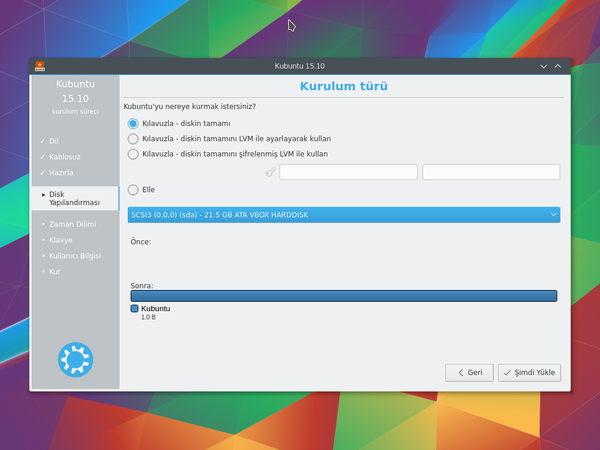
Aşağıdaki bölümler seçebileceğiniz senaryolardan birkaçıdır. Bu seçimlerin her biri bir sayfaya veya daha fazla ayrıntı içeren sayfa serisine götürür. Her seçenek için (El ile hariç), yükleyici kullanılacak sabit sürücüyü soracaktır. Seçimden sonra ilgili sabit diskte önceki ve sonraki yerleşimi göreceksiniz.
Yeniden Boyutlandır
Bu seçenek disk bölümlerini sizin için yeniden boyutlandıracak ve Kubuntu'yu boş alana yüklemenizi sağlayacaktır. Bu seçenek ile başlangıçta hangi işletim sistemini seçmek istediğinizi soran ikili önyüklemeyi oluşturabilirsiniz.
Use entire disk
Using this option the installer will create two partitions on your hard drive; one for most of the content, including the root and home directories, and one partition for the swap.
Tüm diski kullan ve LVM ayarla
LVM hakkında daha fazla bilgi
Tüm diski kullan ve şifreli LVM ayarla
Şifrelenmiş dosya sistemleri hakkında daha fazla bilgi
El ile
kullanarak sisteminizi kendi dilediğiniz gibi ayarlayabilmek için şunları aklınızda tutun:
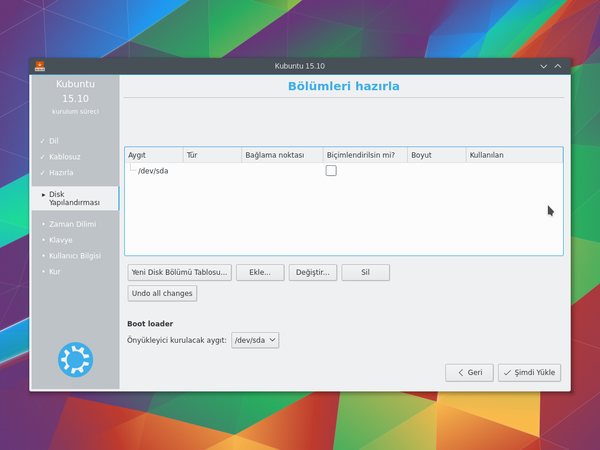
- The root ( / ) directory needs at least 25 GB of space.
- The home ( /home ) directory needs as much space as you will need for your files, music, pictures, and documents. So it is best to use the remaining space for the home partition, unless you are going to have a dual boot.
- Swap space of at least half of the available RAM is recommended. For instance, with 8 GB of RAM, you should make the swap have at least 4 GB.
Bir Linux sistemininin Disk Yapılandırması hakkında daha ayrıntılı bilgi için Disk Alanı sayfasına bakabilirsiniz.
Zaman Dilimi
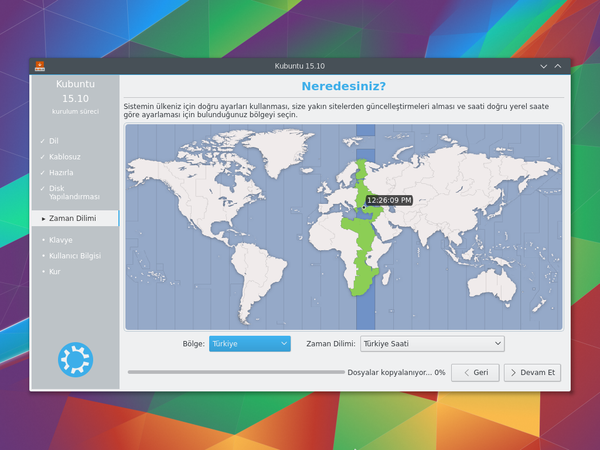
Bu adımda yaşadığınız bölgeyi ve bu bölgedeki Zaman Dilimi'ni seçeceksiniz. Örneğin İstanbul'da yaşıyorsanız bu durumda bölge Türkiye, Zaman Dilimi de Türkiye Saati (GMT+2) olacaktır.
Klavye
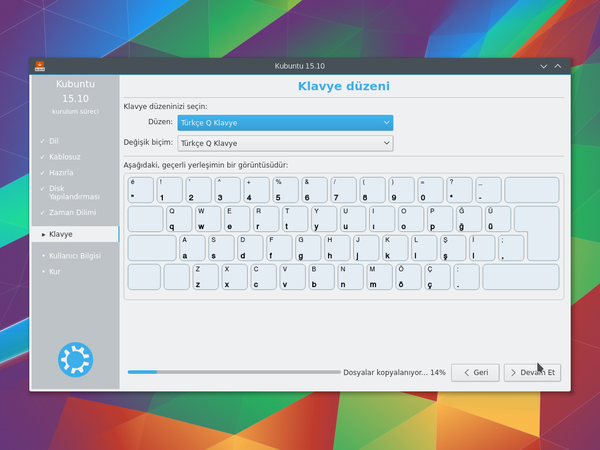
Bu adım klavye dilini ve varsa bu dilin sürümlerini ayarlayacaktır. Örneğin Türkçe için Q veya F klavye seçimlerini bu adımdan yapabilirsiniz. Kubuntu'yu herkes için kolay bir sistem yapmaya çalışıyoruz.
Kullanıcı Bilgisi
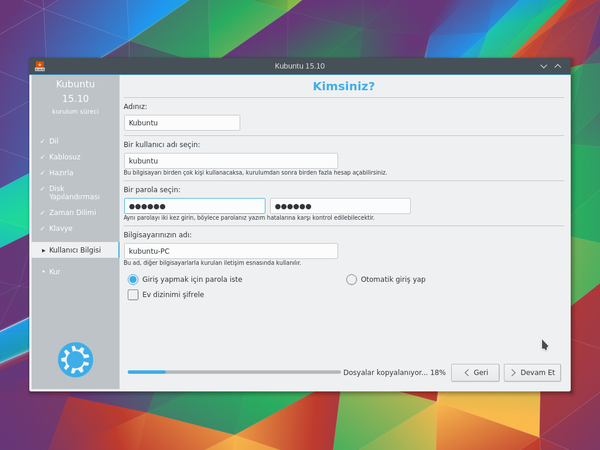
Kurulumun bu adımında isim, kullanıcı adı ve parola gibi kullanıcı bilgilerini giriyor olacaksınız. Parolanız yeni kurulumunuzda oturum açmak için kullanılacağı gibi, aynı zamanda yeni yazılım kurulumu, sistemi güncelleme ve daha birçok şey için de kullanılacaktır. Bu yüzden bir yere yazmayı unutmayın!
