Kdenlive/Manual/Timeline Menu/Selection: Difference between revisions
Created new page with placeholder |
Deleted "Under Construction" disclaimer |
||
| (6 intermediate revisions by the same user not shown) | |||
| Line 1: | Line 1: | ||
{{ | === Selection Menu === | ||
[[Image:Kdenlive timeline menu selection.png]] | |||
<br clear=all> | |||
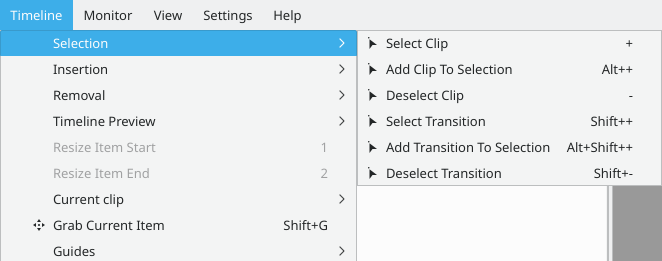
The purpose of this submenu is to allow you to select multiple clips or transitions on the timeline for the purpose of performing operations on all of them simultaneously. However, it should be said up front that making selections this way is not very practical. That’s because, in order to select a clip or transition using this menu, you must first position the playhead on it. A much quicker and easier way is to press <keycap>Ctrl + left-click</keycap> on each clip you want to add to the selection. The clips do not have to be contiguous to be selected using this method. If the clips you want to select are all contiguous, you can press <keycap>Shift + left-click</keycap> and drag your mouse over all the clips. | |||
[[File:Kdenlive timeline select clip-03.png|frame|left|Figure 1.]] | |||
In Figure 1, three of the five clips on the timeline have been selected using the <keycap>Ctrl + left-click</keycap> method. At first, it might be difficult to tell which clips are part of the selection because of the different colors. Kdenlive indicates that a clip is selected by changing the color of the filename text to white; unselected clips show the filename with black letters. So even though two of the selected clips have a light blue outline and the third is outlined in a red border, they are all part of the same selection (the ''clipxx.MOV'' filenames are all in white). Conversely, ''clip03.MOV'' and ''clip05.MOV'' are not part of the selection — their text is black. | |||
<br clear=all> | |||
[[File:Kdenlive timeline select clip-02.png|frame|left|Figure 2.]] | |||
Now that multiple clips have been selected, you can do things like moving, copying, pasting or deleting all of them at once. Or you can use the [[Kdenlive/Manual/Timeline/Grouping#How_to_Group_Clips|Group Clips]] option to perform other advanced operations on the clips. Figure 2 shows that the selected clips from Figure 1 have been moved to another track by grabbing any of the selected clips with the mouse and dragging them. Clicking anywhere outside of the selected clips will unselect all of them. Note however, that if you had used the '''Group Clips''' option on the selections, the clips will still be grouped even though they are no longer selected. | |||
<br clear=all> | |||
[[File:Kdenlive timeline select trans-01.png|frame|left|Figure 3.]] | |||
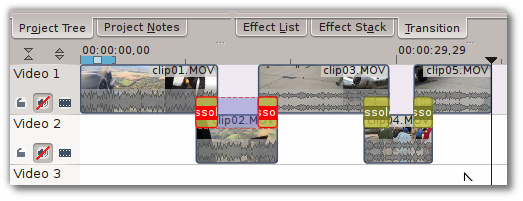
Selecting multiple transitions works just like selecting clips. Click on the first one and then <keycap>Ctrl + left-click</keycap> on as many others as you'd like to add to the selection. Figure 3 shows two '''Dissolve''' transitions selected. These transitions can now be copied, moved, deleted, etc. just as with clips. | |||
<br clear=all> | |||
{{Prevnext2 | |||
| prevpage=Special:MyLanguage/Kdenlive/Manual/Timeline_Menu | |||
| prevtext=Timeline Menu | |||
| index=Special:MyLanguage/Kdenlive/Manual | indextext=Back to menu | |||
}} | |||
Latest revision as of 01:31, 23 December 2014
Selection Menu

The purpose of this submenu is to allow you to select multiple clips or transitions on the timeline for the purpose of performing operations on all of them simultaneously. However, it should be said up front that making selections this way is not very practical. That’s because, in order to select a clip or transition using this menu, you must first position the playhead on it. A much quicker and easier way is to press Ctrl + left-click on each clip you want to add to the selection. The clips do not have to be contiguous to be selected using this method. If the clips you want to select are all contiguous, you can press Shift + left-click and drag your mouse over all the clips.

In Figure 1, three of the five clips on the timeline have been selected using the Ctrl + left-click method. At first, it might be difficult to tell which clips are part of the selection because of the different colors. Kdenlive indicates that a clip is selected by changing the color of the filename text to white; unselected clips show the filename with black letters. So even though two of the selected clips have a light blue outline and the third is outlined in a red border, they are all part of the same selection (the clipxx.MOV filenames are all in white). Conversely, clip03.MOV and clip05.MOV are not part of the selection — their text is black.

Now that multiple clips have been selected, you can do things like moving, copying, pasting or deleting all of them at once. Or you can use the Group Clips option to perform other advanced operations on the clips. Figure 2 shows that the selected clips from Figure 1 have been moved to another track by grabbing any of the selected clips with the mouse and dragging them. Clicking anywhere outside of the selected clips will unselect all of them. Note however, that if you had used the Group Clips option on the selections, the clips will still be grouped even though they are no longer selected.

Selecting multiple transitions works just like selecting clips. Click on the first one and then Ctrl + left-click on as many others as you'd like to add to the selection. Figure 3 shows two Dissolve transitions selected. These transitions can now be copied, moved, deleted, etc. just as with clips.
