KDevelop4/Manual/Code generation with templates: Difference between revisions
m Small note about using File -> New from Template vs. the context menu in project view |
No edit summary |
||
| Line 53: | Line 53: | ||
=== Managing templates === | === Managing templates === | ||
From the <menuchoice>File -> New from Template</menuchoice> assistant, you can also download additional file templates by clicking the <menuchoice>Get more Templates...</menuchoice> button. This opens a Get Hot New Stuff dialog, where you can install additional templates, as well as update or remove them. | |||
Of course, if none of the available template suit your project, you can always create new ones. The easiest way is probably to copy and modify an existing template, while a short [http://techbase.kde.org/Development/Tutorials/KDevelop/Creating_a_class_template tutorial] and a longer [http://techbase.kde.org/Projects/KDevelop4/File_template_specification specification document] are there to help you. You can also start with a sample C++ class template by [[Special:myLanguage/KDevelop4/Manual/Sessions and projects#Creating projects from scratch|creating a new project]] and selecting the <tt>C++ Class Template</tt> project in category <tt>KDevelop</tt>. | |||
{{Prevnext2 | {{Prevnext2 | ||
Revision as of 08:58, 19 August 2012
Code generation with templates
KDevelop uses templates for generating source code files and to avoid writing repeatable code.
Creating a new class
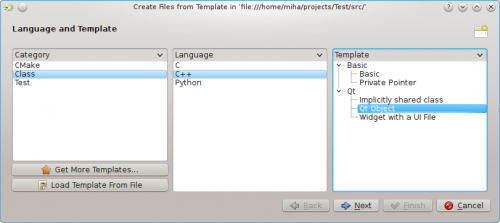
The most common use for code generation is probably writing new classes. To create a new class in an existing project, right click on a project folder and choose . The same dialog can be started from the menu by clicking , but using a project folder has the benefit of setting a base URL for the output files. Choose Class in the category selection view, and the desired language and template in the other two views. After you have selected a class template, you will have to specify the details of the new class.

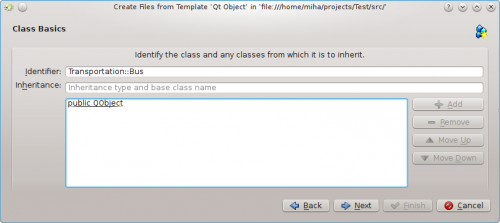
First you have to specify an identifier for the new class. This can be a simple name (like Bus) or a complete identifier with namespaces (like Transportation::Bus). In the latter case, KDevelop will parse the identifier and correctly separate the namespaces from the actual name. On the same page, you can add base classes for the new class. You may notice that some templates choose a base class on their own, you are free to remove it and/or add other bases. You should write the full inheritance statement here, which is language-dependent, such as public QObject for C++, extends SomeClass for PHP or simply the name of the class for Python.

In the next page, you are offered a selection of virtual methods from all inherited classes, as well as some default constructors, destructors and operators. Checking the check box next to a method signature will implement this method in the new class.
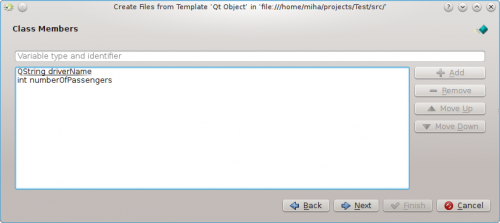
Clicking brings up a page where you can add members to a class. Depending on the selected template, these may appear in the new class as member variables, or the template may create properties with setters and getters for them. In a language where variable types have to be declared, such as C++, you have to specify both the type and the name of the member, such as int number or QString name. In other languages, you may leave out the type, but it is good practice to enter it anyway, because the selected template could still make some use of it.

In the following pages, you can choose a license for you new class, set any custom options required by the selected template, and configure output locations for all the generated files. By clicking , you complete the assistant and create the new class. The generated files will be opened in the editor, so you can start adding code right away.
After creating a new C++ class, you will be given an option of adding the class to a project target. Choose a target from the dialog page, or dismiss the page and add the files to a target manually.
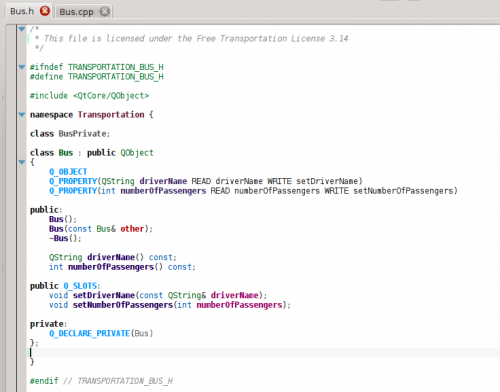
If you chose the Qt Object template, checked some of the default methods, and added two member variables, the output should look like on the following picture.

You can see that data members are converted into Qt properties, with accessor functions and the Q_PROPERTY macros. Arguments to setter functions are even passed by const-reference, where appropriate. Additionally, a private class is declared, and a private pointer created with Q_DECLARE_PRIVATE. All this is done by the template, choosing a different template in the first step could completely change the output.
Creating a new unit test
Even though most testing frameworks require each test to also be a class, KDevelop includes a method to simplify the creation of unit tests. To create a new test, right click on a project folder and choose . In the template selection page, choose Test as the category, then choose your programming language and template and click .
You will be prompted for the test name and a list of test cases. For the test cases, you only have to specify a list of names. Some unit testing frameworks, such as PyUnit and PHPUnit, require that test cases start with a special prefix. In KDevelop, the template is responsible for adding the prefix, so you do not have to prefix the test cases here. After clicking , specify the license and output locations for the generated files, and the test will be created.
Unit tests created this way will not be added to any target automatically. If you are using CTest or some other testing framework, make sure to add the new files to a target.
Other files
While classes and unit tests receive special attention when generating code from templates, the same method can be used for any kind of source code files. For example, one could use a template for a CMake Find module or a .desktop file. This can be done by choosing , and selecting the wanted category and template. If the selected category is neither Class nor Test, you will only have the option of choosing the license, any custom options specified by the template, and the output file locations. As with classes and tests, finishing the assistant will generate the files and open them in the editor.
Managing templates
From the assistant, you can also download additional file templates by clicking the button. This opens a Get Hot New Stuff dialog, where you can install additional templates, as well as update or remove them.
Of course, if none of the available template suit your project, you can always create new ones. The easiest way is probably to copy and modify an existing template, while a short tutorial and a longer specification document are there to help you. You can also start with a sample C++ class template by creating a new project and selecting the C++ Class Template project in category KDevelop.
