KDevelop4/Manual/Code generation with templates/uk: Difference between revisions
Created page with "За допомогою наступних сторінок ви зможете вибрати умови ліцензування вашого нового класу, вст..." |
Created page with "Після створення класу C++ програма запропонує вам додати клас до певної цілі у проекті. Виберіть ..." |
||
| Line 23: | Line 23: | ||
За допомогою наступних сторінок ви зможете вибрати умови ліцензування вашого нового класу, встановити нетипові параметри, характерні для вибраного шаблона, та налаштувати місце зберігання виведених даних для всіх створених програмою файлів. Натискання кнопки <menuchoice>Завершити</menuchoice> призведе до завершення роботи допоміжної програми і створення нового класу. Створені допоміжною програмою файли буде одразу відкрито у вікні редактора, отже ви зможете негайно перейти до додавання потрібного коду. | За допомогою наступних сторінок ви зможете вибрати умови ліцензування вашого нового класу, встановити нетипові параметри, характерні для вибраного шаблона, та налаштувати місце зберігання виведених даних для всіх створених програмою файлів. Натискання кнопки <menuchoice>Завершити</menuchoice> призведе до завершення роботи допоміжної програми і створення нового класу. Створені допоміжною програмою файли буде одразу відкрито у вікні редактора, отже ви зможете негайно перейти до додавання потрібного коду. | ||
Після створення класу C++ програма запропонує вам додати клас до певної цілі у проекті. Виберіть у діалоговому вікні відповідну ціль або закрийте діалогове вікно і додайте файли до цілі вручну. | |||
If you chose the <tt>Qt Object</tt> template, checked some of the default methods, and added two member variables, the output should look like on the following picture. | If you chose the <tt>Qt Object</tt> template, checked some of the default methods, and added two member variables, the output should look like on the following picture. | ||
Revision as of 10:13, 23 August 2012
Створення коду за допомогою шаблонів
У KDevelop для створення початкового коду можна використовувати шаблони. Отже, за допомогою шаблонів ви можете уникнути повторного написання поширених частин коду.
Створення класу
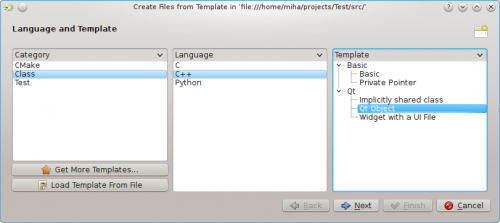
Найпоширенішим випадком використання створення коду за шаблоном є, ймовірно, написання нового класу. Щоб створити новий клас у вже створеному проекті, наведіть вказівник миші на теку проекту, клацніть правою кнопкою миші і виберіть у контекстному меню пункт . Те саме діалогове вікно може бути відкрито за допомогою меню, пункту , але використання теки проекту має перевагу встановлення базової адреси для вихідних файлів. Виберіть Клас на панелі вибору категорії, бажану мову програмування та шаблон. Після вибору шаблона класу вам слід вказати інші характеристики нового класу.
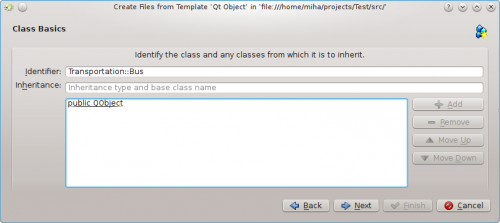
Спочатку слід вказати ідентифікатор нового класу. Це може бути проста назва (наприклад Bus) або повний ідентифікатор у просторі назв (наприклад Transportation::Bus). У останньому випадку KDevelop виконає обробку ідентифікатора і відповідним чином відокремить простір назв від назви класу. За допомогою цієї самої сторінки ви можете додати основні класи для нового класу. Ви можете зауважити, що у деяких шаблонах уже передбачено вибір основних класів. Ви можете просто вилучити зайві і/або додати інші основні класи. Тут вам слід вказати інструкцію наслідування повністю. Звичайно ж, така інструкція залежить від вибраної мови програмування, це буде public QObject для C++, extends SomeClass для PHP або просто назва класу для Python.
За допомогою наступної сторінки ви можете вибрати віртуальні методи з успадкованих класів, а також типові конструктори, деструктори і оператори. Реалізувати метод у новому класі можна простим позначенням пунктів з підписами методів.
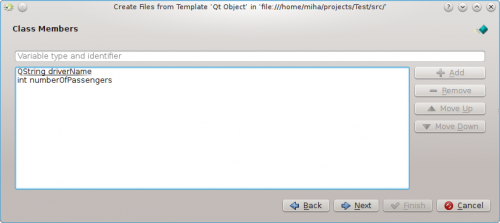
Після натискання кнопки буде показано сторінку, за допомогою якої ви можете додати до класу методи. Залежно від вибраного шаблона, методи може бути реалізовано у новому класі як змінні-елементи або може бути створено властивості з функціями встановлення та отримання значень. У мовах, де типи змінних слід оголошувати, зокрема у C++, вам слід вказати одразу тип і назву елемента, наприклад int number або QString name. У інших мовах можна не вказувати тип, але все ж варто його визначити, оскільки таке визначення може бути корисним для подальшої роботи з шаблоном.
За допомогою наступних сторінок ви зможете вибрати умови ліцензування вашого нового класу, встановити нетипові параметри, характерні для вибраного шаблона, та налаштувати місце зберігання виведених даних для всіх створених програмою файлів. Натискання кнопки призведе до завершення роботи допоміжної програми і створення нового класу. Створені допоміжною програмою файли буде одразу відкрито у вікні редактора, отже ви зможете негайно перейти до додавання потрібного коду.
Після створення класу C++ програма запропонує вам додати клас до певної цілі у проекті. Виберіть у діалоговому вікні відповідну ціль або закрийте діалогове вікно і додайте файли до цілі вручну.
If you chose the Qt Object template, checked some of the default methods, and added two member variables, the output should look like on the following picture.
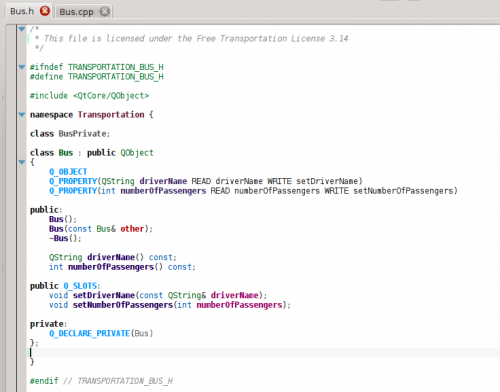
You can see that data members are converted into Qt properties, with accessor functions and the Q_PROPERTY macros. Arguments to setter functions are even passed by const-reference, where appropriate. Additionally, a private class is declared, and a private pointer created with Q_DECLARE_PRIVATE. All this is done by the template, choosing a different template in the first step could completely change the output.
Creating a new unit test
Even though most testing frameworks require each test to also be a class, KDevelop includes a method to simplify the creation of unit tests. To create a new test, right click on a project folder and choose . In the template selection page, choose Test as the category, then choose your programming language and template and click .
You will be prompted for the test name and a list of test cases. For the test cases, you only have to specify a list of names. Some unit testing frameworks, such as PyUnit and PHPUnit, require that test cases start with a special prefix. In KDevelop, the template is responsible for adding the prefix, so you do not have to prefix the test cases here. After clicking , specify the license and output locations for the generated files, and the test will be created.
Unit tests created this way will not be added to any target automatically. If you are using CTest or some other testing framework, make sure to add the new files to a target.
Other files
While classes and unit tests receive special attention when generating code from templates, the same method can be used for any kind of source code files. For example, one could use a template for a CMake Find module or a .desktop file. This can be done by choosing , and selecting the wanted category and template. If the selected category is neither Class nor Test, you will only have the option of choosing the license, any custom options specified by the template, and the output file locations. As with classes and tests, finishing the assistant will generate the files and open them in the editor.
Managing templates
From the assistant, you can also download additional file templates by clicking the button. This opens a Get Hot New Stuff dialog, where you can install additional templates, as well as update or remove them. There is also a configuration module for template, which can be reached by clicking . From there, you can manage both file templates (explained above) and project templates (used for creating new projects).
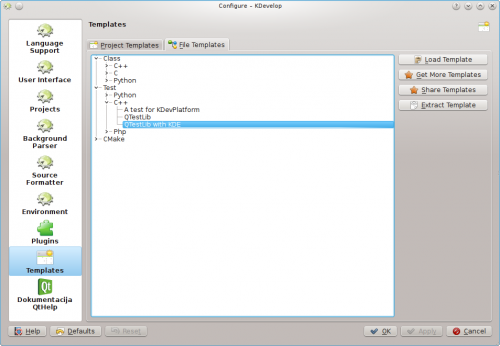
Of course, if none of the available template suit your project, you can always create new ones. The easiest way is probably to copy and modify an existing template, while a short tutorial and a longer specification document are there to help you. To copy an installed template, open the template manager by clicking , select the template you wish to copy, then click the button. Select a destination folder, then click , and the contents of the template will be extracted into the selected folder. Now you can edit the template by opening the extracted files and modifying them. After you are done, you can import your new template into KDevelop by opening the template manager, activating the appropriate tab (either or ) and clicking . Open the template description file, which is the one with the suffix either .kdevtemplate or .desktop. KDevelop will compress the files into a template archive and import the template.
If you want to write a template from scratch, you can start with a sample C++ class template by creating a new project and selecting the C++ Class Template project in category KDevelop.

