Digikam/Огляд
Вступ
Любителям цифрової фотографії, як галузі мистецтва, відомі програмні продукти, створені компаніями Adobe™, Corel™, ACD Systems™, Bibble Labs™, Light Crafts™ та Google™. Більшості з них також відома програма, яка до недавнього часу була найкращим редактором фотографій з відкритим кодом, Gimp. На жаль, у Gimp відсутня дуже важлива для фотографів можливість: можливість редагування зображень з 16-бітовими каналами кольорів. Через цю ваду більшість професійних фотографів навіть не розглядають Gimp як альтернативу іншим програмам. Так, є ще Cinepaint, розробку якого на основі Gimp було розпочато декілька років тому. Там передбачено можливість редагування зображень з 16-бітовими каналами кольорів. На жаль, інтерфейс цієї програми далекий від досконалості, до того ж, здається, серйозну розробку програми давно припинено.
На щастя, тепер з’явилася ще одна альтернативна програма з відкритими кодами, яка може редагувати зображення у 16-бітовому режимі. Ця програма змусить «великих хлопців» похвилюватися за ринок їх дорогих програм. Цією програмою є digiKam. Я особисто лише нещодавно відкрив для себе digiKam. Так, я колись вже намагався користуватися цією програмою, але лише з часу появи версії для KDE4 вона досягла рівня, коли нею можна користуватися без обмежень. Особисто мене здивувала та кількість покращень та нових можливостей, які було включено до цієї версії. Серед можливостей програми:
- Підтримка роботи з 16-бітовими каналами кольорів.
- Інструменти роботи з кривими і рівнями кольорів.
- Підтримка керування кольорами.
- Інструмент балансу білого кольору з піпеткою.
- Інструменти виправлення дефектів об’єктива.
- Інструмент обрізання за співвідношенням розмірів з декількома стандартними форматами паперу.
- Інструмент перетворення зображення на чорно-біле з багатьма художніми фільтрами.
- Пакетна обробка зображень.
- Можливості визначення міток і пошуку за ними.
- Можливості експорту до Facebook, Flickr, Picasa тощо.
Крім того, існує набагато, набагато більше можливостей, всі з яких навіть важко згадати. Звичайно ж, digiKam не є взірцем досконалості. Сподіваюся декілька з недоліків буде виправлено вже найближчим часом. Але, я певен, якщо ви знаєтеся на фотографії, ви ще почуєте багато хороших відгуків щодо digiKam і, сподіваюся, зможете самі скористатися перевагами цієї програми.
Тепер, дозвольте мені здійснити разом з вами невеличку подорож, яка дозволить вам зрозуміти основні принципи роботи у digiKam. Для нашої подорожі ми скористаємося поточною версією digiKam, 1.0.0-beta4, зі сховищ KDE4 PCLinuxOS.
Редагування цифрових негативів
Для прикладу я обрав наведену нижче фотографію, оскільки на ній очевидні наслідки помилок з освітленням під час зйомки.

Це зображення цифрового негатива (RAW) зняте за допомогою мого старого Pentax istDS*. Нижче наведено вікно редактора digiKam з цим зображенням. Доступ до редактора можна отримати і як до окремої програми, яка називається showFotoshowFoto.
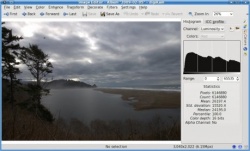
Якщо ви вже колись працювали з гістограмами кольорів, ви можете помітити, що гістограма на знімку вікна виглядає дещо дивно. Причиною цього є те, що digiKam може показувати гістограми двох типів: лінійні і логарифмічні. На знімку наведено логарифмічну гістограму, але більшість користувачів звикли до лінійних гістограм. Перемкнутися між різними режимами показу гістограм можна натисканням відповідної невеличкої кнопочки, розташованої над гістограмою. На жаль, після натискання кнопочки лінійної гістограми для цього зображення програма показує пряму лінію. Ось що говориться про це у документації до digiKam:
“для зображень, на яких містяться значні однотонні
області лінійна діаграма часто перетворюється на єдиний стовпчик. У такому
разі краще скористатися логарифмічною гістограмою.”
Мені зрозуміло, що подібні ефекти викликано технічними причинами, але також дивно те, що інші програми, зокрема Cinepaint, здатні правильно показувати і лінійну діаграму для цього зображення. Я згадав про це, оскільки відомо, що багато користувачів покладаються на гістограму, тому я вважаю, що лінійний тип гістограми був би кориснішим. Але, згоден, логарифмічна гістограма — краще ніж відсутність гістограми. Отже, оскільки можна працювати і з логарифмічною гістограмою, ми продовжимо нашу подорож.
Я зовсім не експерт з остаточної обробки зображень. Звичайна процедура обробки, яку я застосовую для редагування зображення, складається з виправлення рівнів, коригування насиченості, обрізання або зміни розмірів з наступним збільшенням різкості зображення. Отже, давайте виконаємо цю процедуру для нашого зображення.
Рівні
First lets use the levels tool found under .
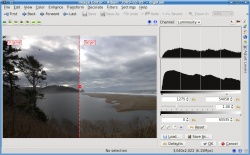
I basically just added a bit of contrast by moving the left lever (below the second histogram) to the right and lighten the image by moving the right lever to the left. The preview window adjusts automatically as I make my adjustments so that I know what the result will be.
Saturation
Now, lets increase the saturation to try to bring out the color a little. For that we use the saturation tool found under .
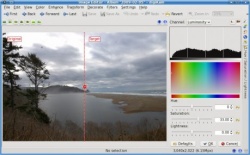
I don’t like the “Disney” look that some point and shoot cameras default to with supper saturated colors. I like to keep my images somewhat realistic looking. So I don’t like to bump the saturation too much. I feel that, for this picture, that amount of saturation is just enough to give it a bit of life without going too far into cartoon land.
Cropping
Now I am going to crop the image. This is really an important step if you are planning on printing the image. If you have ever taken your DSLR images to be printed without cropping them first, you may have been unpleasantly surprised by the fact that they were not centered correctly, or that an important part of the image was left out. The reason for this is that the image you gave them did not have the same proportions as the paper you asked them to print it on. And so they had to crop it for you. To prevent that from happening you need to crop your images to the same proportions of the paper you will be printing on. Yes, that means that you will need a different image if you want to print 8×10 than if you want 5×7, 14×20, etc. Fortunately, digiKam makes this step a breeze with its aspect ratio crop tool found under .
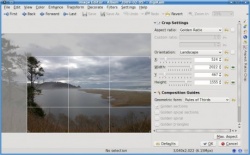
As you can see I chose to use the “Golden Ratio” option for this image, but digiKam has predefined settings for all the common printing paper ratios in the market and even allows you to choose a custom ratio if you desire.
Sharpening
The final step in my photo processing work-flow is to sharpen the image. I am used to using the method for this purpose, but in reading digiKam’s documentation I was surprised to learn that they actually recommend the method as a way to obtain better results. This is how the Sharpen tool looks, found under .
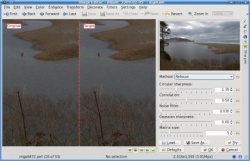
As you can see, you can change the sharpening method used with a drop down button. You can zoom in to the image as much as you want using the button, and you can move the zoom window around in the small preview image above the settings area. I was conservative in the amount of Circular sharpness specified because I could see in the preview area that going for more would result in a lot of grain being visible. This amount improved the sharpness significantly while still retaining the smooth look of the overall image. This is my final result.

As you can see, there is quite a bit of improvement over what we started with.
Auto-Correction
Normally I would have been content with leaving it at that. But since I am still in the exploring digiKam mode, I decided to test some of the tools available. To do that, I went back to the original RAW image, and after importing it, I went straight into . This is what it looks like.
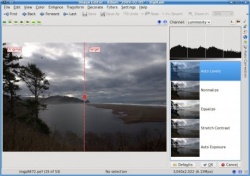
As you can see, there are five automatic correction levels that you can choose from to improve your image. In most images that I have tried this with, the option gives the best results. However, in this particular image the result was too dark. I had not seen any image for which the option resulted in an improvement, but for this particular image the results it gave me were surprisingly good. This is what the digiKam documentation says about the method of :
"Equalize: this method adjusts the brightness of colors across the selected image so that the histogram for the Value channel is as flat as possible, that is, so that each possible brightness value appears at about the same number of pixels as each other value. Sometimes Equalize works wonderfully at enhancing the contrasts of an image. Other times it gives garbage. It is a very powerful operation, which can either work miracles on a image or destroy it."
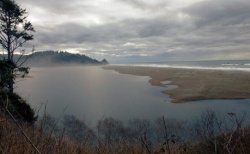
Well, looks like they were not kidding. My image turned out much better using this method of correction instead of my normal level adjustment step. This is how the image looks after adding saturation, cropping it, and sharpening it.
Conclusion
Without a doubt digiKam has a lot to offer for the photographers among us. Unfortunately, it still has one glaring omission – a clone tool. You may have noticed that the original RAW image had some dust specks in the sky above the trees and in other parts of the clouds. In digiKam, the only tool available for trying to remove such things (other than cropping them out as I did here) is a tool called , found under . However, that tool is not easy to use and is rather slow. With a proper clone tool, as available in most other photo editors, removing such items only takes a few seconds. The good news is that the digiKam developers have acknowledged this omission as a bug and we can expect to see it implemented in a future version of digiKam. In the mean time we can use the Gimp to take care of these items as a final touch up step.
I think you will agree that digiKam is an amazing open source tool. It has now become my main photo editor. If you are into photography, why not give it a try?
This page was written in October 2009. Can you add to it, talking about a later version?

