Kdenlive/Manual/Projects and Files/Project Tree
The Project Tree
The Project Tree is a tab in Kdenlive which lists all the clips that are associated with the project.
Clips can be dragged from the Project Tree to the Timeline
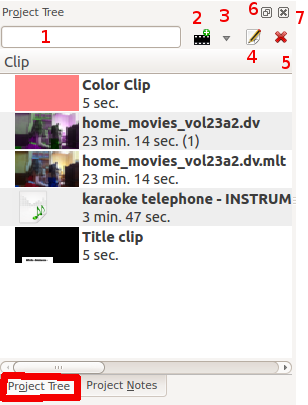
Text Box labeled 1 is a filter which filters the clips visible in the tree by name
Icon labeled 2 is the Add Clip Button - adds Video or Audio clips to the project tree
Drop Down labeled 3 is an drop down list, it allows you to add other clip types to the project tree
Icon labeled 4 brings up the properties for the clip that is selected in the project tree
Icon labeled 5 deletes the selected clip from the project tree (but not from the file system)
Icon labeled 6 toggles docking of the Project tree.
Icon labeled 7 closes the project tree. The project tree can be made visible again from the View menu.
The number in brackets after the length of the clip is the number of times this clip appears in the timeline. In the screen shot the home_movies_vol23a2.dv clip is 23 min 14 secs long and appears in the timline one time.
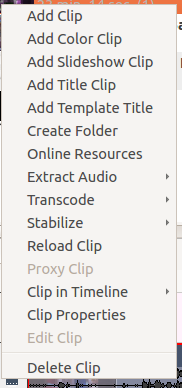
Project Tree - Right Click Menu
The menu items that appear on right click on an item in the project tree are also available from the Project Menu.


