Archive:Kdenlive/Manual/Projects and Files/Project Tree/zh-tw: Difference between revisions
(Created page with "圖上標示1的輸入盒是個過濾器,可以用名稱來過濾出您要的素材。") |
(Created page with "標示2的小圖示是加上素材的按鈕-把影片或聲音素材加到專案樹裏。") |
||
| Line 11: | Line 11: | ||
圖上標示1的輸入盒是個過濾器,可以用名稱來過濾出您要的素材。 | 圖上標示1的輸入盒是個過濾器,可以用名稱來過濾出您要的素材。 | ||
標示2的小圖示是加上素材的按鈕-把影片或聲音素材加到專案樹裏。 | |||
Drop Down labeled 3 is an <menuchoice>Add Clip</menuchoice> drop down list, it allows you to add other clip types to the project tree | Drop Down labeled 3 is an <menuchoice>Add Clip</menuchoice> drop down list, it allows you to add other clip types to the project tree | ||
Revision as of 02:36, 2 April 2013
專案樹
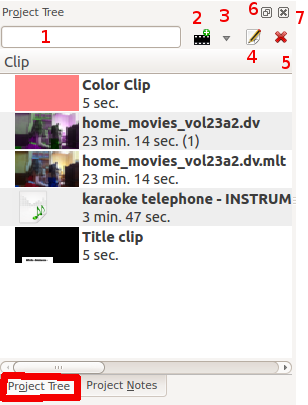
專案樹是 Kdenlive裏的一個頁籤,其上列出了此專案所用到的素材。
素材可直接從專案樹拖到時間軸
圖上標示1的輸入盒是個過濾器,可以用名稱來過濾出您要的素材。
標示2的小圖示是加上素材的按鈕-把影片或聲音素材加到專案樹裏。
Drop Down labeled 3 is an drop down list, it allows you to add other clip types to the project tree
Icon labeled 4 brings up the properties for the clip that is selected in the project tree
Icon labeled 5 deletes the selected clip from the project tree (but not from the file system)
Icon labeled 6 toggles docking of the Project tree.
Icon labeled 7 closes the project tree. The project tree can be made visible again from the menu.
The number in brackets after the length of the clip is the number of times this clip appears in the timeline. In the screen shot the home_movies_vol23a2.dv clip is 23 min 14 secs long and appears in the timeline one time.
Project Tree - Right Click Menu
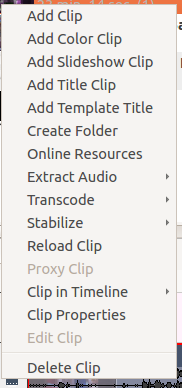
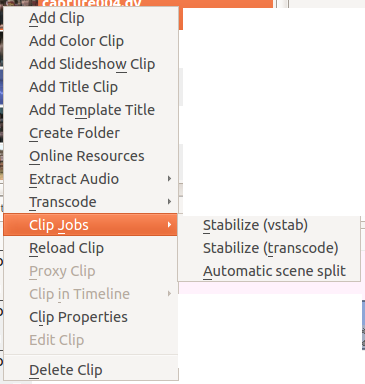
The images below show the menu items available when you right click a clip in the project tree. The images show the 0.9.2 and the 0.9.3 version of the menu. In version 0.9.3 of Kdenlive the transcode submenu item is replaced by a clip jobs submenu item.
 |
 |
| ver 0.9.2 of Kdenlive | ver 0.9.3 of Kdenlive |
The menu items that appear on right click on an item in the project tree are also available from the Project Menu.
- Add Clip
- Add Color Clip
- Add Slideshow Clip
- Add Title Clip
- Add Template Title
- Create Folder
- Online Resources
- Extract Audio
- Transcode
- Stabilize (ver 0.9.2)
- Clip Jobs > Stabilize (ver 0.9.3)
- Clip Jobs > Automatic Scene Split (ver 0.9.3)
- Reload Clip
- Proxy Clip
- Clip in Timeline
- Clip Properties
- Edit Clip
- Delete Clip

