KAddressBook/Tutorials/How to add a new contact?/de: Difference between revisions
(Created page with "400px|center|thumb|Klicken Sie auf <menuchoice>Neuer Kontakt</menuchoice>") |
(Created page with "In dem Formular geben Sie nun die Informationen ein, die Sie zu dem Kontakt speichern wollen. Ganz oben in dem Formular können Sie das Adressbuch auswählen indem Sie den Kon...") |
||
| Line 9: | Line 9: | ||
[[File:KAddressBookNewContact1.png|400px|center|thumb|Klicken Sie auf <menuchoice>Neuer Kontakt</menuchoice>]] | [[File:KAddressBookNewContact1.png|400px|center|thumb|Klicken Sie auf <menuchoice>Neuer Kontakt</menuchoice>]] | ||
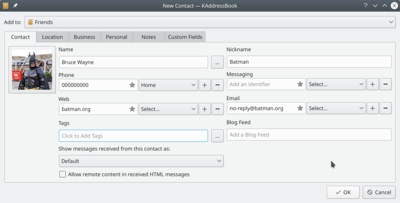
In | In dem Formular geben Sie nun die Informationen ein, die Sie zu dem Kontakt speichern wollen. Ganz oben in dem Formular können Sie das Adressbuch auswählen indem Sie den Kontakt speichern wollen. | ||
{{Note|You can add more than one phone number, website, and email. Just click on the <menuchoice>+</menuchoice> button and select a category. }} | {{Note|You can add more than one phone number, website, and email. Just click on the <menuchoice>+</menuchoice> button and select a category. }} | ||
Revision as of 15:10, 16 August 2020
Das Hinzufügen eines neuen Kontakts ist eine der wesentlichsten Funktionen einer Adressbuchanwendung.
Klicken Sie zuerst auf den Knopf links oben. In einem neuen Fenster öffnet sich ein Formular.

In dem Formular geben Sie nun die Informationen ein, die Sie zu dem Kontakt speichern wollen. Ganz oben in dem Formular können Sie das Adressbuch auswählen indem Sie den Kontakt speichern wollen.

More information can be added. For this, navigate between the tabs: , , , , .
When you are done, confirm the contact creating by clicking on .


