KMail/Import Options/da: Difference between revisions
(Importing a new version from external source) |
(Importing a new version from external source) |
||
| Line 49: | Line 49: | ||
* For at importere e-mails skal du markere den mappe du vil have importeret dine e-mails til. Når den er valgt klikker du på knappen <menuchoice>Importér e-mails</menuchoice>. Når fremgangslinjen når 100%, så klikker du på knappen <menuchoice>Næste</menuchoice> eller på knappen <menuchoice>Afslut</menuchoice>, hvis du ikke vil importere mere materiale. | * For at importere e-mails skal du markere den mappe du vil have importeret dine e-mails til. Når den er valgt klikker du på knappen <menuchoice>Importér e-mails</menuchoice>. Når fremgangslinjen når 100%, så klikker du på knappen <menuchoice>Næste</menuchoice> eller på knappen <menuchoice>Afslut</menuchoice>, hvis du ikke vil importere mere materiale. | ||
* | * For at importere mail-filtre skal du klikke på knappen <menuchoice>Importér filtre</menuchoice>, så importeres alle fundne filtre. Når importen er aflsuttet, så klikker du på knappen <menuchoice>Næste</menuchoice> eller på knappen <menuchoice>Afslut</menuchoice> hvis du ikke vil importere mere materiale. | ||
*To Import settings, click the <menuchoice>Import Settings</menuchoice> button. The wizard will ask you some questions e.g. which folder to use for account folders that do not exist. The wizard will also create your identity. Once complete, click the <menuchoice>Next</menuchoice> button, or the <menuchoice>Finish</menuchoice> button, if this was your last material selection. | *To Import settings, click the <menuchoice>Import Settings</menuchoice> button. The wizard will ask you some questions e.g. which folder to use for account folders that do not exist. The wizard will also create your identity. Once complete, click the <menuchoice>Next</menuchoice> button, or the <menuchoice>Finish</menuchoice> button, if this was your last material selection. | ||
Revision as of 06:16, 7 March 2014
Importfunktioner
Import til KMail
Dette afsnit beskriver KMaiis forskellige funktioner til import.
Import-guiden
Import-guiden lade dig importere e-mails, indstillinger, adressebog og kalenderdata til din konto fra følgende mail-programmer:
- Trojitá
- Evolution 1.x - 3.x
- OS X Mail
- Opera
- Sylpheed
- Thunderbird/Mozilla
- The Bat!
- Outlook Express
- Balsa
- Pegasus-Mail
- Claws Mail
Du kan enten starte importguiden fra programstarteren eller fra KMail med

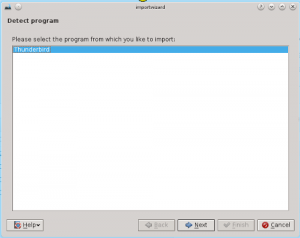
Når den startes finder importguiden alle understøttede e-mail-programmer og laver en liste med dem i vinduet.
Væld det e-mail-program du vil importere fra og klik på knappen .
Guiden vil så spørge om du vil importere alt eller give dig mulighed for at vælge, hvilken type materiale du ønsker at importere.
Afhængigt af hvad du markerer i importvinduet vil du se en eller flere af følgende skærme:
- For at importere e-mails skal du markere den mappe du vil have importeret dine e-mails til. Når den er valgt klikker du på knappen . Når fremgangslinjen når 100%, så klikker du på knappen eller på knappen , hvis du ikke vil importere mere materiale.
- For at importere mail-filtre skal du klikke på knappen , så importeres alle fundne filtre. Når importen er aflsuttet, så klikker du på knappen eller på knappen hvis du ikke vil importere mere materiale.
- To Import settings, click the button. The wizard will ask you some questions e.g. which folder to use for account folders that do not exist. The wizard will also create your identity. Once complete, click the button, or the button, if this was your last material selection.
- To Import address books, click the button, and it will import all address books it finds. Once complete, click the button.
Click the button to complete and exit the wizard. If at any time you wish to end the wizard, you can click the button.
within KMail or run KMailCVT from the application launcher.

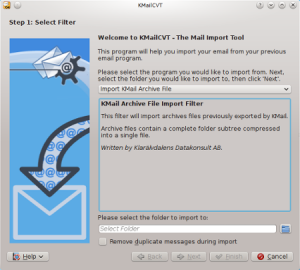
KMailCVT is to be used to import your email messages if your previous email application/format is listed below.
- KMail Archive
- mbox(Unix, Evolution)
- Evolution 1.x
- Evolution 2.x
- Evolution 3.x
- KMail
- OS X Mail
- Opera
- Sylpheed
- Thunderbird/Mozilla
- The Bat!
- Outlook Express
- Pegasus-Mail
- Lotus Notes
- Plain Text
Select your previous email program from the drop down box. The center text area of KMailCVT will update with special instructions (if applicable), and the known location of email message storage for that application.
Follow these instructions, then select the folder you wish to import your messages to.
If you want the KMailCVT tool to remove duplicate messages, check . A file select dialog will pop up and you need to select the file/folder noted in the instructions.
Click the button to complete the import. When the import is finished you can click the button to import from another application or the button to exit.


