Krita/Tutorial 2: Difference between revisions
No edit summary |
No edit summary |
||
| Line 189: | Line 189: | ||
|} | |} | ||
<translate> | <translate> | ||
Tips: | |||
* Switch off the visibility of filter masks or filter layers when you're drawing on affected layers, or the whole thing becomes really slow, since everything is updated dynamically. | |||
* Can be edited like Masks/Erase layers: see section on masks. | |||
* Also great for group or image-level adjustments like Brightness/Contrast or Hue without having to flatten the image. | |||
[[image:Krita-tutorial2-I.3.png|thumb|center|300px]] | |||
=== Local selections === | |||
Local selections basically allow you to "save" a selection to a layer. With a local selection "on": | |||
* When you select that layer, the local selection will be activated. | |||
* When you switch to another layer, the local selection will turn off. | |||
* You can also switch the local selection off manually, or have several local selections per layer. | |||
[[image:Krita-tutorial2-I.4.png|thumb|center|500px]] | |||
In this example, after creating the first local selection, I then inverted it and created a second one. As you see, this allowed me to divide my (transparency-locked) base clothes layer into two, so I can color them independently. | |||
Warning: when you create the local selection from a selection, there are two selections active at the same time: | |||
* The original one, which will Not disappear when you switch to another layer | |||
* And the new local selection, tied to that layer. | |||
This will lead to some confusion when you want to switch the selections off. To switch them both off: | |||
* Switch the original active selection off with <keycap>Shift + Ctrl + A</keycap> | |||
* Toggle off the local selection by switching to another layer, or by toggling local selection off in the layer docker | |||
Tip: As with layers and masks, you can duplicate a local selection and drag it to another layer. | |||
=== Clone layers === | |||
'''Krita''' can make either duplicate or clones of layers. | |||
* Duplicates are basically independent copies. Nothing special there. | |||
* Clones, however, are linked to the original:</translate> | |||
<translate> | |||
** They cannot be painted on independently</translate> | |||
<translate> | |||
** But they will update automatically as the original is changed</translate> | |||
<translate> | |||
** You can also change the blending mode (Normal, Multiply, Overlay, etc.) | |||
[[image:Krita-tutorial2-I.5-1.png|thumb|center|500px]] | |||
Tip: You can clone groups! The output is a single, dynamically-updated layer! | |||
[[image:Krita-tutorial2-I.5-2.png|thumb|center|300px]] | |||
What is this for? Well: | |||
* Re-using elements: You can move clones. When making comic or animation frames, you can more easily re-use elements. | |||
* Organizing: You could organize say... greyscale layers in another folder, and use clones in sub-groups. So, to view only the greyscale, you can turn the greyscale folder visible. (selective viewing can also be achieved with the composition docker) | |||
* Play with blending modes: for some reason or other, you may want to make an exact copy of your layer just to see how a clone with a different composite mode changes your image. A common-ish usage would be to clone comic frames or lineart to place at the top. | |||
=== How to use all these features === | |||
Still awake? I'm going to give you an overview of features seen so far, but before that I'll address a limitation of just using transparency lock. | |||
Filling in a flat area, locking the transparency and just shading on it will satisfy most people's requirements. There is one problem though: edge cases. | |||
[[image:Krita-tutorial2-I.6-1.png|thumb|center|300px]] | |||
This is actually quite problematic if you're smudging near the edges to blend some colors. | |||
Both alpha-locking and masks allow you to overcome this issue, because additional portions are just hidden, '''Krita''' still uses the hidden parts for calculating smudging and such. | |||
So anyway, overview: | |||
</translate> | |||
{| class="wikitable" <!--}--> | |||
<translate> | |||
! Feature | |||
! (Recommended) uses | |||
! Comments/Limitations</translate> | |||
|- | |||
<translate> | |||
! Visibility | |||
| Toggles layer visibility | |||
| (obvious features available for all layers and groups)</translate> | |||
|- | |||
<translate> | |||
! Layer-locking | |||
| Prevents you from drawing on layer accidentally | |||
| (obvious features available for all layers and groups)</translate> | |||
|- | |||
<translate> | |||
! Transparency-locking | |||
| You can only draw on areas already opaque | |||
| Issues when smudging edges</translate> | |||
|- | |||
<translate> | |||
! Alpha-locking | |||
| "Anti-spillover" for shading and texturing layers | |||
| Can't affect layers in sub-groups individually, but you can alpha-lock a group</translate> | |||
|- | |||
<translate> | |||
! Masks | |||
| Transparency fade effects | |||
| Transparency can only be tweaked by "erasing" for now. Opacity for erase brushes must be tweaked from the brush editing panel, not the top toolbar</translate> | |||
|- | |||
<translate> | |||
! Erase-mode layers | |||
| Like masks, but on a layer | |||
| Easier to use than masks, and opacity for erase brushes can be tweaked from top toolbar. Affects all layers beneath it, so caution!</translate> | |||
|- | |||
<translate> | |||
! Filter brush/mask/layer | |||
| Apply filters through a brush/Mask/Layer | |||
| Filter masks or layers allow non-destructive and/or partial aplication of filters. Turn off visibility when drawing to avoid slow-down.</translate> | |||
|- | |||
<translate> | |||
! Local selections | |||
| Save selections to a layer | |||
| Helps you further divide a layer into zones</translate> | |||
|- | |||
<translate> | |||
! Duplicate layers | |||
| Copy of a layer, group or mask | |||
| Good for some composite effects </translate> | |||
|- | |||
<translate> | |||
! Clone layers | |||
| Linked layer that updates when the original is updated | |||
| Cannot be edited independently save for moving. Allows easy re-use of elements. Cloning a group produces a single, easy to manage and dynamically-updated layer.</translate> | |||
|- | |||
<translate> | |||
! Vector layers* | |||
| Comic frames (See Anitim's Krita Comic tutorial on Youtube) | |||
| Vectors are editable shapes, which makes them handy for comic frames. Vector drawing is a whole genre, though '''Krita''' isn't specialized in vectors, so I won't cover it here... | |||
</translate> | |||
|} | |||
<translate> | |||
The above are just some usage suggestions. I figured most of them from scratch, so I don't know how other people use them. | |||
Additional tips: | |||
* Greyscale layers: If you're the type of person who likes to separate greyscale and coloring layers, then you can change a layer into pure greyscale layer with <menuchoice>Layer -> Convert Layer Type...</menuchoice> (from the main menu) and changing it to grayscale | |||
[[image:Krita-tutorial2-I.6-2.png|thumb|center|500px]] | |||
You will now automatically draw in greyscale on this layer, even if you use a color brush. Other layers remain color layers. | |||
* Use <menuchoice>Layer</menuchoice> in the main menu for other, rather self-explanatory layer functions:</translate> | |||
<translate> | |||
** Save layer as image (works for groups)</translate> | |||
<translate> | |||
** Merge with layer below: also available from right-clicking images. Be careful if they're using different blending modes.</translate> | |||
<translate> | |||
** Flatten image</translate> | |||
<translate> | |||
** Mirror / Shear / Scale / Rotate</translate> | |||
<translate> | |||
** Layer effects | |||
That's it for layers, layers management and layer properties. (ugh) | |||
[[Category:Office]] | [[Category:Office]] | ||
[[Category:Graphics]] | [[Category:Graphics]] | ||
[[Category:Tutorials]] | [[Category:Tutorials]] | ||
</translate> | </translate> | ||
Revision as of 10:15, 27 October 2012
Krita tutorial - Part II
Welcome to the second part of my tutorial! This somewhat boring (but still useful!) episode will cover:
- Layer management tips and tricks
- General image editing tips and tricks
Tips:
- Unless you always draw everything on the same layer, always remember to make a new, transparent layer to draw on instead of the background layer (unless you're drawing the background). I always forget to do this, and haven't found an easy work-around yet...
- Better yet, get the habit of stuffing things into layer groups.
Layer management
Krita has lots of ways to manage layers and their visibility. I'll be addressing some of them in more detail.
Reminder tips:
- Filling a layer with a color: Backspace (background color) or Shift+Backspace (foreground color).
- Delete a layer's content: delete. Use this instead of Backspace to clear a transparent layer.
Alpha locking (alpha = transparency)
Suppose you want to draw some clothes. You have a "base" layer, and you want to add:
- a layer for shadows
- a layer for highlights
- a layer for patterns
- then a layer for textures
You want everything to be constrained to the area of the drawn clothes.
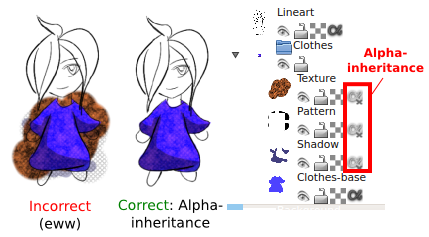
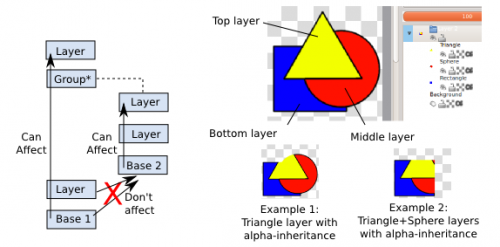
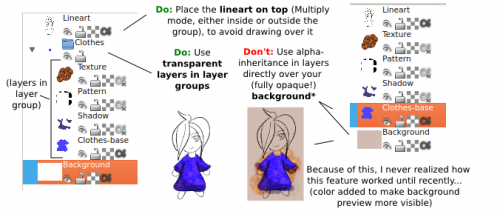
Alpha-locking locks the visibility state of a layer to only areas visible on all the layers below it, in the same stack.
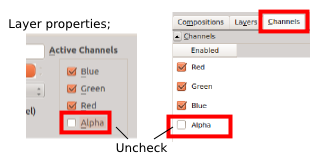
To activate alpha lock for a group:
- Right-click on the group folder, select Properties, and uncheck "alpha"
- Or select the group folder, go to the Channel docker, and uncheck "alpha":
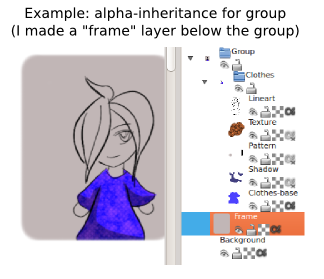
Do's and don'ts:
Tip: Comic frames
This feature works with vectors layers, which makes it handy to create comic frames. See Anitim's Comic with Krita tutorial on Youtube for more.
Layer masks and Erase mode
A layer or group's transparency mask basically dictates their visibility state:
- Black mask areas -> fully visible areas
- White mask areas -> invisible areas
- Grey mask areas -> transparent areas
- Unlike true erasing, your original drawing is still there: you can turn off the mask to make the corresponding layer or group fully visible again.
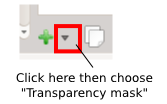
Tips:
- You can add masks to groups. Their position relative to the layers in the group doesn't seem to matter.
- You can duplicate or clone masks and move that to another layer or group, in case you need several layers to "share" masks.
Creating and editing masks
To edit a mask, you basically have to erase on it. You basically have 3 ways to give shape to a mask: create from selection, brush on erase mode and gradients.
Selection to mask
If you have a selection active, then when you make a mask, the mask will automatically take the shape of the selection.
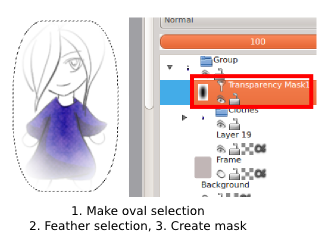
Tip: You can feather the selection for a more smooth transition: choose in the top menu.
Brushes on Erase mode
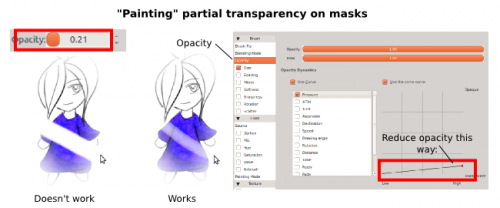
You can toggle on the "Erase mode" on most brushes with E. Drawing on the mask again with a not-invisible brush will allow you to "add opacity" again. Warning:
- - The opacity setting from the top toolbar seems to be ignored: even if you lower the opacity from there, you will still end up erasing 100% from the mask. This is rather a problem when you want just partial transparency.
- However, opacity from the brush editor seems to work. So, if you need partial transparency, open up the brush editor, lower the opacity there, and erase away.
Gradients
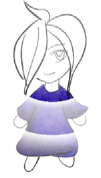
You can also use gradients on "Erase" mode. Remember that on erase mode:
- The opaque areas of the gradient will erase the mask
- The transparent areas will leave it intact
You can create custom gradients too. The example left uses a radial gradient with several full opacity and partial opacity stops.
Custom gradients in Krita
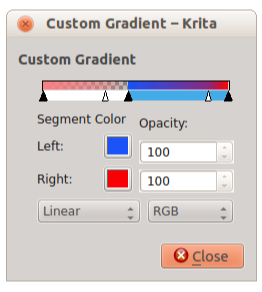
- The black arrows represent control points with the colors left or right.
- The white arrows just determine the speed of transition.
- To add a new segment, click a segment, right-click and choose "split segment"
- Note: Each segment has independent "left" and "right" values (shown in the example). This means you can easily create "abrupt" transitions.
- If you Don't want abrupt transitions, click the color button, copy the html value, open the color of the next segment, and paste the value in.
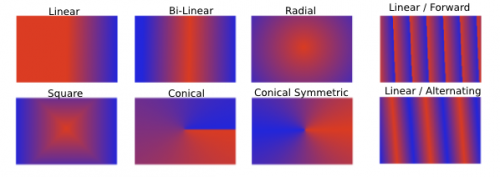
Gradient shapes: (from Tool options)
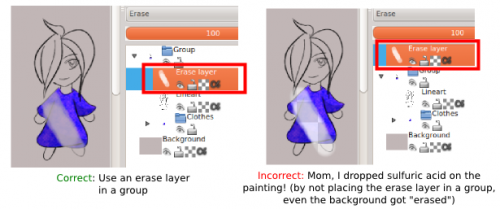
Layers on erase mode:
Erase mode works a lot like masks, except:
- It affects all the layers and groups beneath it
- The opacity setting from the top toolbar works properly when erasing with brushes.
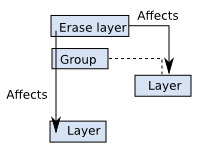
Basically, easier than making masks, though you have to stuff corresponding layers into sub-folders.
Filter brushes, masks and layers
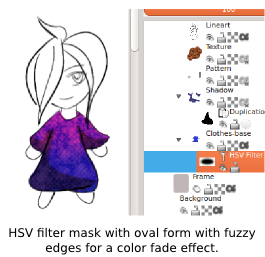
I'm sure you've noticed by now that Krita has: filter brushes, filter masks And filter layers?
| Feature | Description | Comments |
|---|---|---|
| Filter brush | "Draw" filters with a brush! | -Not everything works as expected... - Many default settings start with "none", so remember to actually enter a value! |
| Filter mask | Apply a filter to a layer or group! | - Non-destructive editing! You can turn the filter-mask on or off at any time. - Right-click -> Properties to adjust filter settings |
| Filter layer | Applies filter to All layers below it | - You can tweak your whole image with a filter without flattening it first! - You can erase parts of the filter layer! |
Tips:
- Switch off the visibility of filter masks or filter layers when you're drawing on affected layers, or the whole thing becomes really slow, since everything is updated dynamically.
- Can be edited like Masks/Erase layers: see section on masks.
- Also great for group or image-level adjustments like Brightness/Contrast or Hue without having to flatten the image.
Local selections
Local selections basically allow you to "save" a selection to a layer. With a local selection "on":
- When you select that layer, the local selection will be activated.
- When you switch to another layer, the local selection will turn off.
- You can also switch the local selection off manually, or have several local selections per layer.
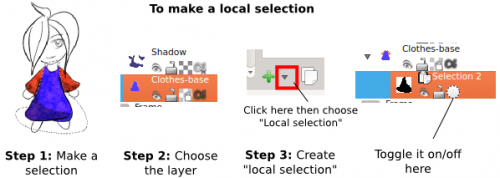
In this example, after creating the first local selection, I then inverted it and created a second one. As you see, this allowed me to divide my (transparency-locked) base clothes layer into two, so I can color them independently.
Warning: when you create the local selection from a selection, there are two selections active at the same time:
- The original one, which will Not disappear when you switch to another layer
- And the new local selection, tied to that layer.
This will lead to some confusion when you want to switch the selections off. To switch them both off:
- Switch the original active selection off with Shift + Ctrl + A
- Toggle off the local selection by switching to another layer, or by toggling local selection off in the layer docker
Tip: As with layers and masks, you can duplicate a local selection and drag it to another layer.
Clone layers
Krita can make either duplicate or clones of layers.
- Duplicates are basically independent copies. Nothing special there.
- Clones, however, are linked to the original:
- They cannot be painted on independently
- But they will update automatically as the original is changed
- You can also change the blending mode (Normal, Multiply, Overlay, etc.)

Tip: You can clone groups! The output is a single, dynamically-updated layer!
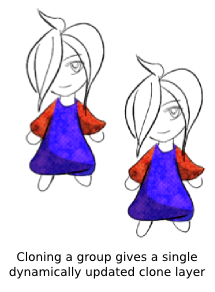
What is this for? Well:
- Re-using elements: You can move clones. When making comic or animation frames, you can more easily re-use elements.
- Organizing: You could organize say... greyscale layers in another folder, and use clones in sub-groups. So, to view only the greyscale, you can turn the greyscale folder visible. (selective viewing can also be achieved with the composition docker)
- Play with blending modes: for some reason or other, you may want to make an exact copy of your layer just to see how a clone with a different composite mode changes your image. A common-ish usage would be to clone comic frames or lineart to place at the top.
How to use all these features
Still awake? I'm going to give you an overview of features seen so far, but before that I'll address a limitation of just using transparency lock.
Filling in a flat area, locking the transparency and just shading on it will satisfy most people's requirements. There is one problem though: edge cases.
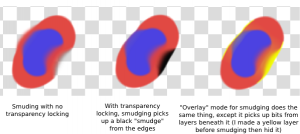
This is actually quite problematic if you're smudging near the edges to blend some colors.
Both alpha-locking and masks allow you to overcome this issue, because additional portions are just hidden, Krita still uses the hidden parts for calculating smudging and such.
So anyway, overview:
| Feature | (Recommended) uses | Comments/Limitations |
|---|---|---|
| Visibility | Toggles layer visibility | (obvious features available for all layers and groups) |
| Layer-locking | Prevents you from drawing on layer accidentally | (obvious features available for all layers and groups) |
| Transparency-locking | You can only draw on areas already opaque | Issues when smudging edges |
| Alpha-locking | "Anti-spillover" for shading and texturing layers | Can't affect layers in sub-groups individually, but you can alpha-lock a group |
| Masks | Transparency fade effects | Transparency can only be tweaked by "erasing" for now. Opacity for erase brushes must be tweaked from the brush editing panel, not the top toolbar |
| Erase-mode layers | Like masks, but on a layer | Easier to use than masks, and opacity for erase brushes can be tweaked from top toolbar. Affects all layers beneath it, so caution! |
| Filter brush/mask/layer | Apply filters through a brush/Mask/Layer | Filter masks or layers allow non-destructive and/or partial aplication of filters. Turn off visibility when drawing to avoid slow-down. |
| Local selections | Save selections to a layer | Helps you further divide a layer into zones |
| Duplicate layers | Copy of a layer, group or mask | Good for some composite effects |
| Clone layers | Linked layer that updates when the original is updated | Cannot be edited independently save for moving. Allows easy re-use of elements. Cloning a group produces a single, easy to manage and dynamically-updated layer. |
| Vector layers* | Comic frames (See Anitim's Krita Comic tutorial on Youtube) | Vectors are editable shapes, which makes them handy for comic frames. Vector drawing is a whole genre, though Krita isn't specialized in vectors, so I won't cover it here... |
The above are just some usage suggestions. I figured most of them from scratch, so I don't know how other people use them.
Additional tips:
- Greyscale layers: If you're the type of person who likes to separate greyscale and coloring layers, then you can change a layer into pure greyscale layer with (from the main menu) and changing it to grayscale
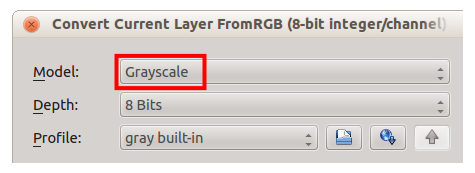
You will now automatically draw in greyscale on this layer, even if you use a color brush. Other layers remain color layers.
- Use in the main menu for other, rather self-explanatory layer functions:
- Save layer as image (works for groups)
- Merge with layer below: also available from right-clicking images. Be careful if they're using different blending modes.
- Flatten image
- Mirror / Shear / Scale / Rotate
- Layer effects
That's it for layers, layers management and layer properties. (ugh)

