Amarok/Manual/Organization/Collection/OrganizeCollection
Organize Collection
While organizing your collection in Amarok is a straight-forward task, you will be manipulating the actual files on your hard drive. Please be sure you have a backup of your files before you begin.
With the Organize Files dialog of Amarok you can easily manage the media files on your hard drive. When you change the naming scheme of media files, you will organize them, which is very powerful. To access the Organize Files dialog, right-click in the Media Sources pane and the menu interface will pop-up.

If the option does not appear, you may have Merged View on (toggled by ![]() ). In order to safely organize your files, you need to see your collections separated, not merged.
). In order to safely organize your files, you need to see your collections separated, not merged.
Organizing Files Interface
After selecting the option Organize Files you will first see an additional option that allows you to move the files to a new location, as well as transcode them at the same time. Depending on the codecs you have installed on the system, some format options might not be available and will be grayed out:

For more information about Transcoding, please see the Transcoding section.
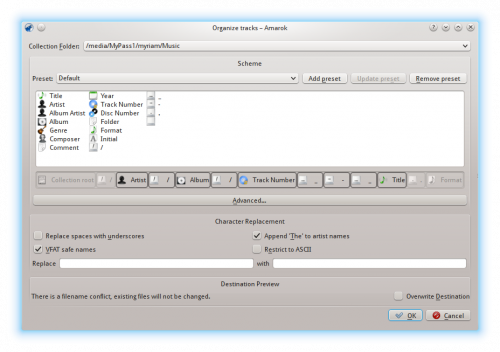
After clicking on the button on top of the screen, the following interface will show:

Contents
| Interface Item | Description |
|---|---|
| The default collection folder. Set multiple folders in . | |
| Token Bar | Drag and drop multiple tokens here to change the naming scheme of your media files. Only available in view. |
| When you have created your naming scheme, save it as a preset by clicking . Remove presets by clicking . | |
| If checked, converts spaces in filenames to underscores. | |
| If checked, artists' names starting with 'The' will instead be styled ', The'. | |
| If checked, replaces characters that are incompatible with MS-DOS or VFAT file systems with underscores. Most people can leave this option enabled. | |
| If checked, all non-ASCII characters will be replaced with underscores. Do not check this option if you have non-English characters in your tags. Most people can leave this option unchecked. | |
| Custom Character Replacement | Replace the tag expressions you write under the box with character strings you write in the box. Useful if there are mis-spellings in CDDB. |
| Shows the original naming scheme of your media files and how they will look after the changes are applied (not available since ver. 2.4.2). | |
| If checked, overwrites files of the same name without asking for further confirmation (not available since ver. 2.4.2). |
Advanced Contents
The code version of the Token Bar, which allows you to code the name format of media files. Activate it by pressing in the interface menu. To change back click .
Enclose conditional inclusion arguments such as CD number in braces, like this:
%artist%/%album%{/Disc %discnumber%}/%track% %title%
Note: formerly, the coding was %token, as of 2.4 it is %token%.


