User:Algotruneman
Introduction:
Retired teacher (junior high science, computer skills) and technology director
AB in Biology and MEd in Educational Leadership (both from Boston University)
Member of Massachusetts Computer Using Educators (20 years as board secretary) [1]
Facilitator for the FLOSS special interest group of MassCUE:
Involved:
Sub Pages:
Tools for use in upcoming pages: [ToolsToUse]
Subpages of User:Algotruneman
KRDC
| Desktop Sharing Client - Use this tool to connect your computer to a the desktop of another computer to provide assistance or do work remotely |
Krdc is one of a pair of KDE programs (Krfb is the other) that let you share your desktop through the local network with another user, probably somebody like the tech downstairs who you want to help you. Sharing your desktop can let her help you figure out something you are having trouble with. You can call the tech on the phone and be talking with her while she assists you. The tech can even "drive" your computer if you decide to let that happen.
KRDC is a client program. It must be matched by a server or "host" program that is running on another computer. In this explanation, we will use the terms "guest" and "host":
- guest for the machine and user that is remote who you want to invite
- host for the machine and you as the one who is sharing your desktop
You will also need to refer to the Krfb Page to make complete sense of the Krfb/Krdc process.
This explanation is, therefore, from the perspective of the technician who is going to work remotely as the "guest".
Steps to Connect
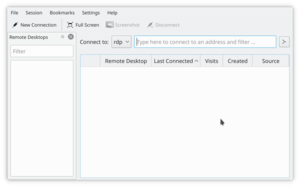
The native protocol of the Krbf/Krdc connection is VNC.
You will note that you, as a guest technician, can provide assistance to many different operating systems because the VNC protocol is widely used for desktop sharing. You are not limited to working with remote host KDE desktops.
- Start Krdc (Kickoff button -> Applications -> Internet -> Krdc)
- Type in the address of the host computer (VNC protocol) (Please use the address sent from the host. These are just examples.)
- Krfb(KDE3)--192.168.1.102:0 (identify the screen number after the colon)
- Krbf(KDE4)--192.168.1.102:5900 (identify the port after the colon)
- Gnome (TigerVNC)--192.168.1.102 (the port number is assumed)
- Type the password that the host requires
- Adjust the screen to better fit (Session -> Scale remote screen...)
- When your mouse is within the window limits from the host, you can control the remote computer if that ability was set at the host (recommended).
- The guest screen (running Krdc) will show the pointer of the host if you select Session->Show local cursor, otherwise, the only evidence of the position of the host mouse pointer (as shown on the guest screen) is the hover effects.
| Remote host pointer on guest screen |
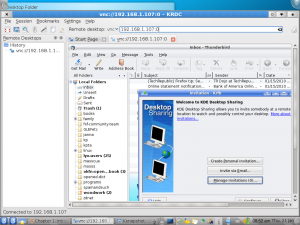
You can see the scroll bars around the screen image of the remote host. This may be the point where you adjust the scale (Session -> Scale remote screen...)
If you do not successfully connect to the host computer it may mean a mistake in typing the address, but if the host is running a firewall, that will block your connection with only a "Server not found" message. The port for the VNC protocol must be opened on the host computer. It may work out for the best if the technician does the initial setup of both computers, after which the host user just needs to click the appropriate sharing option when making the help call.
You can bookmark a connection on the Krdc "guest" to save time with repeat tech help calls. You'll need to enter the new password for each desktop sharing session.
You will not want to use KWallet password manager with Krdc since the password for each desktop sharing session is unique.
Krdc isn't the typical way to administer a dedicated server because it is recommended that servers run without a GUI desktop. Server administrators are urged to use command line and the secure SSH protocol.
Krfb
| Desktop Sharing Server - Use this tool to share your desktop with a remote guest user |
Krfb is one of a pair of KDE programs (Krdc is the other) that let you share your desktop through the local network with another user, probably somebody like the tech downstairs who you wants to help you figure out how to do something you are having trouble with. You can call the tech on the phone and be talking with her while she assists you. The tech can even "drive" your computer if you decide to let that happen.
Krfb is a server program. It must be matched by a client or "guest" program that is running on another computer. In this explanation, we will use the terms:
- guest for the machine and user that is remote who you want to invite
- host for the machine and you as the one who is sharing your desktop
You will also need to refer to the Krdc Page to make complete sense of this explanation.
This explanation is, therefore, from the perspective of the "host" person, sharing out, who wants help from a technician/friend and invites them to work remotely as the "guest".
Steps to Connect Using Personal Invitation
- Start Krfb: K Menu (Kickoff) -> Applications -> Internet -> Desktop Sharing (Krfb)
- Call the guest/tech/friend you want to invite.
- Click the "New Personal Invitation" button
- Tell the guest the address of your computer which is shown in the Krfb window. (Mention the need for the port number which is required by Krfb)
- Carefully tell the guest the password, emphasizing the capital and lower case letters and the dash.
- When the guest enters the correct password you will see a popup window in which you can approve the connection by clicking appropriate button. (You can really wreck your relationship with the tech, by rejecting the connection, but that wouldn't be too good.)
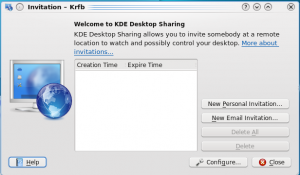
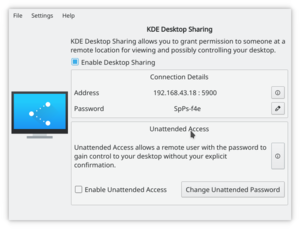
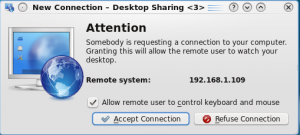
Once the connection is established, you and the tech can continue to talk while either you or the guest control your computer. You or the guest tech can launch programs, minimize/restore windows, change settings, anything that you could try to do alone on your own. Because the tech is watching your screen, it will be easier to see if you missed a step or made a wrong choice. When you have the choice, make menu selections with the mouse instead of using keyboard shortcuts. The guest cannot see your keyboard or your fingers as you type, but will be able to watch as your mouse pointer moves around the screen.
Connecting using Email Option
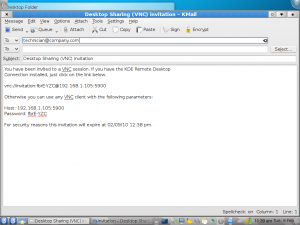
Krfb also lets you send your guest an email which will include the address and password. Remember that email isn't normally encrypted. The password will be in open text on the network. Once your guest gets the email, she will be able to use Krdc to connect to your hosting computer. The guest tech or friend must be ready to receive the email invitation. Like the personal invitation, the invitation is open just for an hour.
Note that closing the Krfb window using the "close" button does NOT stop Krfb. It continues to run as a background task. Make sure to notice the icon in the system tray, typically near the right end of the panel, When you are ready to quit sharing, right click the Krfb icon in the panel and choose the quit option. Do not try to restart Krfb through the K menu. You'll just launch another instance of the program, not connect to the one that is already running. More than one Krfb instance can make things very confusing.

When you quit Krfb completely, the connection to your guest will be broken.
Notes:
- If you have an active firewall running on the "host" machine, you will need to open port 5900. If a firewall is blocking port 5900, the process of sharing at the host end will appear to work fine, but the guest will get a message saying the server wasn't found. It is difficult to determine whether the connection failed because of a mistyped address or a firewall. It may make sense to plan ahead and have your first sharing session with the tech in the same room with you. You and she can work through any difficulties about the connection and then do help sessions remotely after that.
- If you close the Krfb window, it does NOT stop the program. To quit Krfb, right click the program's icon in the system tray and choose the option to quit.
- Turning off your host computer does NOT stop Krfb. It will pop up at the next restart. You must quit through the system tray icon.
- Though it is possible to use Krfb/Krdc across the Internet, cable modem/routers at the host "end" must be set to forward port 5900 and there are similar issues trying to cross corporate firewalls.
- About information (version, etc.) is found by right clicking the system tray Krfb icon.
- If the guest user clicks the print screen key, the screen capture tool Ksnapshot will launch on both guest and host.
- The VNC protocol does NOT enable file sharing between guest and host. You will need to transfer files saved on either computer by some other method.
Color Picker Plasmoid
| Color Picker Plasmoid - Use this tool to capture the color of something on your screen |
When you are working inside a graphic program, there is typically a tool for selecting the color of a piece of the graphic open in the program. Gimp has such a tool, for example. But if you are working in a browser and want to know about a color you find on a Web page, you'll need to use the Color Picker plasmoid.
[Use the standard directions for adding a plasmoid/widget]
Like all plasmoids, you can set this one to be bigger or smaller, though it does not shrink smaller than the sizes of the icons which make up the Color Picker because they have a fixed size.
To choose a color, click the upper icon which represents a small dropper. A cross-hairs appears on the screen. Move it around with your mouse/touchpad until the cross-hairs centers on the color for which you want information. Click the left mouse button to "select" the color.
The color you clicked is put into the lower circle icon of the plasmoid as a visible color patch. It also is recorded in the plasmoid history (see that history by clicking the plasmoid's color circle).
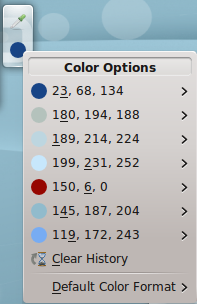
If you slide the mouse pointer down the list of colors and hover over the color which interests you, you'll see it listed in a variety of formats. For most users, the default decimal values will be the most useful. You can change the default format to your preferences.
Of course, if you are color blind, you'll still have trouble, sorry.
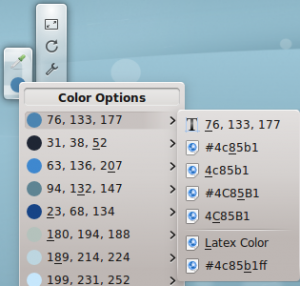
Let's say I wanted to pick a screen color to use in a Gimp image. I'd pick the color with Color Picker, then choose the HTML coding format #bac4bd by clicking the picker's color circle and then clicking the desired format which also puts the color choice into the system clipboard. Finally, I would switch to my open Gimp image and click on the the foreground color tool and paste the color into the dialog blank. Gimp's default color format is the HTML format known as hexadecimal. The application you use may need a different format. In the worst case situation, you can retype the numbers in blanks when the application gives you a separate blank for each of the decimal values for red, green and blue (RGB) 186, 196, 189.


