Archive:Kdenlive/Manual/Capturing/ko: Difference between revisions
Created page with "* ''연결 버튼''을 클릭 File:Kdenlive Connect firewire button.png" |
Updating to match new version of source page |
||
| (2 intermediate revisions by 2 users not shown) | |||
| Line 1: | Line 1: | ||
<languages/> | <languages/> | ||
== 동영상 | == 동영상 캡처 == | ||
{{Note|인력 부족으로 KDE 5로 | {{Note|인력 부족으로 KDE 5로 이식하는 과정에서 Firewire 및 웹캠 캡처 기능 등이 삭제되었습니다.}} | ||
'''Kdenlive'''는 Firewire, FFmpeg, | '''Kdenlive'''는 Firewire, FFmpeg, 화면 캡처 및 Blackmagic 등 외부 장치에서 동영상을 캡처할 수 있습니다. | ||
<menuchoice>설정 -> Kdenlive 설정 -> 캡처</menuchoice>에서 비디오 캡처 설정을 변경할 수 있습니다([[Special:myLanguage/Kdenlive/Manual/Settings_Menu/Configure_Kdenlive#캡처|더 알아보기]]). | |||
<menuchoice>설정 -> Kdenlive 설정 -> 환경 -> 기본 폴더</menuchoice>에서 캡처 저장 기본 위치를 설정할 수 있습니다([[Special:myLanguage/Kdenlive/Manual/Settings_Menu/Configure_Kdenlive#기본 폴더|더 알아보기]]). | |||
비디오를 캡처하려면 [[Special:myLanguage/Kdenlive/Manual/Monitors#녹화 모니터|녹화 모니터]]를 선택하고 오른쪽 아래 드롭다운 목록에서 캡처 장치를 선택하십시오. | |||
[[File:Kdenlive Capture video1.png|500px]] | [[File:Kdenlive Capture video1.png|500px]] | ||
| Line 15: | Line 15: | ||
=== Firewire === | === Firewire === | ||
이 옵션은 최신 Kdenlive 버전에서 사용할 수 없습니다. Firewire에서 비디오를 캡처하려면 dvgrab 유틸리티를 터미널에서 직접 호출하십시오. | |||
Firewire(IEEE1394, i.Link로도 알려짐)로 연결된 외부 장치로부터 비디오를 캡처합니다. 이 기능은 [http://linux.die.net/man/1/dvgrab dvgrab] 프로그램을 사용하며 <menuchoice>설정 -> Kdenlive 설정</menuchoice>에서 변경할 수 있습니다. [[Kdenlive/Manual/Settings_Menu/Configure_Kdenlive#Firewire_캡처_설정|더 알아보기]]. | |||
캡처를 수행하려면: | 캡처를 수행하려면: | ||
| Line 23: | Line 23: | ||
* 장치를 Firewire 카드에 연결하고 재생 모드로 켭니다 | * 장치를 Firewire 카드에 연결하고 재생 모드로 켭니다 | ||
* ''연결 | * ''연결 단추'' [[File:Kdenlive Connect firewire button.png]]를 클릭합니다 | ||
* | * 녹화 단추를 클릭하면 녹화하는 동안 회색으로 전환됩니다 | ||
* | * 녹화 단추를 다시 클릭하면 캡처를 중단합니다. 정지 단추를 눌러도 됩니다. | ||
* | * 캡처가 완료되었으면 연결 해제 단추 [[File:Kdenlive Disconnect capture.png]]를 클릭하십시오 | ||
* | * ''캡처된 파일'' 대화 상자에서 가져오기 단추를 클릭하면 캡처된 파일을 프로젝트 보관함으로 가져옵니다. | ||
[[File:Kdenlive Captured files dialog.png]] | [[File:Kdenlive Captured files dialog.png]] | ||
{{Note| | {{Note|녹화 단추를 클릭했을 때 원본 장치 재생이 시작되지 않았다면 장치에서 직접 재생을 시작한 후 녹화 단추를 클릭하십시오.}} | ||
=== FFmpeg === | === FFmpeg === | ||
''Video4Linux2''를 사용하는 웹캠에서 비디오를 캡처할 수 있습니다. | |||
<span id="Screen_Grab"></span> | |||
=== 화면 녹화 === | === 화면 녹화 === | ||
PC 화면에 표시된 내용을 녹화합니다. 0.9.2 버전에서는 ''recordMyDesktop''으로 화면을 녹화합니다. 0.9.2 버전에는 알려진 문제가 있습니다. 버그 트래커 ID [http://www.kdenlive.org/mantis/view.php?id=2643 2643]을 참조하십시오. | |||
0.9.3에서는 ''ffmpeg''으로 화면을 녹화합니다. 0.9.3 버전에서 화면을 녹화하려면 ''ffmpeg'' 설치본이 <code>--enable-x11grab</code> 옵션을 사용하여 컴파일되어 있어야 합니다. 우분투의 ''ffmpeg'' 패키지에는 해당 옵션이 켜져 있습니다. | |||
리눅스 배포판에서 확인해 보려면 터미널에서 <code>ffmpeg --version</code> 명령을 실행하고 <code>--enable-x11grab</code> 옵션이 있는지 확인하십시오.<ref>현재 ''ffmpeg''에는 브랜치가 두 개 있습니다: ''libav'', ffmpeg.org. ffmpeg.org 브랜치의 ''ffmpeg'' 버전은 <code>ffmpeg -version</code> 명령을 실행했을 때 설정을 표시합니다. ''Libav'' 버전은 표시하지 않습니다. 따라서 ''ffmpeg''의 ''Libav'' 버전을 사용 중이라면 이 방식으로 <code>--enable-x11grab</code> 사용 여부를 확인할 수 없습니다.</ref> | |||
만약 화면 캡처 시 X264를 사용하고 오디오를 설정한 상태로 다음 스크린샷과 같은 충돌이 발생했다면 ... | |||
[[File:Kdenlive Screen cap with audio crash.png]] | [[File:Kdenlive Screen cap with audio crash.png]] | ||
... | ... 새 오디오 캡처 프로필을 만들어서 <code>-acodec pcm_s16le</code> 대신 <code>-acodec libvorbis -b 320k</code>를 사용하십시오. [[Special:myLanguage/Kdenlive/Manual/Settings_Menu/Configure_Kdenlive#캡처|더 알아보기]]. | ||
=== Blackmagic === | === Blackmagic === | ||
Blackmagic [https://www.blackmagicdesign.com/kr/products/decklink/ DeckLink] 캡처 카드에서 캡처합니다. 이 코드의 안정성은 확신할 수 없습니다. 버그 [http://www.kdenlive.org/mantis/view.php?id=2130 2130]을 참조하십시오. | |||
=== | === 주석 === | ||
<references/> | <references/> | ||
{{Prevnext2 | {{Prevnext2 | ||
| prevpage=Special:MyLanguage/Kdenlive/Manual/Project_Menu/Render/Render_Profile_Parameters | nextpage=Special:MyLanguage/Kdenlive/Manual/CapturingAudio | | prevpage=Special:MyLanguage/Kdenlive/Manual/Project_Menu/Render/Render_Profile_Parameters | nextpage=Special:MyLanguage/Kdenlive/Manual/CapturingAudio | ||
| prevtext= | | prevtext=렌더 프로필 인자 | nexttext=오디오 캡처(더빙) | ||
| index=Special:MyLanguage/Kdenlive/Manual | indextext= | | index=Special:MyLanguage/Kdenlive/Manual | indextext=메뉴로 돌아가기 | ||
}} | }} | ||
[[Category:Kdenlive]] | [[Category:Kdenlive]] | ||
Latest revision as of 13:54, 11 August 2023
동영상 캡처
Kdenlive는 Firewire, FFmpeg, 화면 캡처 및 Blackmagic 등 외부 장치에서 동영상을 캡처할 수 있습니다.
에서 비디오 캡처 설정을 변경할 수 있습니다(더 알아보기).
에서 캡처 저장 기본 위치를 설정할 수 있습니다(더 알아보기).
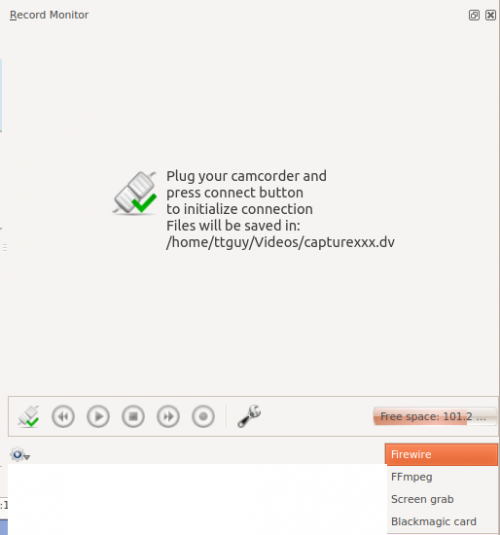
비디오를 캡처하려면 녹화 모니터를 선택하고 오른쪽 아래 드롭다운 목록에서 캡처 장치를 선택하십시오.
Firewire
이 옵션은 최신 Kdenlive 버전에서 사용할 수 없습니다. Firewire에서 비디오를 캡처하려면 dvgrab 유틸리티를 터미널에서 직접 호출하십시오.
Firewire(IEEE1394, i.Link로도 알려짐)로 연결된 외부 장치로부터 비디오를 캡처합니다. 이 기능은 dvgrab 프로그램을 사용하며 에서 변경할 수 있습니다. 더 알아보기.
캡처를 수행하려면:
- 장치를 Firewire 카드에 연결하고 재생 모드로 켭니다
- 녹화 단추를 클릭하면 녹화하는 동안 회색으로 전환됩니다
- 녹화 단추를 다시 클릭하면 캡처를 중단합니다. 정지 단추를 눌러도 됩니다.
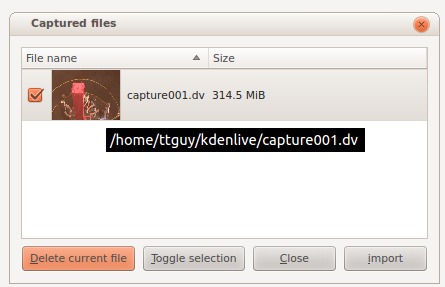
- 캡처된 파일 대화 상자에서 가져오기 단추를 클릭하면 캡처된 파일을 프로젝트 보관함으로 가져옵니다.
FFmpeg
Video4Linux2를 사용하는 웹캠에서 비디오를 캡처할 수 있습니다.
화면 녹화
PC 화면에 표시된 내용을 녹화합니다. 0.9.2 버전에서는 recordMyDesktop으로 화면을 녹화합니다. 0.9.2 버전에는 알려진 문제가 있습니다. 버그 트래커 ID 2643을 참조하십시오.
0.9.3에서는 ffmpeg으로 화면을 녹화합니다. 0.9.3 버전에서 화면을 녹화하려면 ffmpeg 설치본이 --enable-x11grab 옵션을 사용하여 컴파일되어 있어야 합니다. 우분투의 ffmpeg 패키지에는 해당 옵션이 켜져 있습니다.
리눅스 배포판에서 확인해 보려면 터미널에서 ffmpeg --version 명령을 실행하고 --enable-x11grab 옵션이 있는지 확인하십시오.[1]
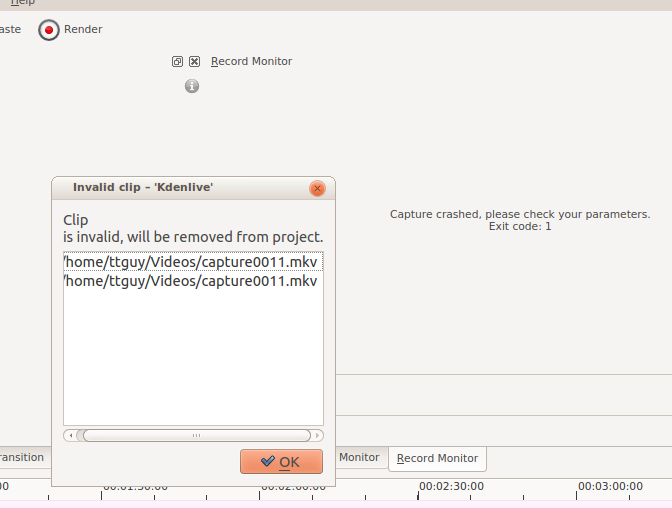
만약 화면 캡처 시 X264를 사용하고 오디오를 설정한 상태로 다음 스크린샷과 같은 충돌이 발생했다면 ...
... 새 오디오 캡처 프로필을 만들어서 -acodec pcm_s16le 대신 -acodec libvorbis -b 320k를 사용하십시오. 더 알아보기.
Blackmagic
Blackmagic DeckLink 캡처 카드에서 캡처합니다. 이 코드의 안정성은 확신할 수 없습니다. 버그 2130을 참조하십시오.
주석
- ↑ 현재 ffmpeg에는 브랜치가 두 개 있습니다: libav, ffmpeg.org. ffmpeg.org 브랜치의 ffmpeg 버전은
ffmpeg -version명령을 실행했을 때 설정을 표시합니다. Libav 버전은 표시하지 않습니다. 따라서 ffmpeg의 Libav 버전을 사용 중이라면 이 방식으로--enable-x11grab사용 여부를 확인할 수 없습니다.


