Archive:Kdenlive/Manual/Titles/zh-tw: Difference between revisions
Created page with "右鍵點擊專案上字幕,然後選擇<menuchoice>Clip properties</menuchoice>." |
Updating to match new version of source page |
||
| (10 intermediate revisions by 2 users not shown) | |||
| Line 1: | Line 1: | ||
<languages/> | <languages/> | ||
<span id="Titles"></span> | |||
== 字幕 == | == 字幕 == | ||
<div class="mw-translate-fuzzy"> | |||
字幕是可以加到時間軸上的文字。出現在任何短片之上。字幕新建於專案樹,可像短片一樣拉到時間軸。 | 字幕是可以加到時間軸上的文字。出現在任何短片之上。字幕新建於專案樹,可像短片一樣拉到時間軸。 | ||
</div> | |||
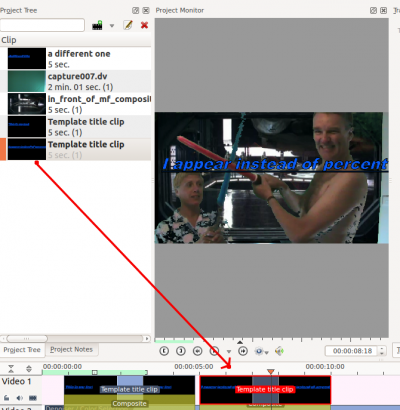
If you want titles to overlay other footage, you put title clips on video track 1 and have the other footage on video track 2. You also need to retain the affine transition that is automatically added to the title clips if you want the footage visible underneath. | |||
<div class="mw-translate-fuzzy"> | |||
要做一個新字幕,您可選擇 <menuchoice>Add Title Clip</menuchoice> ,從 [[Special:myLanguage/Kdenlive/Manual/Project_Menu|Project Menu]] 或從右鍵開窗[[Special:myLanguage/Kdenlive/Manual/Projects_and_Files/Project_Tree|Project Tree]] | 要做一個新字幕,您可選擇 <menuchoice>Add Title Clip</menuchoice> ,從 [[Special:myLanguage/Kdenlive/Manual/Project_Menu|Project Menu]] 或從右鍵開窗[[Special:myLanguage/Kdenlive/Manual/Projects_and_Files/Project_Tree|Project Tree]] | ||
</div> | |||
<span id="How to Save a Title"></span> | <span id="How to Save a Title"></span> | ||
<span id="How_to_Save_a_Title"></span> | |||
=== 如何存字幕=== | === 如何存字幕=== | ||
<div class="mw-translate-fuzzy"> | |||
從這裏[[Special:myLanguage/Kdenlive/Manual/Projects_and_Files/Project_Tree|Project Tree]] 點擊兩下開啟一段字幕,或是按右鍵開窗選 <menuchoice>Clip Properties</menuchoice>. | 從這裏[[Special:myLanguage/Kdenlive/Manual/Projects_and_Files/Project_Tree|Project Tree]] 點擊兩下開啟一段字幕,或是按右鍵開窗選 <menuchoice>Clip Properties</menuchoice>. | ||
</div> | |||
[[File:Title_clip_in_proj_tree.png|center|100px]] | [[File:Title_clip_in_proj_tree.png|center|100px]] | ||
| Line 20: | Line 30: | ||
| Title Editor Toolbar when title editor is wide enough for the whole toolbar to display.<br />The toolbar items are: '''Selection Tool''', '''Add Text''', '''Add Rectangle''', '''Add Image''', '''Open Document''', '''Save As''' | | Title Editor Toolbar when title editor is wide enough for the whole toolbar to display.<br />The toolbar items are: '''Selection Tool''', '''Add Text''', '''Add Rectangle''', '''Add Image''', '''Open Document''', '''Save As''' | ||
|} | |} | ||
或是選 <menuchoice>Save as</menuchoice> ,從功能列的子功能列裏可以發現<menuchoice>>></menuchoice> 按鍵 - 請看圖示 | 或是選 <menuchoice>Save as</menuchoice> ,從功能列的子功能列裏可以發現<menuchoice>>></menuchoice> 按鍵 - 請看圖示 | ||
| Line 32: | Line 43: | ||
字幕會存成副檔名為 <tt>.kdenlivetitle</tt> 型態的文件。 | 字幕會存成副檔名為 <tt>.kdenlivetitle</tt> 型態的文件。 | ||
<span id="How to Load a Title"></span> | <span id="How to Load a Title"></span> | ||
<span id="How_to_Load_a_Title"></span> | |||
=== 如何載入一段字幕 === | === 如何載入一段字幕 === | ||
| Line 40: | Line 52: | ||
點擊 '''Open Document''' 按鍵,位於字幕編輯器的功能列。或選 '''Open document''' 從<menuchoice>>></menuchoice> 清單,然後載入一個之前存檔過的字幕。 | 點擊 '''Open Document''' 按鍵,位於字幕編輯器的功能列。或選 '''Open document''' 從<menuchoice>>></menuchoice> 清單,然後載入一個之前存檔過的字幕。 | ||
<span id="How_to_edit_an_existing_title"></span> | |||
=== 如何編輯一個現行的字幕 === | === 如何編輯一個現行的字幕 === | ||
右鍵點擊專案上字幕,然後選擇<menuchoice>Clip properties</menuchoice>. | 右鍵點擊專案上字幕,然後選擇<menuchoice>Clip properties</menuchoice>. | ||
<span id="Template Titles - User Defined"></span> | <span id="Template Titles - User-Defined"></span> | ||
=== | <span id="Template_Titles_-_User-Defined"></span> | ||
=== 樣本字幕 - 使用者自訂 === | |||
''Template Titles'' | ''Template Titles'' 允許您對專案中的字幕產生樣板。您在專案中使用樣板可以重覆使用它。假如您想換字幕的外觀,只要換樣板就能把所用使用此樣板的字幕都置換掉外觀。 | ||
''' | '''新建一個樣板字幕''' | ||
Choose <menuchoice>Add Title Clip</menuchoice> from the <menuchoice>Add Clip</menuchoice> drop down and create a title with the text ''%s'' in it and | Choose <menuchoice>Add Title Clip</menuchoice> from the <menuchoice>Add Clip</menuchoice> drop down and create a title with the text ''%s'' in it and formatted how you desire it. Save this title as described above. | ||
[[File:Template_title1.png|center|250px]] | [[File:Template_title1.png|center|250px]] | ||
| Line 58: | Line 72: | ||
Choose <menuchoice>Add Template Title</menuchoice> from the <menuchoice>Add Clip</menuchoice> drop down and choose the title with the ''%s'' in it that you just saved. | Choose <menuchoice>Add Template Title</menuchoice> from the <menuchoice>Add Clip</menuchoice> drop down and choose the title with the ''%s'' in it that you just saved. | ||
Right click this clip in the | Right-click this clip in the Project Tree and select <menuchoice>Clip Properties</menuchoice>, | ||
[[File:Title_clip_properties.png|center|200px]] | [[File:Title_clip_properties.png|center|200px]] | ||
Enter the text that this title should display into the text field in the dialog that appears | Enter the text that this title should display into the text field in the dialog that appears. | ||
[[File:Title_template2.png|center|250px]] | [[File:Title_template2.png|center|250px]] | ||
| Line 72: | Line 86: | ||
[[File:Title_template3.png|400px]] | [[File:Title_template3.png|400px]] | ||
A known issue with template titles is that text centering | A known issue with template titles is that text centering does not work correctly for text replacing the %s - see [http://kdenlive.org/forum/title-template-aligning-doesnt-work this] forum post. | ||
=== Template Titles - Built In === | === Template Titles - Built In === | ||
| Line 80: | Line 94: | ||
[[File:Kdenlive_Template_Title1.png|700px]] | [[File:Kdenlive_Template_Title1.png|700px]] | ||
To install more built in title templates choose [[Kdenlive/Manual/Settings_Menu/Download_New_Title_Templates|Download New Title Templates]] from the <menuchoice>Settings</menuchoice> menu. | To install more built-in title templates choose [[Kdenlive/Manual/Settings_Menu/Download_New_Title_Templates|Download New Title Templates]] from the <menuchoice>Settings</menuchoice> menu. | ||
The .kdenlivetitle files that supply these templates are installed to /usr/share/kde4/apps/kdenlive/titles/ | |||
=== Import an Image into the title === | === Import an Image into the title === | ||
On the Toolbar overflow menu ('''>>''') shown in the picture below the second menu item - (labeled only with <keycap>Alt + I</keycap> in ver 0.9.2 - fixed in ver 0.9.4)- is the '''Add Image''' Button. Selecting this brings up a file chooser where you can choose an image to be inserted into your title. | On the Toolbar overflow menu ('''>>''') shown in the picture below, the second menu item - (labeled only with <keycap>Alt + I</keycap> in ver 0.9.2 - fixed in ver 0.9.4) - is the '''Add Image''' Button. Selecting this brings up a file chooser where you can choose an image to be inserted into your title. | ||
[[File:Kdenlive_Add_image_to_title.png]] | [[File:Kdenlive_Add_image_to_title.png]] | ||
| Line 90: | Line 106: | ||
=== Draw Rectangle Toolbar Item === | === Draw Rectangle Toolbar Item === | ||
The 1st menu item shown in the picture above - (labeled only with <keycap>Alt + R</keycap> in ver 0.9.2 - fixed in ver 0.9.4) is the '''Add Rectangle''' button. After selecting this | The 1st menu item shown in the picture above - (labeled only with <keycap>Alt + R</keycap> in ver 0.9.2 - fixed in ver 0.9.4) - is the '''Add Rectangle''' button. After selecting this, drag the mouse to draw a rectangle. Use the rectangle toolbar (shown below) to change the fill color, border color and border width of the rectangle. | ||
[[File:Kdenlive_Alt-R_title_menu.png]] | [[File:Kdenlive_Alt-R_title_menu.png]] | ||
| Line 110: | Line 126: | ||
[[File:Scrolling titles.png]] | [[File:Scrolling titles.png]] | ||
The above title | The text in the above title scrolls up the screen. It is as if the camera starts on the "start rectangle" and then pans down to the "end rectangle" | ||
To make the text scroll faster change the duration field highlighted in red in the image above to a smaller value. To make the text scroll slower change the duration to a larger value. | To make the text scroll faster, change the duration field highlighted in red in the image above to a smaller value. To make the text scroll slower, change the duration to a larger value. | ||
Note: changing the length of the title clip on the | Note: changing the length of the title clip on the timeline does not change the scrolling speed. If the length of the clip on the timeline is longer than the duration specified in the title editor, the titles will pause on the screen between the time the title's duration expires until the end of the clip. | ||
If the length of the clip on the | If the length of the clip on the timeline is shorter than the duration specified in the title editor, the scrolling will not complete before the title clip finishes. | ||
Note: the above description of title behaviour with respect to duration only applies to titles that don't get edited after they have been placed on the timeline. If you expand the length of a title clip on the timeline and then edit the title (by double-clicking it in the Project Tree), its apparent duration will become the length that it currently has on the timeline (i.e., the scrolling will not pause at the end anymore) but the duration displayed in the title editor will not have changed. | |||
=== To make the title scroll Horizontally === | === To make the title scroll Horizontally === | ||
| Line 124: | Line 142: | ||
=== How to fade titles in and/or out === | === How to fade titles in and/or out === | ||
To make titles fade in and out you modify the transition | To make titles fade in and out, you modify the transition which gets automatically added between the title and the track below. The modifications consist of adding keyframes into the transition and adjusting the opacity of the transitions at these keyframes. In version 0.9.3 it is an [[Special:MyLanguage/Kdenlive/Manual/Transitions/Affine|affine]] transition that is automatically added between the title and the track below. In ver 0.9.2 it is a [[Special:MyLanguage/Kdenlive/Manual/Transitions/Composite|composite]] transition. | ||
In the image below we have | In the image below we have four keyframes (labeled 1 to 4). The first keyframe is the one currently displayed and we can see that the opacity on this keyframe is zero. The opacity at keyframes 2 and 3 is 100%. The opacity at the 4th keyframe is zero percent. The overall effect is that the title fades in between keyframe 1 and keyframe 2. And then it fades out between keyframe 3 and keyframe 4 . | ||
[[File:Kdenlive Fade titles anotated.png]] | [[File:Kdenlive Fade titles anotated.png]] | ||
| Line 134: | Line 152: | ||
To create a title sequence like this ... | To create a title sequence like this ... | ||
{{# | {{#ev:youtube|IIV87bFjfo0}} | ||
you put three titles on three different tracks but you make all three affine transitions go to the same empty video track (instead of the tracks directly below them, which is the default). See timeline screenshot below. | |||
[[File:Kdenlive 3 fade in titles.png ]] | [[File:Kdenlive 3 fade in titles.png ]] | ||
=== FAQ === | === FAQ === | ||
Q: How to duplicate a title clip to modify it slightly | Q: How to duplicate a title clip to modify it slightly. | ||
A: You can save a copy of the title (see [[Special:MyLanguage/Kdenlive/Manual/Titles#How_to_Save_a_Title|How to Save a Title]]) and then create a new title based on that saved version as described [[Special:MyLanguage/Kdenlive/Manual/Titles#How_to_Load_a_Title|above]], Or you could use the [[Special:MyLanguage/Kdenlive/Manual/Titles#Template_Titles_-_User_Defined|template titles]] functionality to base the two slightly different titles on the one template. | A: You can save a copy of the title (see [[Special:MyLanguage/Kdenlive/Manual/Titles#How_to_Save_a_Title|How to Save a Title]]) and then create a new title based on that saved version as described [[Special:MyLanguage/Kdenlive/Manual/Titles#How_to_Load_a_Title|above]], Or you could use the [[Special:MyLanguage/Kdenlive/Manual/Titles#Template_Titles_-_User_Defined|template titles]] functionality to base the two slightly different titles on the one template. | ||
Latest revision as of 14:52, 11 August 2023
字幕
字幕是可以加到時間軸上的文字。出現在任何短片之上。字幕新建於專案樹,可像短片一樣拉到時間軸。
If you want titles to overlay other footage, you put title clips on video track 1 and have the other footage on video track 2. You also need to retain the affine transition that is automatically added to the title clips if you want the footage visible underneath.
要做一個新字幕,您可選擇 ,從 Project Menu 或從右鍵開窗Project Tree
如何存字幕
從這裏Project Tree 點擊兩下開啟一段字幕,或是按右鍵開窗選 .

點擊 ,位於功能列上的按鍵。
| Title Editor Toolbar when title editor is wide enough for the whole toolbar to display. The toolbar items are: Selection Tool, Add Text, Add Rectangle, Add Image, Open Document, Save As |
或是選 ,從功能列的子功能列裏可以發現 按鍵 - 請看圖示
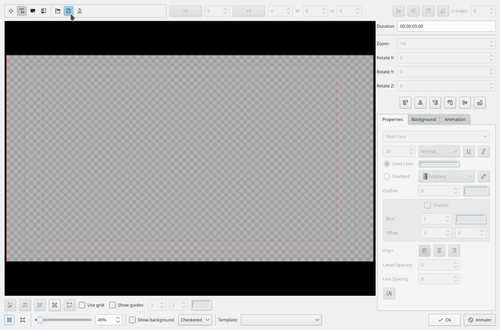 |
| Title Editor Toolbar 當字幕編輯器不夠寬時,導致整個工具列沒法全秀出來。這些沒有秀出來的項目可以經由 按鍵來顯現在工具列的下面。 |
選一個位置來存放目錄。
字幕會存成副檔名為 .kdenlivetitle 型態的文件。
如何載入一段字幕
選 從 Add Clip 的下拉選單 (看圖)
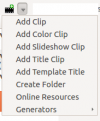
點擊 Open Document 按鍵,位於字幕編輯器的功能列。或選 Open document 從 清單,然後載入一個之前存檔過的字幕。
如何編輯一個現行的字幕
右鍵點擊專案上字幕,然後選擇.
樣本字幕 - 使用者自訂
Template Titles 允許您對專案中的字幕產生樣板。您在專案中使用樣板可以重覆使用它。假如您想換字幕的外觀,只要換樣板就能把所用使用此樣板的字幕都置換掉外觀。
新建一個樣板字幕
Choose from the drop down and create a title with the text %s in it and formatted how you desire it. Save this title as described above.
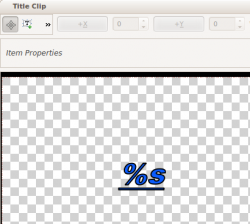
To use the template title
Choose from the drop down and choose the title with the %s in it that you just saved.
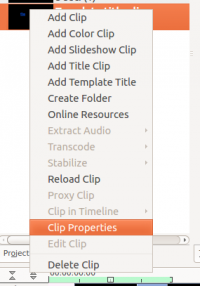
Right-click this clip in the Project Tree and select ,
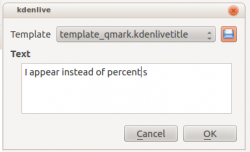
Enter the text that this title should display into the text field in the dialog that appears.
Drag the title to the timeline.
The %s in the template will be replaced with the text that you enter in the .
A known issue with template titles is that text centering does not work correctly for text replacing the %s - see this forum post.
Template Titles - Built In
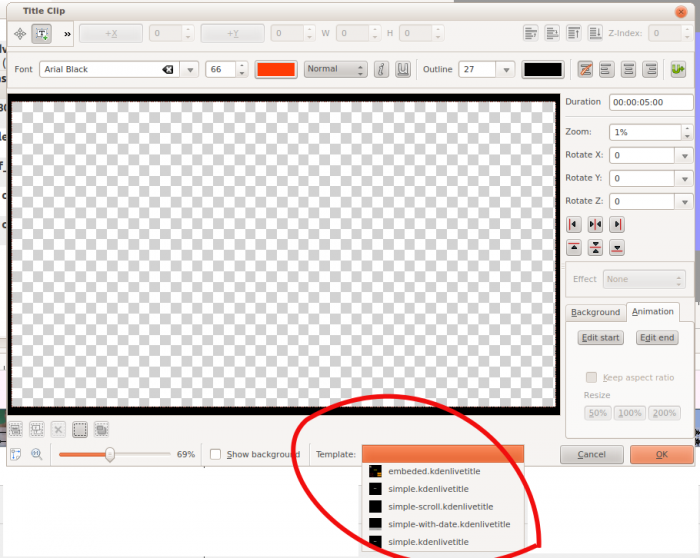
Kdenlive has some built-in title templates that can be accessed from the drop-down list found on the bottom of the Title Clip window - see below.
To install more built-in title templates choose Download New Title Templates from the menu.
The .kdenlivetitle files that supply these templates are installed to /usr/share/kde4/apps/kdenlive/titles/
Import an Image into the title
On the Toolbar overflow menu (>>) shown in the picture below, the second menu item - (labeled only with Alt + I in ver 0.9.2 - fixed in ver 0.9.4) - is the Add Image Button. Selecting this brings up a file chooser where you can choose an image to be inserted into your title.
Draw Rectangle Toolbar Item
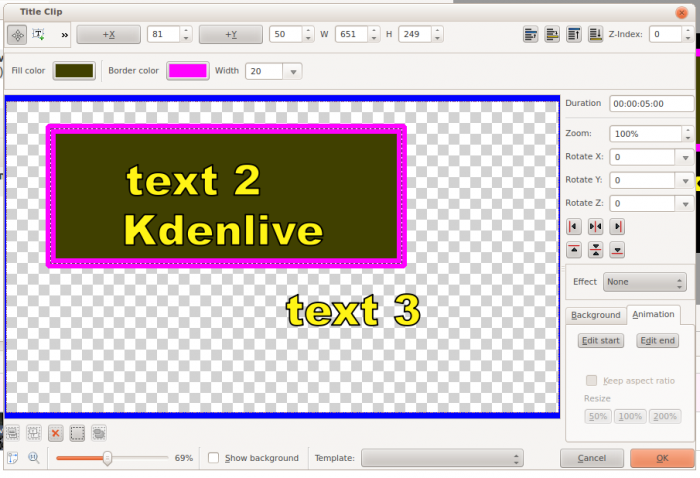
The 1st menu item shown in the picture above - (labeled only with Alt + R in ver 0.9.2 - fixed in ver 0.9.4) - is the Add Rectangle button. After selecting this, drag the mouse to draw a rectangle. Use the rectangle toolbar (shown below) to change the fill color, border color and border width of the rectangle.
The rectangles can be placed behind text by selecting them and the changing the Z-index (top right corner) to a lower value.
To make the title scroll vertically
Put a long title onto the title window. Zoom out so you can see it all. The text should run off the top (or bottom) of the viewable area.
Select the tab and click . Now drag the start rectangle to above the viewable area.
Select and drag the end rectangle to below the viewable area.
Click and preview the scrolling title.
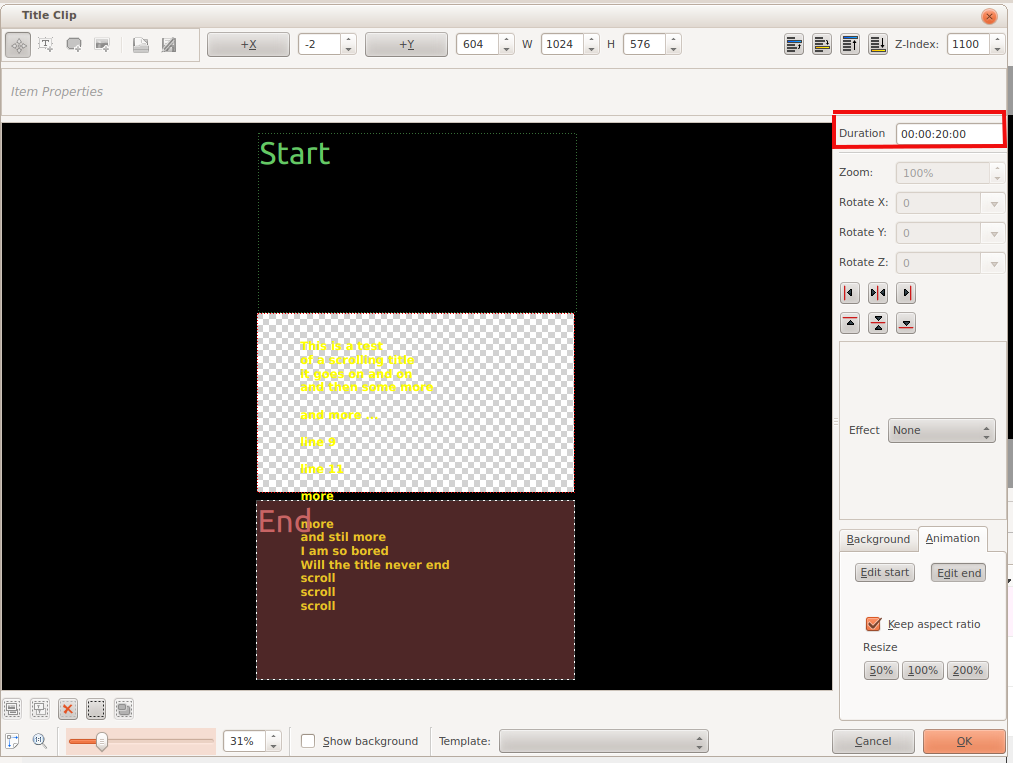
The text in the above title scrolls up the screen. It is as if the camera starts on the "start rectangle" and then pans down to the "end rectangle"
To make the text scroll faster, change the duration field highlighted in red in the image above to a smaller value. To make the text scroll slower, change the duration to a larger value.
Note: changing the length of the title clip on the timeline does not change the scrolling speed. If the length of the clip on the timeline is longer than the duration specified in the title editor, the titles will pause on the screen between the time the title's duration expires until the end of the clip.
If the length of the clip on the timeline is shorter than the duration specified in the title editor, the scrolling will not complete before the title clip finishes.
Note: the above description of title behaviour with respect to duration only applies to titles that don't get edited after they have been placed on the timeline. If you expand the length of a title clip on the timeline and then edit the title (by double-clicking it in the Project Tree), its apparent duration will become the length that it currently has on the timeline (i.e., the scrolling will not pause at the end anymore) but the duration displayed in the title editor will not have changed.
To make the title scroll Horizontally
Use the instructions for vertical scrolling - just put the start and stop rectangles off to the sides of the screen rather than the top and bottom
How to fade titles in and/or out
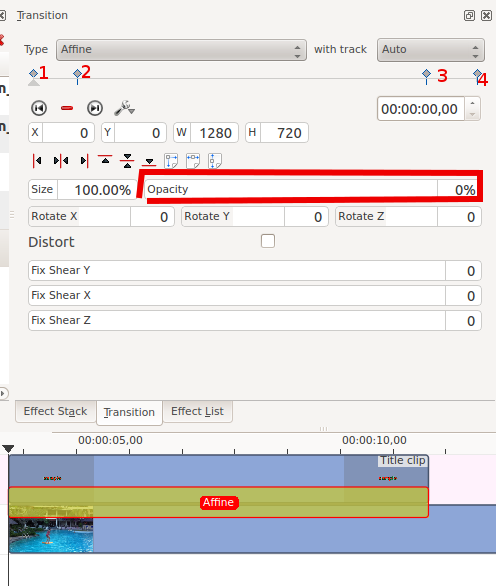
To make titles fade in and out, you modify the transition which gets automatically added between the title and the track below. The modifications consist of adding keyframes into the transition and adjusting the opacity of the transitions at these keyframes. In version 0.9.3 it is an affine transition that is automatically added between the title and the track below. In ver 0.9.2 it is a composite transition.
In the image below we have four keyframes (labeled 1 to 4). The first keyframe is the one currently displayed and we can see that the opacity on this keyframe is zero. The opacity at keyframes 2 and 3 is 100%. The opacity at the 4th keyframe is zero percent. The overall effect is that the title fades in between keyframe 1 and keyframe 2. And then it fades out between keyframe 3 and keyframe 4 .
How to fade in more than one title sequentially
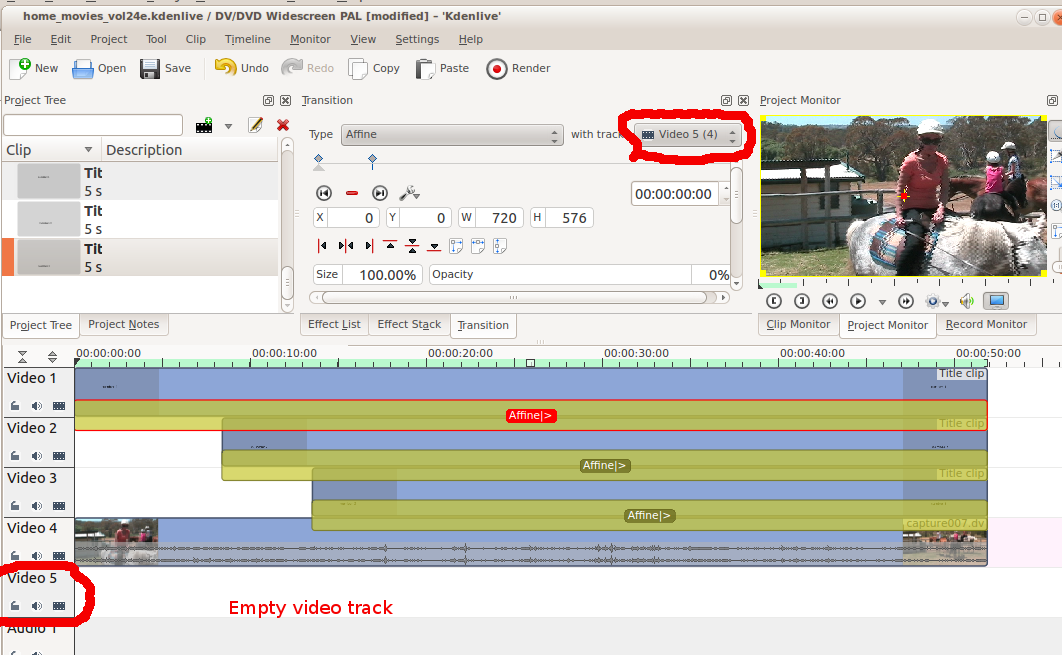
To create a title sequence like this ...
you put three titles on three different tracks but you make all three affine transitions go to the same empty video track (instead of the tracks directly below them, which is the default). See timeline screenshot below.
FAQ
Q: How to duplicate a title clip to modify it slightly.
A: You can save a copy of the title (see How to Save a Title) and then create a new title based on that saved version as described above, Or you could use the template titles functionality to base the two slightly different titles on the one template.

