KDevelop4/Manual/Plugins: Code Generation: Difference between revisions
No edit summary |
Moved title to start of page |
||
| (14 intermediate revisions by 2 users not shown) | |||
| Line 1: | Line 1: | ||
== How To == | |||
{{Construction}} | |||
=== Files organization === | === Files organization === | ||
The Code Generation plugin files are located into the [http://techbase.kde.org/KDE_System_Administration/KDE_Filesystem_Hierarchy#Directory_Tree KDE user data directory] of KDevelop | The Code Generation plugin files are located into the [http://techbase.kde.org/KDE_System_Administration/KDE_Filesystem_Hierarchy#Directory_Tree KDE user data directory] of KDevelop. | ||
Each resource has its own folder : | Each resource has its own folder : | ||
| Line 57: | Line 21: | ||
=== Creating your context === | === Creating your context === | ||
The first step is to create a new | The first step is to create a new widget with Qt Designer. | ||
{{ Info | Do not add usual dialog buttons ("Finish", "Cancel", etc.). Your widget will be inserted into a standard wizard. }} | |||
[[Image:CreateForm.png|frame|center|Creating your context as a simple Widget]] | [[Image:CreateForm.png|frame|center|Creating your context as a simple Widget]] | ||
Then add a new dynamic property called ''contextName''. Set up the value with the name of your context. | Then add a new dynamic property called '''contextName'''. Set up the value with the name of your context. | ||
{{Tip|Try to find an unique context name to avoid conflicts.}} | {{Tip|Try to find an unique context name to avoid conflicts.}} | ||
[[Image:ContextName.png|frame|center| | [[Image:ContextName.png|frame|center|Seting up the name of your context]] | ||
It's time to define your data. Add many fields into your form. Use layouts, labels and others setup tools to make your own dialog. | It's time to define your data. Add many fields into your form. Use layouts, labels and others setup tools to make your own dialog. They will do not produce any data. | ||
[[Image:ContextExample.png|frame|center|Making your own context]] | [[Image:ContextExample.png|frame|center|Making your own context]] | ||
[[ | Take care of the fields names. They will be used to generate variables in the template. | ||
[[Image:ContextVariablesNames.png|frame|center|Defining variables names]] | |||
Like previously mentionned, each kind of form field will produce a different data type: | |||
* '''name''' will be a string containing the name of the class | |||
* '''baseClasses''' will be a list of string containing the names of base classes | |||
* all '''implements*''' fields will be boolean | |||
All variables names wil be prefixed by the context name : '''MyCppClassContext.name''', '''MyCppClassContext.baseClasses''', etc. | |||
Now, you can save your context in an UI file named '''<contextName>.ui''': | |||
* codegeneration/ | |||
** templates/ | |||
** contexts/ | |||
*** MyCppClassContext.ui | |||
** generators/ | |||
=== Using data in your template === | |||
Create a simple text file '''<templateName>.tpl''': | |||
* codegeneration/ | |||
** templates/ | |||
*** MyCppClassTemplate.tpl | |||
** contexts/ | |||
*** MyCppClassContext.ui | |||
** generators/ | |||
Use data you have defined into your context : | |||
{{Input|<syntaxhighlight lang="cpp" line> | |||
#ifndef {{ MyCppClassContext.name }} | |||
#define {{ MyCppClassContext.name }} | |||
class {{ MyCppClassContext.name }} : {% for %}{% endfor %} | |||
{ | |||
} | |||
#endif // {{ MyCppClassContext.name }} | |||
</syntaxhighlight>}} | |||
== See also == | |||
{{TechbaseLink|KDevelop4/Plugins:_Code_Generation}} | |||
[[Category:Development]] | |||
Latest revision as of 19:11, 17 August 2012
How To
Files organization
The Code Generation plugin files are located into the KDE user data directory of KDevelop.
Each resource has its own folder :
- codegeneration/
- templates/
- contexts/
- generators /
Flexibility
As Code Generation plugin is very flexible, you do not need to create templates, contexts and generators for simple tasks.
You can edit a template to modify generated source code using the same contexts. If provided data are not enough, modify the context and use your new variables in your template or simply add existing contexts.
Creating your context
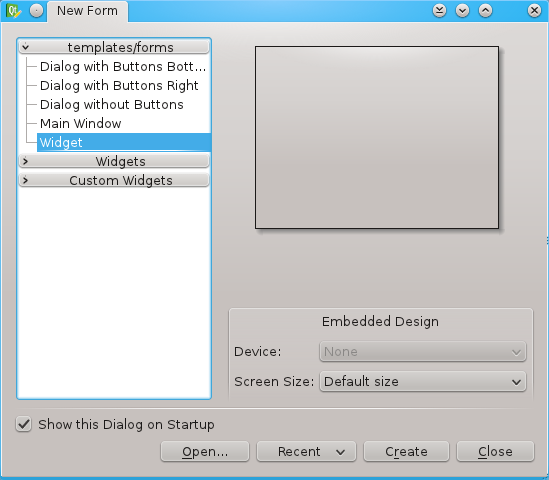
The first step is to create a new widget with Qt Designer.

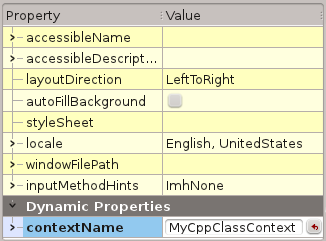
Then add a new dynamic property called contextName. Set up the value with the name of your context.

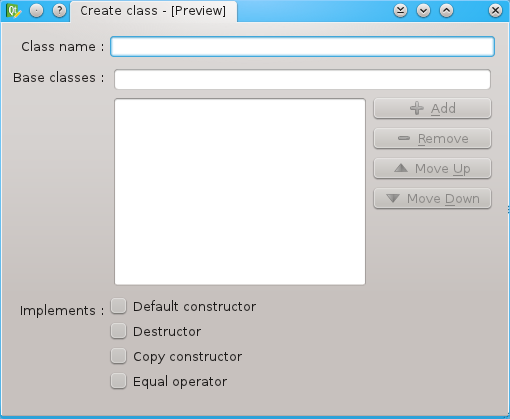
It's time to define your data. Add many fields into your form. Use layouts, labels and others setup tools to make your own dialog. They will do not produce any data.

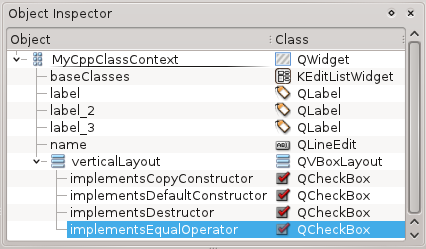
Take care of the fields names. They will be used to generate variables in the template.

Like previously mentionned, each kind of form field will produce a different data type:
- name will be a string containing the name of the class
- baseClasses will be a list of string containing the names of base classes
- all implements* fields will be boolean
All variables names wil be prefixed by the context name : MyCppClassContext.name, MyCppClassContext.baseClasses, etc.
Now, you can save your context in an UI file named <contextName>.ui:
- codegeneration/
- templates/
- contexts/
- MyCppClassContext.ui
- generators/
Using data in your template
Create a simple text file <templateName>.tpl:
- codegeneration/
- templates/
- MyCppClassTemplate.tpl
- contexts/
- MyCppClassContext.ui
- generators/
- templates/
Use data you have defined into your context :
'"`UNIQ--syntaxhighlight-00000000-QINU`"'
See also
The KDevelop4/Plugins:_Code_Generation page on Techbase.


