Translations:Kdenlive/Manual/QuickStart/13/ru: Difference between revisions
Appearance
No edit summary |
Smolyaninov (talk | contribs) No edit summary |
||
| (18 intermediate revisions by 2 users not shown) | |||
| Line 1: | Line 1: | ||
[[File:Kdenlive Quickstart-Mainwindow.png|thumb|left|400px|Окно Kdenlive | [[File:Kdenlive Quickstart-Mainwindow.png|thumb|left|400px|Окно Kdenlive с учебными клипами]] | ||
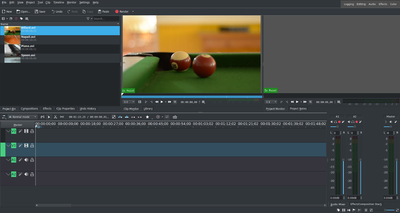
После | После добавления клипов, интерфейс '''Kdenlive''' будет выглядеть примерно так: Слева — уже знакомая нам, корзина проекта. Посередине — вкладки свойства, эффекты и переходы. Справа — мониторы для просмотра видео: монитор клипа проигрывает видео оригинального клипа, монитор проекта проигрывает обрабатываемое видео с применёнными переходами, эффектами и т.д. Внизу — монтажный стол, на котором редактируются клипы. На монтажном столе используются два типа дорожек: видео- и звуковые. На видеодорожки можно перемещать любые клипы, на звуковые дорожки тоже, но если видеоклип поместить на звуковую дорожку, будет воспроизводиться только звук. | ||
Latest revision as of 10:21, 19 November 2020

После добавления клипов, интерфейс Kdenlive будет выглядеть примерно так: Слева — уже знакомая нам, корзина проекта. Посередине — вкладки свойства, эффекты и переходы. Справа — мониторы для просмотра видео: монитор клипа проигрывает видео оригинального клипа, монитор проекта проигрывает обрабатываемое видео с применёнными переходами, эффектами и т.д. Внизу — монтажный стол, на котором редактируются клипы. На монтажном столе используются два типа дорожек: видео- и звуковые. На видеодорожки можно перемещать любые клипы, на звуковые дорожки тоже, но если видеоклип поместить на звуковую дорожку, будет воспроизводиться только звук.
