KDevelop4/Manual/Getting started: A small CMake tutorial: Difference between revisions
No edit summary |
No edit summary |
||
| Line 6: | Line 6: | ||
== Adding a file == | == Adding a file == | ||
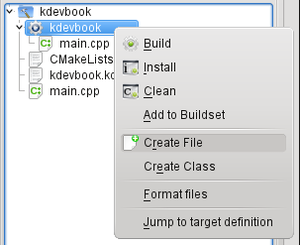
[[image:kdevelop4_target_addfile.png|thumb]] | [[image:kdevelop4_target_addfile.png|thumb|Create a File in a Target]] | ||
Right-click on the project's main target and select <menuchoice>Create File</menuchoice>. You will be asked for a filename – enter <code>helloworld.cpp</code> here and click on "OK". | Right-click on the project's main target and select <menuchoice>Create File</menuchoice>. You will be asked for a filename – enter <code>helloworld.cpp</code> here and click on "OK". | ||
| Line 13: | Line 13: | ||
The newly created file is now opened in the editor. Enter the following code and save the file: | The newly created file is now opened in the editor. Enter the following code and save the file: | ||
{{Input|void heyWorld() { | {{Input|#include <iostream> | ||
void heyWorld() { | |||
std::cout << "Hello, world!"; | std::cout << "Hello, world!"; | ||
} }} | } }} | ||
== First compilation == | |||
There are several ways to compile your program. | |||
; Target context menu | |||
: Right-click on the target you want to build and click on <menuchoice>Build</menuchoice>. | |||
; Projects Toolview button | |||
: Click on the small button with the gear on it – it has the same functionality as the menu entry in the target context menu. | |||
; Click on <menuchoice>Project -> Build Selection</menuchoice> or press <keycap>F8</keycap>. | |||
: This is still the same functionality as described above. | |||
; Click on <menuchoice>Project -> Build all Projects</menuchoice>. | |||
: This does what you expect – it builds all your projects. | |||
Now simply press <keycap>F8</keycap>. | |||
On the first pass, '''KDevelop''' calls '''CMake''' and prints its output to the ''Build Toolview'' which pops up at the bottom: | |||
{{Output|1=/home/sto/projects/kdevbook/build> /usr/bin/cmake ‐DCMAKE_BUILD_TYPE=Debug /home/sto/projects/kdevbook/ | |||
‐‐ The C compiler identification is GNU | |||
‐‐ The CXX compiler identification is GNU | |||
‐‐ Check for working C compiler: /usr/bin/gcc | |||
‐‐ Check for working C compiler: /usr/bin/gcc ‐‐ works | |||
‐‐ Detecting C compiler ABI info | |||
‐‐ Detecting C compiler ABI info ‐ done | |||
‐‐ Check for working CXX compiler: /usr/bin/c++ | |||
‐‐ Check for working CXX compiler: /usr/bin/c++ ‐‐ works | |||
‐‐ Detecting CXX compiler ABI info | |||
‐‐ Detecting CXX compiler ABI info ‐ done | |||
‐‐ Configuring done | |||
‐‐ Generating done | |||
‐‐ Build files have been written to: /home/sto/projects/kdevbook/build }} | |||
After this step, the Makefiles have been generated, and '''KDevelop''' calls <code>make</code>: | |||
{{Output|1=/home/sto/projects/kdevbook/build> make | |||
Scanning dependencies of target kdevbook | |||
[ 50%] Building CXX object CMakeFiles/kdevbook.dir/helloworld.cpp.o | |||
[100%] Building CXX object CMakeFiles/kdevbook.dir/main.cpp.o | |||
Linking CXX executable kdevbook | |||
[100%] Built target kdevbook | |||
*** Finished ***}} | |||
Congratulations, you built your first application using KDevelop! | |||
{{KDevelop4Nav|prev=Getting started|next=Getting started: Sessions and Projects}} | {{KDevelop4Nav|prev=Getting started|next=Getting started: Sessions and Projects}} | ||
Revision as of 08:02, 8 December 2010
In this chapter, you will learn how to build your CMake based project and how to add files.
If you want do get a more in-depth tutorial on CMake, see Appendix B: CMake for bigger projects.
Adding a file

Right-click on the project's main target and select . You will be asked for a filename – enter helloworld.cpp here and click on "OK".
The dialog that pops up now shows the changes that will be made to CMakeLists.txt. For now, click on "OK".
The newly created file is now opened in the editor. Enter the following code and save the file:
#include <iostream>

void heyWorld() {
    std::cout << "Hello, world!";
}
First compilation
There are several ways to compile your program.
- Target context menu
- Right-click on the target you want to build and click on .
- Projects Toolview button
- Click on the small button with the gear on it – it has the same functionality as the menu entry in the target context menu.
- Click on or press F8.
- This is still the same functionality as described above.
- Click on .
- This does what you expect – it builds all your projects.
Now simply press F8.
On the first pass, KDevelop calls CMake and prints its output to the Build Toolview which pops up at the bottom:
/home/sto/projects/kdevbook/build> /usr/bin/cmake ‐DCMAKE_BUILD_TYPE=Debug /home/sto/projects/kdevbook/
‐‐ The C compiler identification is GNU
‐‐ The CXX compiler identification is GNU
‐‐ Check for working C compiler: /usr/bin/gcc
‐‐ Check for working C compiler: /usr/bin/gcc ‐‐ works
‐‐ Detecting C compiler ABI info
‐‐ Detecting C compiler ABI info ‐ done
‐‐ Check for working CXX compiler: /usr/bin/c++
‐‐ Check for working CXX compiler: /usr/bin/c++ ‐‐ works
‐‐ Detecting CXX compiler ABI info
‐‐ Detecting CXX compiler ABI info ‐ done
‐‐ Configuring done
‐‐ Generating done
‐‐ Build files have been written to: /home/sto/projects/kdevbook/build
After this step, the Makefiles have been generated, and KDevelop calls make:
/home/sto/projects/kdevbook/build> make
Scanning dependencies of target kdevbook
[ 50%] Building CXX object CMakeFiles/kdevbook.dir/helloworld.cpp.o
[100%] Building CXX object CMakeFiles/kdevbook.dir/main.cpp.o
Linking CXX executable kdevbook
[100%] Built target kdevbook
*** Finished ***
Congratulations, you built your first application using KDevelop!

