Digikam/Versioning/uk: Difference between revisions
Created page with "Щоб переглянути всі версії певної фотографії, позначте початковий варіант у його альбомі і розго..." |
Created page with "Під час редагування фотографій у '''digiKam''', ймовірно, варто залишати початкові зображення незмінни..." |
||
| Line 3: | Line 3: | ||
Створено на основі допису у блозі Дмітрія Попова (Dmitri Popov), 28 березня 2011 року | Створено на основі допису у блозі Дмітрія Попова (Dmitri Popov), 28 березня 2011 року | ||
Під час редагування фотографій у '''digiKam''', ймовірно, варто залишати початкові зображення незмінними. Ось тут вам і допоможе можливість роботи з ''версіями''. За її допомогою ви зможете кожну з проміжних версій редагування початкового зображення як окреме зображення зі списком всіх застосованих до нього дій з редагування. | |||
The way versioning works is pretty straightforward. When you are ready to save a modified version of a photo, press the <menuchoice>Save As New Version</menuchoice> button. This saves the edited version as a separate image. Keep in mind that if you are working with a RAW file, all versions will be automatically converted to one of the supported graphics formats. By default, it’s JPEG, but you can switch to another supported format. To do this, choose <menuchoice>Settings -> Configure digiKam</menuchoice>, switch to the <menuchoice>Editing Images</menuchoice> section, and select the desired format from the <menuchoice>Save files as</menuchoice> drop-down list. To bypass the global settings, you can save a single version in a different format by clicking on the triangle and choosing the desired format from the <menuchoice>Save in Format</menuchoice> menu. | The way versioning works is pretty straightforward. When you are ready to save a modified version of a photo, press the <menuchoice>Save As New Version</menuchoice> button. This saves the edited version as a separate image. Keep in mind that if you are working with a RAW file, all versions will be automatically converted to one of the supported graphics formats. By default, it’s JPEG, but you can switch to another supported format. To do this, choose <menuchoice>Settings -> Configure digiKam</menuchoice>, switch to the <menuchoice>Editing Images</menuchoice> section, and select the desired format from the <menuchoice>Save files as</menuchoice> drop-down list. To bypass the global settings, you can save a single version in a different format by clicking on the triangle and choosing the desired format from the <menuchoice>Save in Format</menuchoice> menu. | ||
Revision as of 18:45, 29 March 2011
Робота з версіями зображень у digiKam 2
Створено на основі допису у блозі Дмітрія Попова (Dmitri Popov), 28 березня 2011 року
Під час редагування фотографій у digiKam, ймовірно, варто залишати початкові зображення незмінними. Ось тут вам і допоможе можливість роботи з версіями. За її допомогою ви зможете кожну з проміжних версій редагування початкового зображення як окреме зображення зі списком всіх застосованих до нього дій з редагування.
The way versioning works is pretty straightforward. When you are ready to save a modified version of a photo, press the button. This saves the edited version as a separate image. Keep in mind that if you are working with a RAW file, all versions will be automatically converted to one of the supported graphics formats. By default, it’s JPEG, but you can switch to another supported format. To do this, choose , switch to the section, and select the desired format from the drop-down list. To bypass the global settings, you can save a single version in a different format by clicking on the triangle and choosing the desired format from the menu.
By default, each version is automatically saved in the same album as the original, so you can end up with multiple thumbnails of the same photo in the album. But digiKam provides an elegant solution to the problem: you can combine the original and all its versions into a single group. To do this, select the original and its versions, right-click on the selection and choose the command. This combines all the selected photos as one neat bundle, and an icon in the lower-right corner of the thumbnail displays the number of images in the group. Alternatively, you can save the version in a separate album: click on the triangle next to the button, select the command, and pick the destination folder.

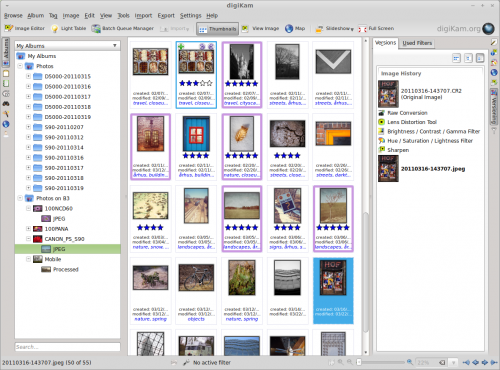
Щоб переглянути всі версії певної фотографії, позначте початковий варіант у його альбомі і розгорніть бічну панель версій, розташовану праворуч. На панелі буде показано всі версії позначеної фотографії з повним списком дій з редагування.
