KDevelop5/Manual/Code generation with templates/da: Difference between revisions
Importing a new version from external source |
Importing a new version from external source |
||
| Line 32: | Line 32: | ||
Du kan se, at datamedlemmerne er blevet lavet om til Qt egenskaber med tilgangsfunktioner og Q_PROPERTY-makroer. Argumenter til setterfunktioner overgives endda ved const-reference, hvor det er passende. Desuden er en privat klasse blevet erklæret og en privat pointer oprettet med Q_DECLARE_PRIVATE. Alt dette gøres af skabelonen. Havde du valgt en anden skabelon, så havde resultatet nok set helt anderledes ud. | Du kan se, at datamedlemmerne er blevet lavet om til Qt egenskaber med tilgangsfunktioner og Q_PROPERTY-makroer. Argumenter til setterfunktioner overgives endda ved const-reference, hvor det er passende. Desuden er en privat klasse blevet erklæret og en privat pointer oprettet med Q_DECLARE_PRIVATE. Alt dette gøres af skabelonen. Havde du valgt en anden skabelon, så havde resultatet nok set helt anderledes ud. | ||
<span id="Creating a new unit test"></span> | <span id="Creating a new unit test"></span> | ||
=== | === Opret en ny unittest === | ||
Even though most testing frameworks require each test to also be a class, '''KDevelop''' includes a method to simplify the creation of unit tests. To create a new test, right click on a project folder and choose <menuchoice>Create from Template</menuchoice>. In the template selection page, choose <tt>Test</tt> as the category, then choose your programming language and template and click <menuchoice>Next</menuchoice>. | Even though most testing frameworks require each test to also be a class, '''KDevelop''' includes a method to simplify the creation of unit tests. To create a new test, right click on a project folder and choose <menuchoice>Create from Template</menuchoice>. In the template selection page, choose <tt>Test</tt> as the category, then choose your programming language and template and click <menuchoice>Next</menuchoice>. | ||
Revision as of 08:03, 16 September 2017
Kodegenering med skabeloner
KDevelop bruger skabeloner til at generere kildekodefiler og for at undgå at skrive kode som gentages.
Opret en ny klasse
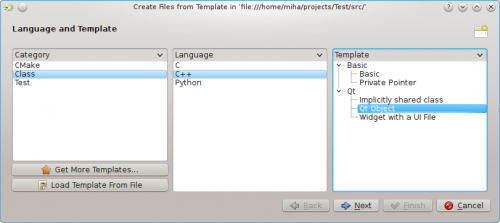
Den mest almindelige anvendelse af kodegenerering er formentlig at skrive en ny klasse. For at oprettet en ny klasse i et eksisterende projekt skal du højreklikke på projektmappen og vælge . Den samme dialog kan startes fra menuen ved at vælge , men at bruge en projektmappe har den fordel, at basis-URL'en bliver sat for outputfilen. Vælg Klasse i afsnittet kategori og det sprog og den skabelon der ønskes i de andre to felter. Efter at du har valgt en klasseskabelon skal du angive detaljer om den nye klasse.
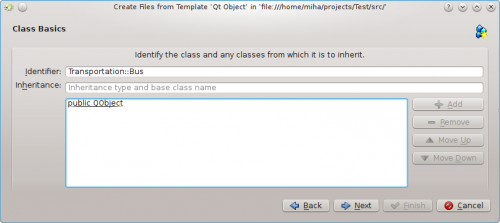
Først skal du angive en identifikator for klassen. Dette kan være en simpelt navn (som Bus) eller en komplet identifikator men navnerum (som Transportation::Bus). I det sidste tilfælde vil KDevelop fortolke identifikatoren og separere navnerummet fra det egentlige navn. I det samme vindue kan du tilføje den nye klasses basisklasser. Du bemærker måske, at nogle skabeloner selv vælger en basisklasse, men du kan frit fjerne den og du kan tilføje andre basisklasser. Du bør skrive hele nedarvningserklæringen her, hvilket afhænger af sproget, fx public QObject for C++, extends SomeClass for PHP og blot klassens navn for Python.
I det næste vindue kan du vælge bland de virtuelle metoder fra alle nedarvede klasser samt nogle standard konstruktorer, destruktorer og operatorer. Markér afkrydsningsfeltet vedsiden af en metodesignatur for at implementere denne metode i den nye klasse.
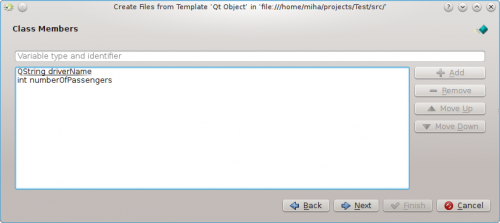
Når du klikker på kommer du til et vindue, hvor du kan tilføje medlemmer til klassen. Afhængigt af den valgte skabelon vil de optræde som medlemsvariable i den nye klasse eller skabelonen vil oprette settere og gettere for dem. I sprog som C++, hvor variable skal erklæres skal du angive både type og navn for medlemmet som fx int number eller QString name. I andre sprog behøver du ikke at angive typen, men det er god praksis at have den med alligevel, for den valgte skabelon kan stadig drage nytte af det.
I de følgende vinduer kan du vælge licensen for din nye klasse, angive særlige oplysninger, som den valgte skabelon skal bruge og angive, hvor de genererede filer skal placeres. Du afslutter guiden ved at klikke , hvorefter den nye klasse genereres. De genererede filer vil blive åbnet i editoren, sådan at du kan begynde at arbejde med dem med det samme.
Efter at have oprettet en ny C++-klasse vil du få mulighed for at føje den til et projektmål. Vælg et mål i dialogvinduet eller annulér vinduet og føj filen til et mål manuelt.
Hvis du valgte skabelonen Qt Objekt, markerede nogle standardmetoder og tilføjede et par medlemsvariable, så skulle outputtet ligne det på billedet herunder.
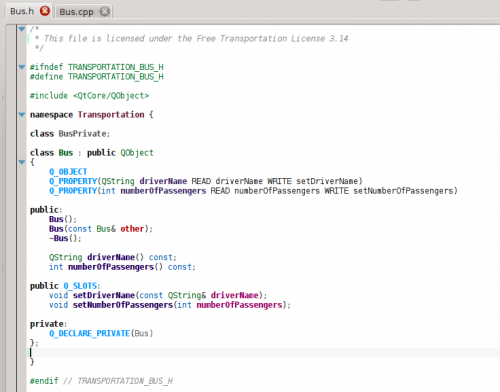
Du kan se, at datamedlemmerne er blevet lavet om til Qt egenskaber med tilgangsfunktioner og Q_PROPERTY-makroer. Argumenter til setterfunktioner overgives endda ved const-reference, hvor det er passende. Desuden er en privat klasse blevet erklæret og en privat pointer oprettet med Q_DECLARE_PRIVATE. Alt dette gøres af skabelonen. Havde du valgt en anden skabelon, så havde resultatet nok set helt anderledes ud.
Opret en ny unittest
Even though most testing frameworks require each test to also be a class, KDevelop includes a method to simplify the creation of unit tests. To create a new test, right click on a project folder and choose . In the template selection page, choose Test as the category, then choose your programming language and template and click .
You will be prompted for the test name and a list of test cases. For the test cases, you only have to specify a list of names. Some unit testing frameworks, such as PyUnit and PHPUnit, require that test cases start with a special prefix. In KDevelop, the template is responsible for adding the prefix, so you do not have to prefix the test cases here. After clicking , specify the license and output locations for the generated files, and the test will be created.
Unit tests created this way will not be added to any target automatically. If you are using CTest or some other testing framework, make sure to add the new files to a target. KDevelop provides a Unit Tests toolview that integrates with CTest.
Other files
While classes and unit tests receive special attention when generating code from templates, the same method can be used for any kind of source code files. For example, one could use a template for a CMake Find module or a .desktop file. This can be done by choosing , and selecting the wanted category and template. If the selected category is neither Class nor Test, you will only have the option of choosing the license, any custom options specified by the template, and the output file locations. As with classes and tests, finishing the assistant will generate the files and open them in the editor.
Managing templates
From the assistant, you can also download additional file templates by clicking the button. This opens a Get Hot New Stuff dialog, where you can install additional templates, as well as update or remove them. There is also a configuration module for template, which can be reached by clicking . From there, you can manage both file templates (explained above) and project templates (used for creating new projects).
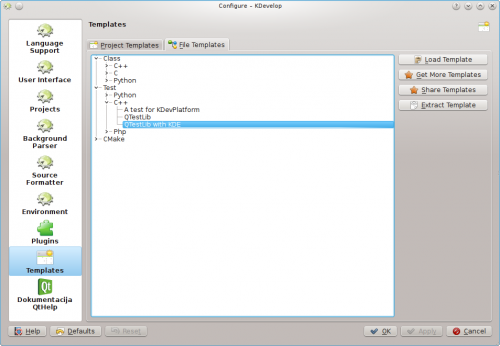
Of course, if none of the available template suit your project, you can always create new ones. The easiest way is probably to copy and modify an existing template, while a short tutorial and a longer specification document are there to help you. To copy an installed template, open the template manager by clicking , select the template you wish to copy, then click the button. Select a destination folder, then click , and the contents of the template will be extracted into the selected folder. Now you can edit the template by opening the extracted files and modifying them. After you are done, you can import your new template into KDevelop by opening the template manager, activating the appropriate tab (either or ) and clicking . Open the template description file, which is the one with the suffix either .kdevtemplate or .desktop. KDevelop will compress the files into a template archive and import the template.
If you want to write a template from scratch, you can start with a sample C++ class template by creating a new project and selecting the C++ Class Template project in category KDevelop.


