Digikam/Lens Correction Using digiKam/uk: Difference between revisions
Created page with "Виберіть зображення, до якого слід застосувати виправлення і натисніть клавішу <keycap>F4</keycap>. У від..." |
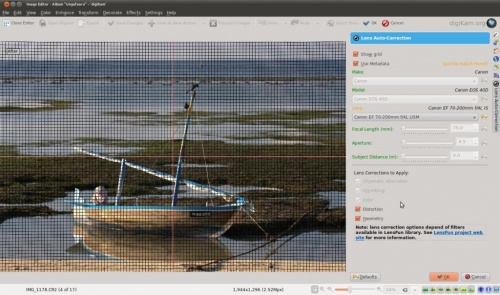
Created page with "center|thumb|500px|Авторські права на зображення належать M.Malik" |
||
| Line 8: | Line 8: | ||
[[Image:Lens_Correction_Screenshot.jpg|center|thumb|500px| | [[Image:Lens_Correction_Screenshot.jpg|center|thumb|500px|Авторські права на зображення належать M.Malik]] | ||
Revision as of 17:51, 30 May 2011
Виправлення дефектів, спричинених об’єктивом, у digiKam
Створено на основі допису у блозі Мохамеда Маліка (Mohammed Malik), 18 березня 2011 року
Жоден з об’єктивів не є оптично довершеним. Навіть найдорожчі об’єктиви мають вади, але digiKam може виправляти дефекти, спричинені об’єктивом, зокрема викривлення зображення, хроматичну аберацію, віньєтування, викривлення кольорів та геометрії зображення.
Виберіть зображення, до якого слід застосувати виправлення і натисніть клавішу F4. У відповідь буде відкрито вікно . У вікні скористайтеся пунктом меню .

This feature uses lens data from the lensfun library and it has a very much up to date database of lenses which are available. It has more than a hundred lenses in its current databases. It also uses the metadata from the image to find-out which lens is used. If the exact used to take the picture is available it will mention that it matches with the meta-data, however if the exact match is not available it will choose the settings from the most closes match. In this case it also allows users to select the lens themselves.
You can either enable or disable the grid lines. Select the corrections you want to apply move you mouse inwards and outwards of the preview window which will show you before and after. When you are satisfied with the result press .
