Digikam/Import Photos in Digikam/da: Difference between revisions
Importing a new version from external source |
Importing a new version from external source |
||
| Line 1: | Line 1: | ||
<languages /> | <languages /> | ||
== | == Importér fotos i digiKam == | ||
Fra Dmitri Popovs blog, 27. juni, 2011 | |||
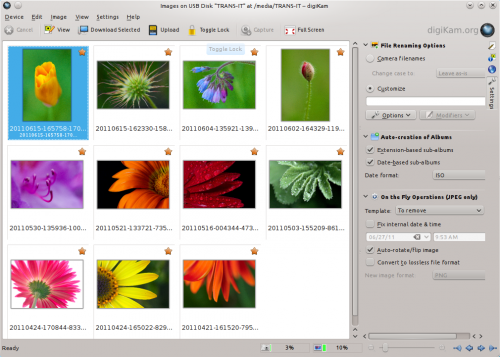
Using the commands tucked under the <menuchoice>Import</menuchoice> menu, you can offload photos from your camera, storage card, or USB stick directly into the application. What’s more, the <menuchoice>Import</menuchoice> dialog box offers a few clever features that allow you to configure the import operation. In the <menuchoice>File Renaming Options</menuchoice> section, you can define a custom rule which renames all incoming photos on the fly. Say, you want to rename imported photos using their date and time info pulled from EXIF metadata. Enable the <menuchoice>Customize</menuchoice> option, and select the <menuchoice>Date & Time</menuchoice> item from the <menuchoice>Options</menuchoice> drop-down list. From the drop-down list next to the <menuchoice>Format</menuchoice> field, select the desired date and time format. The available options include Standard, ISO, Text, UnixTimeStamp, and Custom. The latter allows you to specify your own data and time format. For example, enter the yyyyMMdd-hhmmss rule in the Format field to rename photos as follows: 19730921-175735. | Using the commands tucked under the <menuchoice>Import</menuchoice> menu, you can offload photos from your camera, storage card, or USB stick directly into the application. What’s more, the <menuchoice>Import</menuchoice> dialog box offers a few clever features that allow you to configure the import operation. In the <menuchoice>File Renaming Options</menuchoice> section, you can define a custom rule which renames all incoming photos on the fly. Say, you want to rename imported photos using their date and time info pulled from EXIF metadata. Enable the <menuchoice>Customize</menuchoice> option, and select the <menuchoice>Date & Time</menuchoice> item from the <menuchoice>Options</menuchoice> drop-down list. From the drop-down list next to the <menuchoice>Format</menuchoice> field, select the desired date and time format. The available options include Standard, ISO, Text, UnixTimeStamp, and Custom. The latter allows you to specify your own data and time format. For example, enter the yyyyMMdd-hhmmss rule in the Format field to rename photos as follows: 19730921-175735. | ||
Revision as of 16:22, 5 July 2011
Importér fotos i digiKam
Fra Dmitri Popovs blog, 27. juni, 2011
Using the commands tucked under the menu, you can offload photos from your camera, storage card, or USB stick directly into the application. What’s more, the dialog box offers a few clever features that allow you to configure the import operation. In the section, you can define a custom rule which renames all incoming photos on the fly. Say, you want to rename imported photos using their date and time info pulled from EXIF metadata. Enable the option, and select the item from the drop-down list. From the drop-down list next to the field, select the desired date and time format. The available options include Standard, ISO, Text, UnixTimeStamp, and Custom. The latter allows you to specify your own data and time format. For example, enter the yyyyMMdd-hhmmss rule in the Format field to rename photos as follows: 19730921-175735.

The options available in the section can come in handy in several situations. If you are downloading photos taken on different dates, you can enable the option and choose the desired date format. This will neatly organize imported photos in albums by date. The option can be useful for importing photos in different formats into separate albums. For example, if you shoot in both RAW and JPEG, you can enable the option, so photos will be imported into appropriate folders based on their file extensions.
Finally, the section allows you to configure several actions to be performed on the photos during the import process. Among other things, you can let digiKam autorotate photos and convert them to another format like PNG or TIFF.
