Krita/Tutorial 1: Difference between revisions
formatting changes |
Marked this version for translation |
||
| Line 2: | Line 2: | ||
<translate> | <translate> | ||
== Krita Tutorial == | == Krita Tutorial == <!--T:1--> | ||
<!--T:2--> | |||
So why would you want to try out '''Krita'''? Artist David Revoy once termed '''Krita''' a "Production Beast." Here is my own list of reasons why you'd want to check it out: | So why would you want to try out '''Krita'''? Artist David Revoy once termed '''Krita''' a "Production Beast." Here is my own list of reasons why you'd want to check it out: | ||
<!--T:3--> | |||
Note: [http://krita.org Krita's website] states that "Krita is no fun without a tablet." That's a huge lie man, it's one of the most fun programs to use when you're tablet-less. xD (I don't have one either. Sure, it's probably more fun with a tablet, but you don't need one) | Note: [http://krita.org Krita's website] states that "Krita is no fun without a tablet." That's a huge lie man, it's one of the most fun programs to use when you're tablet-less. xD (I don't have one either. Sure, it's probably more fun with a tablet, but you don't need one) | ||
== Symmetry Mode == | == Symmetry Mode == <!--T:4--> | ||
<!--T:5--> | |||
I'm starting with this part because it's short. But yay, symmetry mode! | I'm starting with this part because it's short. But yay, symmetry mode! | ||
<!--T:6--> | |||
* Toggle it on and off with just a button at the top | * Toggle it on and off with just a button at the top | ||
<!--T:7--> | |||
* Redefine the axis with <keycap>Shift + R</keycap>, then click | * Redefine the axis with <keycap>Shift + R</keycap>, then click | ||
<!--T:8--> | |||
* Symmetry Mode + Sketch brush is what I term the "Killer combo." As in, it will kill your productivity, because you're too busy having fun with 5-minute doodles. | * Symmetry Mode + Sketch brush is what I term the "Killer combo." As in, it will kill your productivity, because you're too busy having fun with 5-minute doodles. | ||
<!--T:9--> | |||
[[image:Krita-tutorial1-I-1.png|thumb|center|300px]] | [[image:Krita-tutorial1-I-1.png|thumb|center|300px]] | ||
<!--T:10--> | |||
[[image:Krita-tutorial1-I-2.png|thumb|center|300px]] | [[image:Krita-tutorial1-I-2.png|thumb|center|300px]] | ||
<!--T:11--> | |||
5-minute doodle. With a mouse! (Hopefully you'll eventually get sick of doing these and start doing "proper" drawings) | 5-minute doodle. With a mouse! (Hopefully you'll eventually get sick of doing these and start doing "proper" drawings) | ||
<!--T:12--> | |||
[[image:Krita-tutorial1-I-3.png|thumb|center|300px]] | [[image:Krita-tutorial1-I-3.png|thumb|center|300px]] | ||
<!--T:13--> | |||
Alternatively, Krita has a Multi-brush mode, to create Kaleidoscope-like drawings. Change the axis or define the number of axes in Tool Options. | Alternatively, Krita has a Multi-brush mode, to create Kaleidoscope-like drawings. Change the axis or define the number of axes in Tool Options. | ||
== A painting-oriented interface == | == A painting-oriented interface == <!--T:14--> | ||
</translate><span id="Drawing"></span><translate> | </translate><span id="Drawing"></span><translate> | ||
=== Drawing === | === Drawing === <!--T:15--> | ||
<!--T:16--> | |||
The awesome part about painting with '''Krita''' is that its interface is geared towards helping you draw quickly and efficiently. | The awesome part about painting with '''Krita''' is that its interface is geared towards helping you draw quickly and efficiently. | ||
<!--T:17--> | |||
* Brush presets: '''Krita''' has lots of different brush engines. Fortunately, it comes with great default brush presets, made by artists, to be used by artists! Just click to select. More on this later. | * Brush presets: '''Krita''' has lots of different brush engines. Fortunately, it comes with great default brush presets, made by artists, to be used by artists! Just click to select. More on this later. | ||
<!--T:18--> | |||
* <menuchoice>Shift + Drag</menuchoice>: dynamically resize brush size. This just saves So much time. | * <menuchoice>Shift + Drag</menuchoice>: dynamically resize brush size. This just saves So much time. | ||
<!--T:19--> | |||
* <keycap>I</keycap> and <keycap>O</keycap>: Decrease / Increase opacity (or just drag the slide at the top) | * <keycap>I</keycap> and <keycap>O</keycap>: Decrease / Increase opacity (or just drag the slide at the top) | ||
<!--T:20--> | |||
* <menuchoice>Mousewheel</menuchoice>: zoom in and out | * <menuchoice>Mousewheel</menuchoice>: zoom in and out | ||
<!--T:21--> | |||
* <keycap>Ctrl + Click</keycap>: select color. | * <keycap>Ctrl + Click</keycap>: select color. | ||
<!--T:22--> | |||
* <keycap>Tab</keycap>: Canvas-only mode | * <keycap>Tab</keycap>: Canvas-only mode | ||
<!--T:23--> | |||
* <keycap>M</keycap>: Mirror image. | * <keycap>M</keycap>: Mirror image. | ||
<!--T:24--> | |||
* <keycap>B</keycap>: Switch from whatever mode you're using to Brush/Freehand mode. | * <keycap>B</keycap>: Switch from whatever mode you're using to Brush/Freehand mode. | ||
<!--T:25--> | |||
* <keycap>E</keycap>: Erase mode. In '''Krita''', any brush can be used as an eraser! | * <keycap>E</keycap>: Erase mode. In '''Krita''', any brush can be used as an eraser! | ||
<!--T:26--> | |||
* <keycap>Ctrl + Z</keycap> / <keycap>Ctrl + Shift + Z</keycap> to undo/Redo (like most programs) | * <keycap>Ctrl + Z</keycap> / <keycap>Ctrl + Shift + Z</keycap> to undo/Redo (like most programs) | ||
<!--T:27--> | |||
{{Tip|1=You can also add or remove shortcuts from the menu. I assigned <keycap>Shift + B</keycap> to drawing dynamically.}} | {{Tip|1=You can also add or remove shortcuts from the menu. I assigned <keycap>Shift + B</keycap> to drawing dynamically.}} | ||
<!--T:28--> | |||
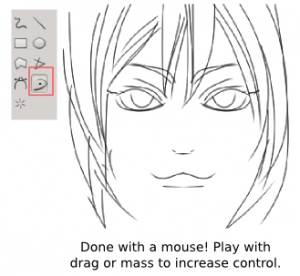
Tip: Want to draw smooth lines with a Mouse? Many of '''Krita's''' brushes have built-in smoothing algorithms, but if you want to draw pretty smooth lines even though you're stuck with a mouse, do this: | Tip: Want to draw smooth lines with a Mouse? Many of '''Krita's''' brushes have built-in smoothing algorithms, but if you want to draw pretty smooth lines even though you're stuck with a mouse, do this: | ||
<!--T:29--> | |||
* Locate the brush preset called Curve_Smooth | * Locate the brush preset called Curve_Smooth | ||
<!--T:30--> | |||
* Select the brush mode "Paint with brushes using dynamic movement" | * Select the brush mode "Paint with brushes using dynamic movement" | ||
<!--T:31--> | |||
* In tool option, increase drag to say... about 50~70. | * In tool option, increase drag to say... about 50~70. | ||
<!--T:32--> | |||
[[image:Krita-tutorial1-II.1.png|thumb|center|300px]] | [[image:Krita-tutorial1-II.1.png|thumb|center|300px]] | ||
=== Colors === | === Colors === <!--T:33--> | ||
<!--T:34--> | |||
But wait, there's more! '''Krita''' also makes it easy to select colors. | But wait, there's more! '''Krita''' also makes it easy to select colors. | ||
<!--T:35--> | |||
* <keycap>D</keycap>: Reset Foreground/Background colors to Black/White | * <keycap>D</keycap>: Reset Foreground/Background colors to Black/White | ||
<!--T:36--> | |||
* <keycap>X</keycap>: Switch between Foreground and Background colors | * <keycap>X</keycap>: Switch between Foreground and Background colors | ||
<!--T:37--> | |||
* <keycap>Backspace</keycap> / <keycap>Shift + Backspace</keycap>: Fill with Background/Foreground color (quick fill!) | * <keycap>Backspace</keycap> / <keycap>Shift + Backspace</keycap>: Fill with Background/Foreground color (quick fill!) | ||
<!--T:38--> | |||
See the color selector docker on the left? Click on the little tool in its upper-left corner to bring up more options, to choose the type you like best. | See the color selector docker on the left? Click on the little tool in its upper-left corner to bring up more options, to choose the type you like best. | ||
<!--T:39--> | |||
[[image:Krita-tutorial1-II.2-1.png|thumb|center|300px]] | [[image:Krita-tutorial1-II.2-1.png|thumb|center|300px]] | ||
<!--T:40--> | |||
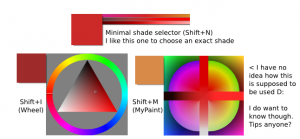
What's more, you can access a lot of selectors on-canvas through shortcuts: | What's more, you can access a lot of selectors on-canvas through shortcuts: | ||
<!--T:41--> | |||
* <keycap>Shift + N</keycap>: Minimal shade selector | * <keycap>Shift + N</keycap>: Minimal shade selector | ||
<!--T:42--> | |||
* <keycap>Shift + M</keycap>: Mypaint shade selector | * <keycap>Shift + M</keycap>: Mypaint shade selector | ||
<!--T:43--> | |||
* <keycap>Shift + I</keycap>: Color selector | * <keycap>Shift + I</keycap>: Color selector | ||
<!--T:44--> | |||
* <keycap>H</keycap>: Color history | * <keycap>H</keycap>: Color history | ||
<!--T:45--> | |||
* <keycap>C</keycap>: Common colors | * <keycap>C</keycap>: Common colors | ||
<!--T:46--> | |||
[[image:Krita-tutorial1-II.2-2.png|thumb|center|300px]] | [[image:Krita-tutorial1-II.2-2.png|thumb|center|300px]] | ||
<!--T:47--> | |||
Wait, what are all those extra color selectors for? Well, more on that soon. | Wait, what are all those extra color selectors for? Well, more on that soon. | ||
=== The mighty right-click! === | === The mighty right-click! === <!--T:48--> | ||
<!--T:49--> | |||
'''Krita's''' right-click is awesome. It brings up this little badass pop-up (right-click again to hide): | '''Krita's''' right-click is awesome. It brings up this little badass pop-up (right-click again to hide): | ||
<!--T:50--> | |||
[[image:Krita-tutorial1-II.3-1.png|thumb|center|300px]] | [[image:Krita-tutorial1-II.3-1.png|thumb|center|300px]] | ||
<!--T:51--> | |||
From center outwards: | From center outwards: | ||
<!--T:52--> | |||
* Color selector | * Color selector | ||
<!--T:53--> | |||
* History palette (most recently used colors) | * History palette (most recently used colors) | ||
<!--T:54--> | |||
* Brush palette | * Brush palette | ||
<!--T:55--> | |||
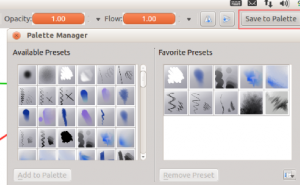
To add brushes to the Palette, click Save to Palette in the top toolbar, and save your favourite brushes. Currently '''Krita''' only allows you to save up to 10 brushes: | To add brushes to the Palette, click Save to Palette in the top toolbar, and save your favourite brushes. Currently '''Krita''' only allows you to save up to 10 brushes: | ||
<!--T:56--> | |||
[[image:Krita-tutorial1-II.3-2.png|thumb|center|300px]] | [[image:Krita-tutorial1-II.3-2.png|thumb|center|300px]] | ||
<!--T:57--> | |||
Tip: Full-canvas mode. Lacking screen-space? I use desktop computers, but maybe you're stuck with a laptop and little screen space. Well: | Tip: Full-canvas mode. Lacking screen-space? I use desktop computers, but maybe you're stuck with a laptop and little screen space. Well: | ||
<!--T:58--> | |||
* <keycap>Tab</keycap>: to enter canvas-only mode | * <keycap>Tab</keycap>: to enter canvas-only mode | ||
<!--T:59--> | |||
* Right-click: to access the color selector and your favourite brushes | * Right-click: to access the color selector and your favourite brushes | ||
<!--T:60--> | |||
* You can control brush size (<keycap>Shift-drag</keycap>) and opacity (<keycap>I</keycap> and <keycap>O</keycap>) without toolbars | * You can control brush size (<keycap>Shift-drag</keycap>) and opacity (<keycap>I</keycap> and <keycap>O</keycap>) without toolbars | ||
<!--T:61--> | |||
* If you need other types of color selectors, remember the previous section? | * If you need other types of color selectors, remember the previous section? | ||
== The brush engines == | == The brush engines == <!--T:62--> | ||
<!--T:63--> | |||
As noted: | As noted: | ||
<!--T:64--> | |||
* '''Krita''' has an Excellent default brush presets, that you can access either from the {{Icon|paintop_settings_01}} button (choose brush preset) in the top toolbar (to the left of <menuchoice>Mode</menuchoice> drop down list), or a docker to the right. Play around with them to choose a few favourites. | * '''Krita''' has an Excellent default brush presets, that you can access either from the {{Icon|paintop_settings_01}} button (choose brush preset) in the top toolbar (to the left of <menuchoice>Mode</menuchoice> drop down list), or a docker to the right. Play around with them to choose a few favourites. | ||
<!--T:65--> | |||
* Personally, the fact that '''Krita''' comes with great public domain presets matters a lot to me, because while there are many resources online, most are under Attribution licenses. I want to respect the wishes of the authors, but keeping track of all those brushes is just such a pain, so I end up not using them. | * Personally, the fact that '''Krita''' comes with great public domain presets matters a lot to me, because while there are many resources online, most are under Attribution licenses. I want to respect the wishes of the authors, but keeping track of all those brushes is just such a pain, so I end up not using them. | ||
<!--T:66--> | |||
* If there are brushes you like a lot, save them to the '''Brush Palette'''. Currently '''Krita''' only allows you to save up to 10 brushes this way. | * If there are brushes you like a lot, save them to the '''Brush Palette'''. Currently '''Krita''' only allows you to save up to 10 brushes this way. | ||
<!--T:67--> | |||
You've probably noticed that this wasn't the main way to access brushes, however. I won't try to explain all the different brush engines, but here are a few main things to try out. | You've probably noticed that this wasn't the main way to access brushes, however. I won't try to explain all the different brush engines, but here are a few main things to try out. | ||
<!--T:68--> | |||
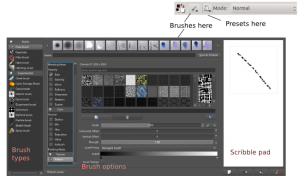
(At this point I noticed that I'm unable to take screenshots with the brush panel open, whoops! Here's a screenshot from the '''Krita''' site instead) | (At this point I noticed that I'm unable to take screenshots with the brush panel open, whoops! Here's a screenshot from the '''Krita''' site instead) | ||
<!--T:69--> | |||
[[image:Krita-tutorial1-III.png|thumb|center|300px]] | [[image:Krita-tutorial1-III.png|thumb|center|300px]] | ||
<!--T:70--> | |||
Note: Although many brushes are categorized as "Experimental", they're quite stable... | Note: Although many brushes are categorized as "Experimental", they're quite stable... | ||
=== Pixel brushes === | === Pixel brushes === <!--T:71--> | ||
<!--T:72--> | |||
Others have written more in-depth [[Special:myLanguage/Krita/Tutorial 1#Links|tutorials on brushes]], so I'll just give an overview of some of the options: | Others have written more in-depth [[Special:myLanguage/Krita/Tutorial 1#Links|tutorials on brushes]], so I'll just give an overview of some of the options: | ||
<!--T:73--> | |||
* Brush tip: autobrush vs predefined brush. "Predefined" brush will give you a nice old boring generic round or square or whatever shape. What's more interesting is the "Predefined brushes" tab: | * Brush tip: autobrush vs predefined brush. "Predefined" brush will give you a nice old boring generic round or square or whatever shape. What's more interesting is the "Predefined brushes" tab: | ||
<!--T:74--> | |||
[[image:Krita-tutorial1-III.1-1.png|thumb|center|300px]] | [[image:Krita-tutorial1-III.1-1.png|thumb|center|300px]] | ||
<!--T:75--> | |||
So a commenter once praised me on the background of this pic I'd done? I didn't have the heart to tell him that I got lazy and just slapped that background up in a few minutes with some cheap'ol predefined brushes... (it's out!) | So a commenter once praised me on the background of this pic I'd done? I didn't have the heart to tell him that I got lazy and just slapped that background up in a few minutes with some cheap'ol predefined brushes... (it's out!) | ||
<!--T:76--> | |||
{{Tip|1=To add some texture over a smooth shading, just click on the area once with a low-opacity texture-y brush (not to be confused with texture mode below).}} | {{Tip|1=To add some texture over a smooth shading, just click on the area once with a low-opacity texture-y brush (not to be confused with texture mode below).}} | ||
<!--T:77--> | |||
* Texture: Starting with '''Krita''' 2.5, you can add texture to the brushes! You can do pre-defined brushes and textures simultaneously! Like if you want to do rocky snake scales. | * Texture: Starting with '''Krita''' 2.5, you can add texture to the brushes! You can do pre-defined brushes and textures simultaneously! Like if you want to do rocky snake scales. | ||
<!--T:78--> | |||
[[image:Krita-tutorial1-III.1-2.png|thumb|center|300px]] | [[image:Krita-tutorial1-III.1-2.png|thumb|center|300px]] | ||
<!--T:79--> | |||
(too bad there aren't any actual snake scales among the default textures. Anybody knows where I can get some?) | (too bad there aren't any actual snake scales among the default textures. Anybody knows where I can get some?) | ||
<!--T:80--> | |||
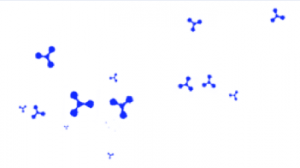
* Dynamics: '''Krita''' has a Whole lot of Dynamics options for its pixel brushes. There are [[Special:myLanguage/Krita/Tutorial 1#Links|Youtube tutorials]] covering that, so I won't get into that. But you can basically map opacity, size, spacing, mirror, softness, sharpness, rotation and scatter dynamics to a number of factors. | * Dynamics: '''Krita''' has a Whole lot of Dynamics options for its pixel brushes. There are [[Special:myLanguage/Krita/Tutorial 1#Links|Youtube tutorials]] covering that, so I won't get into that. But you can basically map opacity, size, spacing, mirror, softness, sharpness, rotation and scatter dynamics to a number of factors. | ||
<!--T:81--> | |||
[[image:Krita-tutorial1-III.1-3.png|thumb|center|300px]] | [[image:Krita-tutorial1-III.1-3.png|thumb|center|300px]] | ||
=== Sketch Brush === | === Sketch Brush === <!--T:82--> | ||
<!--T:83--> | |||
Sketch Brush was adapted from [http://mrdoob.com/projects/harmony/ Project Harmony] . I call it the cheat brush: | Sketch Brush was adapted from [http://mrdoob.com/projects/harmony/ Project Harmony] . I call it the cheat brush: | ||
<!--T:84--> | |||
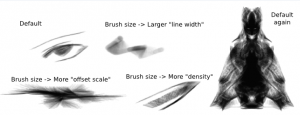
* Parameters to fiddle with are under Brush Size: <menuchoice>Line width</menuchoice>, <menuchoice>Offset scale</menuchoice>, <menuchoice>Density</menuchoice> | * Parameters to fiddle with are under Brush Size: <menuchoice>Line width</menuchoice>, <menuchoice>Offset scale</menuchoice>, <menuchoice>Density</menuchoice> | ||
<!--T:85--> | |||
* This brush can be used to make rough sketches, but also for achieving pencil-like or ink-like shading | * This brush can be used to make rough sketches, but also for achieving pencil-like or ink-like shading | ||
<!--T:86--> | |||
* I like to use it for drawing details and hair shading. For example, I'd draw rough areas, smudge them to get proper shading, then draw in details like edges with sketch brush. | * I like to use it for drawing details and hair shading. For example, I'd draw rough areas, smudge them to get proper shading, then draw in details like edges with sketch brush. | ||
<!--T:87--> | |||
[[image:Krita-tutorial1-III.2.png|thumb|center|300px]] | [[image:Krita-tutorial1-III.2.png|thumb|center|300px]] | ||
<!--T:88--> | |||
Tips: | Tips: | ||
<!--T:89--> | |||
* Remember that you can toggle the background and foreground colors with <keycap>X</keycap>. So if you're sketching in black on a white background, you can toggle to white to erase. The result is nicer than if you're just erasing big chunks with a hard round shape. | * Remember that you can toggle the background and foreground colors with <keycap>X</keycap>. So if you're sketching in black on a white background, you can toggle to white to erase. The result is nicer than if you're just erasing big chunks with a hard round shape. | ||
<!--T:90--> | |||
* If you're sketching on a new transparent layer, turn on the Erase mode with <keycap>E</keycap> to erase instead. Basically you can easily fix anything easily. | * If you're sketching on a new transparent layer, turn on the Erase mode with <keycap>E</keycap> to erase instead. Basically you can easily fix anything easily. | ||
<!--T:91--> | |||
* You can resize this brush. A smaller brush will have less of those in-between lines. | * You can resize this brush. A smaller brush will have less of those in-between lines. | ||
=== Curve and Particle Brushes === | === Curve and Particle Brushes === <!--T:92--> | ||
<!--T:93--> | |||
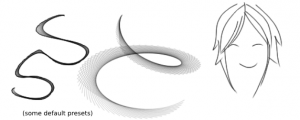
These somewhat similar-looking brushes look like they're just there to be pretty, but they can achieve some interesting results: | These somewhat similar-looking brushes look like they're just there to be pretty, but they can achieve some interesting results: | ||
<!--T:94--> | |||
* Curve_smooth (a curve brush preset) + paint dynamically mode + increase drag in the tool options = really smooth lines (see example in [[Special:myLanguage/Krita/Tutorial 1#Drawing|Drawing]]) | * Curve_smooth (a curve brush preset) + paint dynamically mode + increase drag in the tool options = really smooth lines (see example in [[Special:myLanguage/Krita/Tutorial 1#Drawing|Drawing]]) | ||
<!--T:95--> | |||
* of course they are useful for decorative effects | * of course they are useful for decorative effects | ||
<!--T:96--> | |||
* they should be useful for some elements of clothes. | * they should be useful for some elements of clothes. | ||
<!--T:97--> | |||
[[image:Krita-tutorial1-III.3.png|thumb|center|300px]] | [[image:Krita-tutorial1-III.3.png|thumb|center|300px]] | ||
=== Smudge Brush === | === Smudge Brush === <!--T:98--> | ||
<!--T:99--> | |||
'''Krita's''' smudge brushes have some interesting properties. In fact, depending on the settings, they are either pure smudge brushes or paint brushes with smudge effects. Erm... I'll just show you some: | '''Krita's''' smudge brushes have some interesting properties. In fact, depending on the settings, they are either pure smudge brushes or paint brushes with smudge effects. Erm... I'll just show you some: | ||
<!--T:100--> | |||
[[image:Krita-tutorial1-III.4.png|thumb|center|300px]] | [[image:Krita-tutorial1-III.4.png|thumb|center|300px]] | ||
<!--T:101--> | |||
Tips: | Tips: | ||
<!--T:102--> | |||
* That brush on the bottom-right is the "basic_mix_soft" preset. It will take the selected color (red here) and mix it somewhat with the background color it is being painted on. | * That brush on the bottom-right is the "basic_mix_soft" preset. It will take the selected color (red here) and mix it somewhat with the background color it is being painted on. | ||
<!--T:103--> | |||
* Drawing small circles over the color changes can get you a "blend" effect (that's right, It's the "don't Ever smudge your colors!!" thing that every artist warns you against. I'm too lazy to build stuff up gradually, sorry. D: )<!--(--> | * Drawing small circles over the color changes can get you a "blend" effect (that's right, It's the "don't Ever smudge your colors!!" thing that every artist warns you against. I'm too lazy to build stuff up gradually, sorry. D: )<!--(--> | ||
=== Other brushes === | === Other brushes === <!--T:104--> | ||
<!--T:105--> | |||
I'll leave you to test the other brushes on your own. A favourite technique of mine so far is to take a low-opacity Basic_Paint_Shade brush to block in rough colors then paint over them with some of the smudge brushes to get painterly-like smudes: | I'll leave you to test the other brushes on your own. A favourite technique of mine so far is to take a low-opacity Basic_Paint_Shade brush to block in rough colors then paint over them with some of the smudge brushes to get painterly-like smudes: | ||
<!--T:106--> | |||
[[image:Krita-tutorial1-III.5.png|thumb|center|300px]] | [[image:Krita-tutorial1-III.5.png|thumb|center|300px]] | ||
<!--T:107--> | |||
More brush presets are available, see [[Special:myLanguage/Krita/Tutorial 1#Links|Links]] | More brush presets are available, see [[Special:myLanguage/Krita/Tutorial 1#Links|Links]] | ||
=== Brush composite modes === | === Brush composite modes === <!--T:108--> | ||
<!--T:109--> | |||
See that <meuchoice>mode</menuchoice> thing at the top? It dictates the composite mode of your brush. For example, <menuchoice>darken only</menuchoice> will only leave a trace if the color of the brush is darker than the color it is painting over. | See that <meuchoice>mode</menuchoice> thing at the top? It dictates the composite mode of your brush. For example, <menuchoice>darken only</menuchoice> will only leave a trace if the color of the brush is darker than the color it is painting over. | ||
<!--T:110--> | |||
Tips: | Tips: | ||
<!--T:111--> | |||
* You can add modes to <menuchoice>favourites</menuchoice>. I suggest adding the following:</translate> | * You can add modes to <menuchoice>favourites</menuchoice>. I suggest adding the following:</translate> | ||
<translate> | <translate> | ||
<!--T:112--> | |||
** <menuchoice>Arithmetic -> Multiply</menuchoice></translate> | ** <menuchoice>Arithmetic -> Multiply</menuchoice></translate> | ||
<translate> | <translate> | ||
<!--T:113--> | |||
** <menuchoice>HSL -> Hue HSL and Color HSL</menuchoice> (HSL = Hue, Saturation, Lightness)</translate> | ** <menuchoice>HSL -> Hue HSL and Color HSL</menuchoice> (HSL = Hue, Saturation, Lightness)</translate> | ||
<translate> | <translate> | ||
<!--T:114--> | |||
** <menuchoice>Lighten -> Screen</menuchoice> (or one of the Dodge options)</translate> | ** <menuchoice>Lighten -> Screen</menuchoice> (or one of the Dodge options)</translate> | ||
<translate> | <translate> | ||
<!--T:115--> | |||
** <menuchoice>Mix -> Normal, Overlay</menuchoice></translate> | ** <menuchoice>Mix -> Normal, Overlay</menuchoice></translate> | ||
<translate> | <translate> | ||
<!--T:116--> | |||
** <menuchoice>Mix -> Erase</menuchoice>: this is more for layer modes (layers and brushes share the same favourite modes). | ** <menuchoice>Mix -> Erase</menuchoice>: this is more for layer modes (layers and brushes share the same favourite modes). | ||
<!--T:117--> | |||
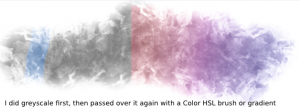
* if you're like me, and bad at choosing colors, just do everything in greyscale first, using multiple layers as appropriate. Then lock the layer transparencies, and pass over the gray with a brush on <menuchoice>Color HSL</menuchoice> mode (gradients work great too). It is also very easy to change colors this way. | * if you're like me, and bad at choosing colors, just do everything in greyscale first, using multiple layers as appropriate. Then lock the layer transparencies, and pass over the gray with a brush on <menuchoice>Color HSL</menuchoice> mode (gradients work great too). It is also very easy to change colors this way. | ||
<!--T:118--> | |||
* There are actually preset brushes for functions such as "color", "darken", "lighten" etc.! | * There are actually preset brushes for functions such as "color", "darken", "lighten" etc.! | ||
<!--T:119--> | |||
[[image:Krita-tutorial1-III.6.png|thumb|center|300px]] | [[image:Krita-tutorial1-III.6.png|thumb|center|300px]] | ||
== Other stuff == | == Other stuff == <!--T:120--> | ||
=== Layers and layer styles === | === Layers and layer styles === <!--T:121--> | ||
<!--T:122--> | |||
The layer types you'll be most interested in are Paint Layers and Group Layers. Notice that layer modes share the same favourites as brush modes. | The layer types you'll be most interested in are Paint Layers and Group Layers. Notice that layer modes share the same favourites as brush modes. | ||
<!--T:123--> | |||
Tips: | Tips: | ||
<!--T:124--> | |||
* If you have a lineart layer, set it at the very top as a Multiply layer. Duplicate it then merge a few times if you think it isn't dark enough. | * If you have a lineart layer, set it at the very top as a Multiply layer. Duplicate it then merge a few times if you think it isn't dark enough. | ||
<!--T:125--> | |||
* Color layers: Remember I said I was bad at colors? Another way to do this is to:</translate> | * Color layers: Remember I said I was bad at colors? Another way to do this is to:</translate> | ||
<translate> | <translate> | ||
<!--T:126--> | |||
** First paint in greyscale</translate> | ** First paint in greyscale</translate> | ||
<translate> | <translate> | ||
<!--T:127--> | |||
** Make a layer with Overlay mode on top. Paint colors on That one. That's it.</translate> | ** Make a layer with Overlay mode on top. Paint colors on That one. That's it.</translate> | ||
<translate> | <translate> | ||
<!--T:128--> | |||
** If you are using multiple layers and don't want the color to go outside of bounds, Duplicate the greyscale, lock the transparency of the new layer (checkered box), and fill it with whatever colors you want. You can't do this with just a brush on Overlay mode, because the brush will change the darkness/light values of your greyscale. | ** If you are using multiple layers and don't want the color to go outside of bounds, Duplicate the greyscale, lock the transparency of the new layer (checkered box), and fill it with whatever colors you want. You can't do this with just a brush on Overlay mode, because the brush will change the darkness/light values of your greyscale. | ||
<!--T:129--> | |||
[[image:Krita-tutorial1-IV.1.png|thumb|center|300px]] | [[image:Krita-tutorial1-IV.1.png|thumb|center|300px]] | ||
<!--T:130--> | |||
* Erase mode: this funny mode where everything you draw on an Erase layer basically creates holes on the layers below (like a mask, just faster). Basically set an Erase layer as the top layer in a group of layers. Anything you draw on it will erase corresponding parts in all the layers below (but only of that group). Good for punching holes and frills. | * Erase mode: this funny mode where everything you draw on an Erase layer basically creates holes on the layers below (like a mask, just faster). Basically set an Erase layer as the top layer in a group of layers. Anything you draw on it will erase corresponding parts in all the layers below (but only of that group). Good for punching holes and frills. | ||
=== Perspective grid === | === Perspective grid === <!--T:131--> | ||
<!--T:132--> | |||
'''Krita''' has this awesome guide called a perspective grid. | '''Krita''' has this awesome guide called a perspective grid. | ||
<!--T:133--> | |||
* Choose the tool | * Choose the tool | ||
<!--T:134--> | |||
* Click 3 points on the canvas and the grid will appear. | * Click 3 points on the canvas and the grid will appear. | ||
<!--T:135--> | |||
* Drag on corners to adjust | * Drag on corners to adjust | ||
<!--T:136--> | |||
* Drag on middle points to make a new "side" appear | * Drag on middle points to make a new "side" appear | ||
<!--T:137--> | |||
* Click on X to delete | * Click on X to delete | ||
<!--T:138--> | |||
[[image:Krita-tutorial1-IV.2.png|thumb|center|300px]] | [[image:Krita-tutorial1-IV.2.png|thumb|center|300px]] | ||
=== Composition dock === | === Composition dock === <!--T:139--> | ||
<!--T:140--> | |||
The Composition dock basically saves layer visibility states. Suppose you have multiple layer groups, each with a greyscale layer and several color effect layers. You want to be able to easily switch off the visibility of all color layers, and leave only the greyscale layers visible. | The Composition dock basically saves layer visibility states. Suppose you have multiple layer groups, each with a greyscale layer and several color effect layers. You want to be able to easily switch off the visibility of all color layers, and leave only the greyscale layers visible. | ||
<!--T:141--> | |||
You can achieve that with the Composition dock. It saves your current layer visibility setup. | You can achieve that with the Composition dock. It saves your current layer visibility setup. | ||
<!--T:142--> | |||
[[image:Krita-tutorial1-IV.3.png|thumb|center|300px]] | [[image:Krita-tutorial1-IV.3.png|thumb|center|300px]] | ||
=== New files and saving === | === New files and saving === <!--T:143--> | ||
<!--T:144--> | |||
I'll just end up with some basics that you'll only need to read once. | I'll just end up with some basics that you'll only need to read once. | ||
<!--T:145--> | |||
* Starting a new file: Just choose <menuchoice>Custom Image</menuchoice> and go with the defaults. There are a lot of options there, but if you don't know what they are, then you probably don't need to change them. | * Starting a new file: Just choose <menuchoice>Custom Image</menuchoice> and go with the defaults. There are a lot of options there, but if you don't know what they are, then you probably don't need to change them. | ||
<!--T:146--> | |||
* Saving: '''Krita''' has its own <tt>.kra</tt> ("'''Krita''' document") file type. Save under that filetype. | * Saving: '''Krita''' has its own <tt>.kra</tt> ("'''Krita''' document") file type. Save under that filetype. | ||
<!--T:147--> | |||
* Exporting: Once you're done with a drawing and want it in a format you can upload, make sure you Export instead of Save (you don't want to lose all your layer information right?). The usual file type to use is JPEG image. | * Exporting: Once you're done with a drawing and want it in a format you can upload, make sure you Export instead of Save (you don't want to lose all your layer information right?). The usual file type to use is JPEG image. | ||
<!--T:148--> | |||
* Note: for some reason, my Windows build of '''Krita''' gives a weird output when I try to save as <tt>.jpg</tt>. I seem to be the only one affected though, and the Linux build works fine. If you have the same problem, save as a PNG image and convert it elsewhere if needed. | * Note: for some reason, my Windows build of '''Krita''' gives a weird output when I try to save as <tt>.jpg</tt>. I seem to be the only one affected though, and the Linux build works fine. If you have the same problem, save as a PNG image and convert it elsewhere if needed. | ||
<!--T:149--> | |||
* Exporting to other programs: Many of us who use Open source programs also use other programs like '''Gimp''' or '''MyPaint'''. If you want to open your file with other programs, save your files as <tt>.ora</tt> ("OpenRaster archiving image"). Unfortunately there doesn't seem to be an easy way to share with '''Inkscape''' though. Bummer. | * Exporting to other programs: Many of us who use Open source programs also use other programs like '''Gimp''' or '''MyPaint'''. If you want to open your file with other programs, save your files as <tt>.ora</tt> ("OpenRaster archiving image"). Unfortunately there doesn't seem to be an easy way to share with '''Inkscape''' though. Bummer. | ||
<!--T:150--> | |||
This concludes this tutorial. Don't forget to drop by the [http://forum.kde.org/viewforum.php?f=136 Krita forums] to thank the developers and post your results in the [http://forum.kde.org/viewforum.php?f=138 Krita forum galleries]. {{Smiley}} | This concludes this tutorial. Don't forget to drop by the [http://forum.kde.org/viewforum.php?f=136 Krita forums] to thank the developers and post your results in the [http://forum.kde.org/viewforum.php?f=138 Krita forum galleries]. {{Smiley}} | ||
<!--T:151--> | |||
The Windows version is quite new so there are still some bugs being worked on, but it didn't prevent me from completing drawings with it. Still, when you come across bugs, help the developers by submitting a bug report. That's it! | The Windows version is quite new so there are still some bugs being worked on, but it didn't prevent me from completing drawings with it. Still, when you come across bugs, help the developers by submitting a bug report. That's it! | ||
</translate><span id="Links"></span><translate> | </translate><span id="Links"></span><translate> | ||
=== Links === | === Links === <!--T:152--> | ||
<!--T:153--> | |||
* [http://www.krita.org Krita site] | * [http://www.krita.org Krita site] | ||
<!--T:154--> | |||
To download '''Krita''': | To download '''Krita''': | ||
<!--T:155--> | |||
Windows: In the '''Krita''' download page, locate the link to "Download '''Krita''' 2.5" (or the latest version). The Windows version is still new and experimental, but it worked pretty well for me when I tried it. | Windows: In the '''Krita''' download page, locate the link to "Download '''Krita''' 2.5" (or the latest version). The Windows version is still new and experimental, but it worked pretty well for me when I tried it. | ||
<!--T:156--> | |||
Linux (Ubuntu): You can install '''Krita''' 2.4 from the package manager, but if you want to get the latest 2.5 version, you'll have to add a ppa: | Linux (Ubuntu): You can install '''Krita''' 2.4 from the package manager, but if you want to get the latest 2.5 version, you'll have to add a ppa: | ||
<!--T:157--> | |||
{{Input|1=<nowiki>sudo add-apt-repository ppa:kubuntu-ppa/backports | {{Input|1=<nowiki>sudo add-apt-repository ppa:kubuntu-ppa/backports | ||
sudo apt-get update | sudo apt-get update | ||
sudo apt-get install krita</nowiki>}} | sudo apt-get install krita</nowiki>}} | ||
<!--T:158--> | |||
More brushes! | More brushes! | ||
* [http://www.davidrevoy.com/?article123/krita-preset-v1a David Revoy] | * [http://www.davidrevoy.com/?article123/krita-preset-v1a David Revoy] | ||
<!--T:159--> | |||
* [http://www.ramonmiranda.com/2012/09/new-set-for-krita-software-45-or-later.html Ramon Miranda] | * [http://www.ramonmiranda.com/2012/09/new-set-for-krita-software-45-or-later.html Ramon Miranda] | ||
<!--T:160--> | |||
* [http://al-dy.deviantart.com/gallery/#/d38rprl Al-dy] | * [http://al-dy.deviantart.com/gallery/#/d38rprl Al-dy] | ||
<!--T:161--> | |||
Brush tutorials: | Brush tutorials: | ||
<!--T:162--> | |||
* [http://www.youtube.com/watch?v=_yoNCVkkSR0 Ramon Miranda] | * [http://www.youtube.com/watch?v=_yoNCVkkSR0 Ramon Miranda] | ||
<!--T:163--> | |||
* [http://www.youtube.com/watch?v=wnol3izUXvA David Revoy] | * [http://www.youtube.com/watch?v=wnol3izUXvA David Revoy] | ||
<!--T:164--> | |||
Others: | Others: | ||
<!--T:165--> | |||
* [http://www.youtube.com/watch?v=FiOvekdqC9Q Anitim's comic tutorial] | * [http://www.youtube.com/watch?v=FiOvekdqC9Q Anitim's comic tutorial] | ||
</translate> | </translate> | ||
Revision as of 16:25, 22 October 2012
Krita Tutorial
So why would you want to try out Krita? Artist David Revoy once termed Krita a "Production Beast." Here is my own list of reasons why you'd want to check it out:
Note: Krita's website states that "Krita is no fun without a tablet." That's a huge lie man, it's one of the most fun programs to use when you're tablet-less. xD (I don't have one either. Sure, it's probably more fun with a tablet, but you don't need one)
Symmetry Mode
I'm starting with this part because it's short. But yay, symmetry mode!
- Toggle it on and off with just a button at the top
- Redefine the axis with Shift + R, then click
- Symmetry Mode + Sketch brush is what I term the "Killer combo." As in, it will kill your productivity, because you're too busy having fun with 5-minute doodles.

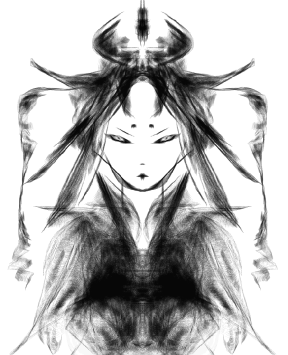
5-minute doodle. With a mouse! (Hopefully you'll eventually get sick of doing these and start doing "proper" drawings)
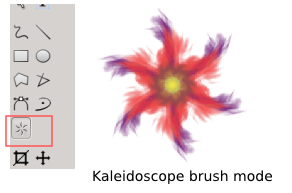
Alternatively, Krita has a Multi-brush mode, to create Kaleidoscope-like drawings. Change the axis or define the number of axes in Tool Options.
A painting-oriented interface
Drawing
The awesome part about painting with Krita is that its interface is geared towards helping you draw quickly and efficiently.
- Brush presets: Krita has lots of different brush engines. Fortunately, it comes with great default brush presets, made by artists, to be used by artists! Just click to select. More on this later.
- : dynamically resize brush size. This just saves So much time.
- I and O: Decrease / Increase opacity (or just drag the slide at the top)
- : zoom in and out
- Ctrl + Click: select color.
- Tab: Canvas-only mode
- M: Mirror image.
- B: Switch from whatever mode you're using to Brush/Freehand mode.
- E: Erase mode. In Krita, any brush can be used as an eraser!
- Ctrl + Z / Ctrl + Shift + Z to undo/Redo (like most programs)
Tip: Want to draw smooth lines with a Mouse? Many of Krita's brushes have built-in smoothing algorithms, but if you want to draw pretty smooth lines even though you're stuck with a mouse, do this:
- Locate the brush preset called Curve_Smooth
- Select the brush mode "Paint with brushes using dynamic movement"
- In tool option, increase drag to say... about 50~70.
Colors
But wait, there's more! Krita also makes it easy to select colors.
- D: Reset Foreground/Background colors to Black/White
- X: Switch between Foreground and Background colors
- Backspace / Shift + Backspace: Fill with Background/Foreground color (quick fill!)
See the color selector docker on the left? Click on the little tool in its upper-left corner to bring up more options, to choose the type you like best.

What's more, you can access a lot of selectors on-canvas through shortcuts:
- Shift + N: Minimal shade selector
- Shift + M: Mypaint shade selector
- Shift + I: Color selector
- H: Color history
- C: Common colors
Wait, what are all those extra color selectors for? Well, more on that soon.
The mighty right-click!
Krita's right-click is awesome. It brings up this little badass pop-up (right-click again to hide):
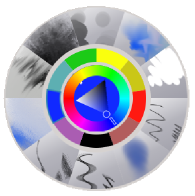
From center outwards:
- Color selector
- History palette (most recently used colors)
- Brush palette
To add brushes to the Palette, click Save to Palette in the top toolbar, and save your favourite brushes. Currently Krita only allows you to save up to 10 brushes:
Tip: Full-canvas mode. Lacking screen-space? I use desktop computers, but maybe you're stuck with a laptop and little screen space. Well:
- Tab: to enter canvas-only mode
- Right-click: to access the color selector and your favourite brushes
- You can control brush size (Shift-drag) and opacity (I and O) without toolbars
- If you need other types of color selectors, remember the previous section?
The brush engines
As noted:
- Krita has an Excellent default brush presets, that you can access either from the
 button (choose brush preset) in the top toolbar (to the left of drop down list), or a docker to the right. Play around with them to choose a few favourites.
- Personally, the fact that Krita comes with great public domain presets matters a lot to me, because while there are many resources online, most are under Attribution licenses. I want to respect the wishes of the authors, but keeping track of all those brushes is just such a pain, so I end up not using them.
- If there are brushes you like a lot, save them to the Brush Palette. Currently Krita only allows you to save up to 10 brushes this way.
You've probably noticed that this wasn't the main way to access brushes, however. I won't try to explain all the different brush engines, but here are a few main things to try out.
(At this point I noticed that I'm unable to take screenshots with the brush panel open, whoops! Here's a screenshot from the Krita site instead)
Note: Although many brushes are categorized as "Experimental", they're quite stable...
Pixel brushes
Others have written more in-depth tutorials on brushes, so I'll just give an overview of some of the options:
- Brush tip: autobrush vs predefined brush. "Predefined" brush will give you a nice old boring generic round or square or whatever shape. What's more interesting is the "Predefined brushes" tab:
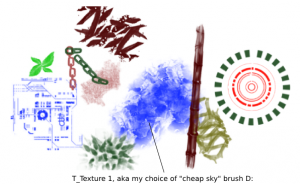
So a commenter once praised me on the background of this pic I'd done? I didn't have the heart to tell him that I got lazy and just slapped that background up in a few minutes with some cheap'ol predefined brushes... (it's out!)
- Texture: Starting with Krita 2.5, you can add texture to the brushes! You can do pre-defined brushes and textures simultaneously! Like if you want to do rocky snake scales.
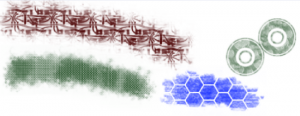
(too bad there aren't any actual snake scales among the default textures. Anybody knows where I can get some?)
- Dynamics: Krita has a Whole lot of Dynamics options for its pixel brushes. There are Youtube tutorials covering that, so I won't get into that. But you can basically map opacity, size, spacing, mirror, softness, sharpness, rotation and scatter dynamics to a number of factors.
Sketch Brush
Sketch Brush was adapted from Project Harmony . I call it the cheat brush:
- Parameters to fiddle with are under Brush Size: , ,
- This brush can be used to make rough sketches, but also for achieving pencil-like or ink-like shading
- I like to use it for drawing details and hair shading. For example, I'd draw rough areas, smudge them to get proper shading, then draw in details like edges with sketch brush.
Tips:
- Remember that you can toggle the background and foreground colors with X. So if you're sketching in black on a white background, you can toggle to white to erase. The result is nicer than if you're just erasing big chunks with a hard round shape.
- If you're sketching on a new transparent layer, turn on the Erase mode with E to erase instead. Basically you can easily fix anything easily.
- You can resize this brush. A smaller brush will have less of those in-between lines.
Curve and Particle Brushes
These somewhat similar-looking brushes look like they're just there to be pretty, but they can achieve some interesting results:
- Curve_smooth (a curve brush preset) + paint dynamically mode + increase drag in the tool options = really smooth lines (see example in Drawing)
- of course they are useful for decorative effects
- they should be useful for some elements of clothes.
Smudge Brush
Krita's smudge brushes have some interesting properties. In fact, depending on the settings, they are either pure smudge brushes or paint brushes with smudge effects. Erm... I'll just show you some:

Tips:
- That brush on the bottom-right is the "basic_mix_soft" preset. It will take the selected color (red here) and mix it somewhat with the background color it is being painted on.
- Drawing small circles over the color changes can get you a "blend" effect (that's right, It's the "don't Ever smudge your colors!!" thing that every artist warns you against. I'm too lazy to build stuff up gradually, sorry. D: )
Other brushes
I'll leave you to test the other brushes on your own. A favourite technique of mine so far is to take a low-opacity Basic_Paint_Shade brush to block in rough colors then paint over them with some of the smudge brushes to get painterly-like smudes:

More brush presets are available, see Links
Brush composite modes
See that <meuchoice>mode</menuchoice> thing at the top? It dictates the composite mode of your brush. For example, will only leave a trace if the color of the brush is darker than the color it is painting over.
Tips:
- You can add modes to . I suggest adding the following:
- (HSL = Hue, Saturation, Lightness)
- (or one of the Dodge options)
- : this is more for layer modes (layers and brushes share the same favourite modes).
- if you're like me, and bad at choosing colors, just do everything in greyscale first, using multiple layers as appropriate. Then lock the layer transparencies, and pass over the gray with a brush on mode (gradients work great too). It is also very easy to change colors this way.
- There are actually preset brushes for functions such as "color", "darken", "lighten" etc.!
Other stuff
Layers and layer styles
The layer types you'll be most interested in are Paint Layers and Group Layers. Notice that layer modes share the same favourites as brush modes.
Tips:
- If you have a lineart layer, set it at the very top as a Multiply layer. Duplicate it then merge a few times if you think it isn't dark enough.
- Color layers: Remember I said I was bad at colors? Another way to do this is to:
- First paint in greyscale
- Make a layer with Overlay mode on top. Paint colors on That one. That's it.
- If you are using multiple layers and don't want the color to go outside of bounds, Duplicate the greyscale, lock the transparency of the new layer (checkered box), and fill it with whatever colors you want. You can't do this with just a brush on Overlay mode, because the brush will change the darkness/light values of your greyscale.

- Erase mode: this funny mode where everything you draw on an Erase layer basically creates holes on the layers below (like a mask, just faster). Basically set an Erase layer as the top layer in a group of layers. Anything you draw on it will erase corresponding parts in all the layers below (but only of that group). Good for punching holes and frills.
Perspective grid
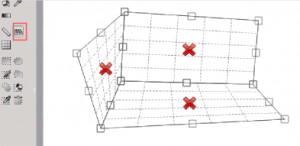
Krita has this awesome guide called a perspective grid.
- Choose the tool
- Click 3 points on the canvas and the grid will appear.
- Drag on corners to adjust
- Drag on middle points to make a new "side" appear
- Click on X to delete
Composition dock
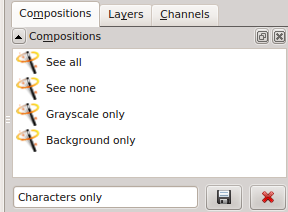
The Composition dock basically saves layer visibility states. Suppose you have multiple layer groups, each with a greyscale layer and several color effect layers. You want to be able to easily switch off the visibility of all color layers, and leave only the greyscale layers visible.
You can achieve that with the Composition dock. It saves your current layer visibility setup.
New files and saving
I'll just end up with some basics that you'll only need to read once.
- Starting a new file: Just choose and go with the defaults. There are a lot of options there, but if you don't know what they are, then you probably don't need to change them.
- Saving: Krita has its own .kra ("Krita document") file type. Save under that filetype.
- Exporting: Once you're done with a drawing and want it in a format you can upload, make sure you Export instead of Save (you don't want to lose all your layer information right?). The usual file type to use is JPEG image.
- Note: for some reason, my Windows build of Krita gives a weird output when I try to save as .jpg. I seem to be the only one affected though, and the Linux build works fine. If you have the same problem, save as a PNG image and convert it elsewhere if needed.
- Exporting to other programs: Many of us who use Open source programs also use other programs like Gimp or MyPaint. If you want to open your file with other programs, save your files as .ora ("OpenRaster archiving image"). Unfortunately there doesn't seem to be an easy way to share with Inkscape though. Bummer.
This concludes this tutorial. Don't forget to drop by the Krita forums to thank the developers and post your results in the Krita forum galleries. ![]()
The Windows version is quite new so there are still some bugs being worked on, but it didn't prevent me from completing drawings with it. Still, when you come across bugs, help the developers by submitting a bug report. That's it!
Links
To download Krita:
Windows: In the Krita download page, locate the link to "Download Krita 2.5" (or the latest version). The Windows version is still new and experimental, but it worked pretty well for me when I tried it.
Linux (Ubuntu): You can install Krita 2.4 from the package manager, but if you want to get the latest 2.5 version, you'll have to add a ppa:
sudo add-apt-repository ppa:kubuntu-ppa/backports
sudo apt-get update
sudo apt-get install krita
More brushes!
Brush tutorials:
Others:

