KAddressBook/Tutorials/How to add a new contact?/da: Difference between revisions
(Created page with "400px|center|thumb|Klik på <menuchoice>+ Ny kontakt</menuchoice>") |
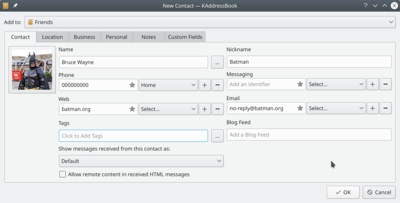
(Created page with "I formularen indsætter du al den information, som du vil gemme. Øverst i formularen kan du vælge, hvilken dressebog du vil føje kontakten til.") |
||
| Line 9: | Line 9: | ||
[[File:KAddressBookNewContact1.png|400px|center|thumb|Klik på <menuchoice>+ Ny kontakt</menuchoice>]] | [[File:KAddressBookNewContact1.png|400px|center|thumb|Klik på <menuchoice>+ Ny kontakt</menuchoice>]] | ||
I formularen indsætter du al den information, som du vil gemme. Øverst i formularen kan du vælge, hvilken dressebog du vil føje kontakten til. | |||
{{Note|You can add more than one phone number, website, and email. Just click on the <menuchoice>+</menuchoice> button and select a category. }} | {{Note|You can add more than one phone number, website, and email. Just click on the <menuchoice>+</menuchoice> button and select a category. }} | ||
Revision as of 07:44, 31 October 2022
En af de basale funktioner i en adressebog er at tilføje nye kontakter.
Klik først på knappen . Dette vil få en formular til at dukke op.

I formularen indsætter du al den information, som du vil gemme. Øverst i formularen kan du vælge, hvilken dressebog du vil føje kontakten til.

More information can be added. For this, navigate between the tabs: , , , , .
When you are done, confirm the contact creating by clicking on .


