digiKam/Обробка файлів цифрових негативів
Обробка файлів цифрових негативів у digiKam
Створено на основі допису у блозі Дмітрія Попова (Dmitri Popov), 4 травня 2011 року
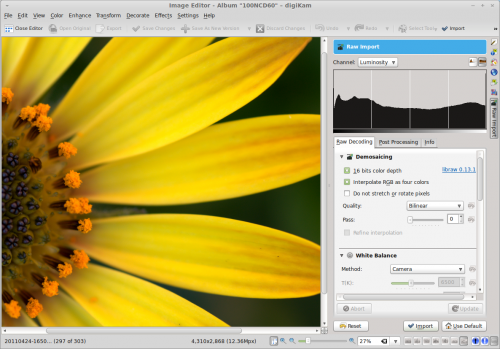
digiKam usually does a decent job of decoding RAW files using the default settings. But if you prefer to have complete control of how the application processes RAW files, choose , switch to the section, and enable the option. Next time you open a RAW file for editing, digiKam drops you into the RAW Import interface where you can tweak the RAW import and post-processing settings. digiKam relies on the LibRaw library for all RAW processing. LibRaw is a pure C++ library which includes demosaicing algorithms from the dcraw software as well as algorithms from other projects like Rawtherapee.

The sidebar contains three tabs: , , and . The section gives you access to settings that let you tweak demosaicing, white balance, noise reduction and chromatic aberration correction, and color management settings.
Demosaicing is a process of reconstructing a full color image from the raw output of an image sensor. To better understand what demosaicing is and how it works, you might want to check the Understanding Digital Camera Sensors article. digiKam (or rather the LibRaw library) supports several demosaicing algorithms, including Bilinear, VNG, AHD, LMMSE, and others. You can use the Shift + F1 keyboard shortcut to view a brief, and rather technical, description of each algorithm. But the best way to see the differences between different algorithms is to try to apply them to the currently opened RAW file. Select the algorithm you want, and press the button to preview the result. The preview pane displays an image that will be imported in the editor, and you can use the zoom slider at the bottom of the window to zoom in on the image for closer examination.
By default, digiKam converts RAW files into 8-bit color images, but you can choose the 16-bit mode instead by enabling the 16 bits color depth option. The 8-bit mode is faster, but the 16-bit conversion is by far the best way to go, as it provides better tonal range. If you choose to work in the 16-bit mode, it’s recommended that you enable and configure color management options in the section to prevent dark rendering of the image in the editor. Due to the way certain algorithms process green pixels, the resulting image can contain undesirable patterns and artifacts. Enabling the option can fix that. The option is there specifically for Fujifilm’s cameras with the Super CCD sensors and cameras using sensors with non-square pixels. When this option is enabled, the image is titled 45 degrees, so that each output pixel corresponds to one RAW pixel. This option also prevents the image from stretching to its correct aspect ratio.
In the section, you can adjust white balance settings and specify how the system should handle highlight clippings (overexposed areas in the photo). LibRaw offers several algorithms for restoring highlight clippings — Solid White, Unclip, Bend, and Rebuild — and you can view their brief description by using the Shift + F1 keyboard shortcut. To process highlights more accurately, enable the option. And if you want LibRaw to automatically adjust brightness, tick the check box. Besides white balance, you can also enable and adjust the option and manually tweak exposure compensation settings. The under- and overexposure buttons at the bottom can identify under- and overexposed areas of the photo in the preview pane, which can help you to adjust exposure settings.
Using the options in the section, you can choose to apply one of the supported noise reduction algorithms to the image as well as enable the chromatic aberration correction option and adjust its settings. And in the section, you can specify a color profile and a color space (refer to Color Management in digiKam for more info on color management).
Under the tab, you can adjust several exposure settings (e.g., brightness, contrast, gamma, and exposure) as well as adjust the luminosity curve. While these adjustments can be performed later when editing the converted image, you can choose do this during the RAW import to streamline the editing process. digiKam applies all adjustments to the preview image, so you can immediately see the result of your tweaking without performing the actual conversion.
Once you’re satisfied with the settings and adjustments you made, press the button to import and process the RAW file. And remember: if in doubt, you can always press the button to let digiKam import the RAW file using the default settings.
