Kexi/Handbook/Kexi Basics/The Kexi Main Window
The KEXI Main Window

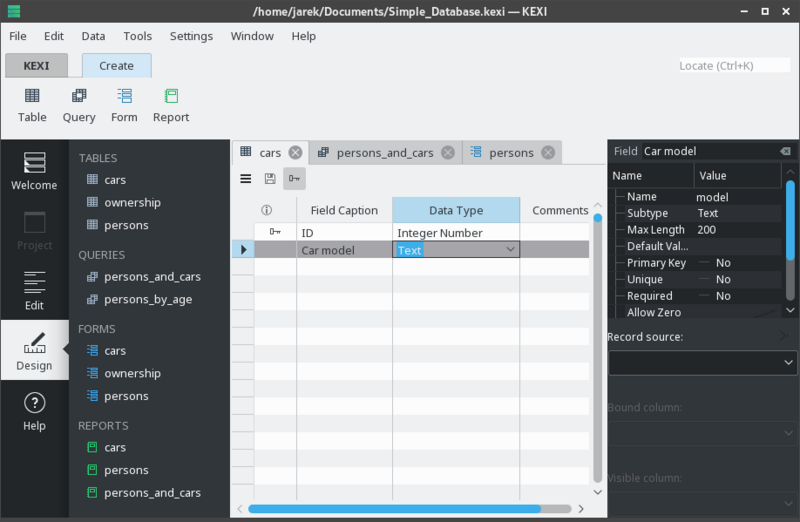
The main window of the KEXI application consists of rectangular elements. You can resize or hide some of them.
The Tabbed Toolbar on the top gives access to common actions and commands.
The Project Navigator and Property Editor are shown in panes on each side of the child window. These can be resized or hidden as required. A pane can be hidden by clicking the small cross at the top of the pane (just below the toolbar).
Database objects (tables, queries, reports.) listed in the Project Navigator can be opened by double-clicking on their names.
Main Application Elements

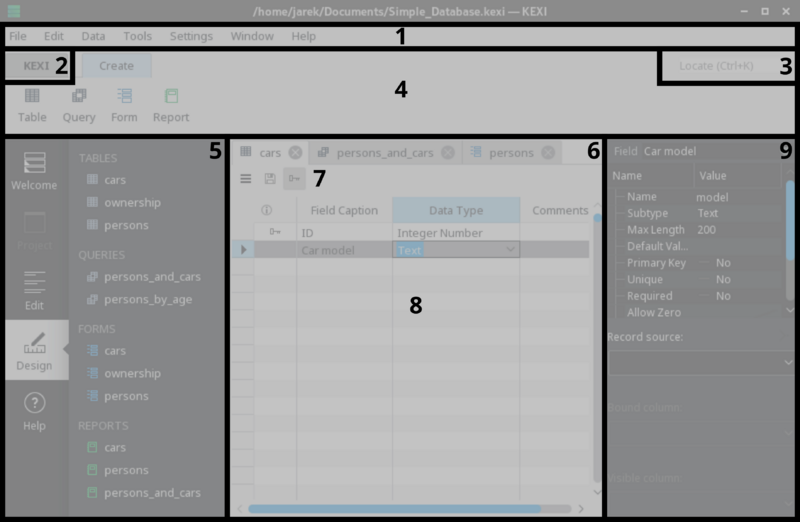
The main elements of KEXI application's window are:
- Menu bar gives access to global commands for the application. For a detailed description, refer to Appendix C: Menu Commands.
- KEXI button gives access to project-related commands, grouped in a special KEXI Menu. For a detailed description, refer to Appendix C: Menu Commands → KEXI Menu.
- Global Search box allows you to quickly search for objects within your opened project.
- Tabbed Toolbar contains the most common global and contextual commands. For a detailed description, refer to Appendix C: Toolbar Commands.
- Project Navigator pane. On the left side of the pane, consisted of a Mode Selector and a list of all objects available within the currently opened project.
- Tabs of opened project objects allow you to switch between the tabs of each object currently open within the project.
- A mini toolbar provides contextual commands that operate on a given open object within the project.
- Area with opened objects in the project is the central area of the application, utilizing most of the screen space, and contains design or data related to the object.
- Property Editor pane contains a list of properties for the currently edited object in the project, such as a form or table.
The Project Navigator pane is one of the most frequently used elements of the KEXI main window. It is consisted of two parts.
- On the left side of the pane, there is a Mode Selector that can be used to perform a particular task, such as data entry or designing tables and forms.
- On the right side of the pane, there is a list of all objects available within the currently opened project.
- The objects are split into groups: tables, queries, forms and reports.
- To open an object in Data View, simply click its name.
- If the object's window was already opened, the action just activates the window without switching it's view mode.
- For each object on the list a context menu is available using the right mouse button. Appendix C: Context Menus in the Project Navigator documents each context menu in details.
Opened Database Objects Area / Tabbed Windows
Whenever you double click an object in the project navigator, it opens in the Opened database objects area. Each window has its own tab in KEXI.
You can rearrange the tabs by drag and drop, and close them using the File:Icon-tab-close.png button located on the right of each tab.
Property Editor Pane
In the Property Editor pane you can change properties of the object displayed in the active window. Depending on the context, the pane consists of one or more tabs. The first, always visible tab, , contains the list of available properties.
Rules for using the Property Editor:
- Each row contains a single property.
- You can use the mouse or the keyboard to change values of particular properties.
- Most frequently used types of property values are:
- a number; you can enter the value directly or increase or decrease its value by clicking with the left mouse button on the up/down arrows at the right of the value field.
- text
- a drop down list of values; click on the desired value to select
- Yes/No; you can toggle the value by clicking on the button; Yes (true) means that the button is toggled on, No (false) means that the button is toggled off.
The Property Editor pane is not visible if:
- no single database object's window is open, or
- the active database object's window does not offer properties as is the case when open in Data View instead of Design View.

