Archive:Kdenlive/Manual/Timeline/zh-tw: Difference between revisions
(Updating to match new version of source page) |
(Updating to match new version of source page) |
||
| Line 7: | Line 7: | ||
[[File:Kdenlive_timeline.png|300px|thumb|right|Timeline pane]]時間軸位於 '''Kdenlive'''的中心部分。它由四部分組成。(請看畫面截圖)。 | [[File:Kdenlive_timeline.png|300px|thumb|right|Timeline pane]]時間軸位於 '''Kdenlive'''的中心部分。它由四部分組成。(請看畫面截圖)。 | ||
* 1 - Track resizing icon. These 2 icons allow you to increase or decrease the height of the tracks. They allow the track height to be adjusted to half the default height or double the default height. The default height of tracks can be configured in '''Kdenlive's''' [[Special:myLanguage/Kdenlive/Manual/Settings_Menu/Configure_Kdenlive#Timeline|Settings]] dialog. | |||
* 1 - | |||
* 2 - '''Timeline ruler'''. This shows the time in frames or in hh:mm:ss notation. The area highlighted in green is called the selection zone, and is useful if you want to render only a part of your project. Left clicking in the timeline ruler will move the [[Special:myLanguage/Kdenlive/Manual/Timeline#Timeline_Cursor.2FPosition_Caret|timeline cursor]] and seek to that position. The Timeline ruler context menu allows you to manage [[Special:myLanguage/Kdenlive/Manual/Timeline/Guides|Guides]]. | |||
* 2 - '''Timeline ruler'''. | |||
* 3 - '''Track header'''. This box shows some options for a track. First is the track name (Video 2 in the screenshot). That name can be changed by simply clicking in it. Below are icons to <menuchoice>Lock the track</menuchoice> (prevent adding / removing clips), <menuchoice>Mute the track</menuchoice>, and <menuchoice>Hide video</menuchoice> from this track. Right clicking in the track header will give you a context menu allowing to manage (add / delete) tracks. | * 3 - '''Track header'''. This box shows some options for a track. First is the track name (Video 2 in the screenshot). That name can be changed by simply clicking in it. Below are icons to <menuchoice>Lock the track</menuchoice> (prevent adding / removing clips), <menuchoice>Mute the track</menuchoice>, and <menuchoice>Hide video</menuchoice> from this track. Right clicking in the track header will give you a context menu allowing to manage (add / delete) tracks. | ||
| Line 28: | Line 24: | ||
=== Tracks === | === Tracks === | ||
The timeline is made of tracks. There are two kind of tracks: audio and video. The number of tracks is defined when creating a new project in the [[Special:myLanguage/Kdenlive/Manual/Projects and Files/Project Settings|Project Settings Dialog]]. Adding a clip in timeline can be achieved by dragging it from the [[Special:MyLanguage/Kdenlive/Manual/Projects_and_Files/Project_Tree|Project | The timeline is made of tracks. There are two kind of tracks: audio and video. The number of tracks is defined when creating a new project in the [[Special:myLanguage/Kdenlive/Manual/Projects and Files/Project Settings|Project Settings Dialog]]. Adding a clip in timeline can be achieved by dragging it from the [[Special:MyLanguage/Kdenlive/Manual/Projects_and_Files/Project_Tree|Project Bin]] or the [[Special:myLanguage/Kdenlive/Manual/Monitors|Clip Monitor]]. | ||
=== See also === | === See also === | ||
Revision as of 18:00, 7 August 2017
時間軸

時間軸位於 Kdenlive的中心部分。它由四部分組成。(請看畫面截圖)。
- 1 - Track resizing icon. These 2 icons allow you to increase or decrease the height of the tracks. They allow the track height to be adjusted to half the default height or double the default height. The default height of tracks can be configured in Kdenlive's Settings dialog.
- 2 - Timeline ruler. This shows the time in frames or in hh:mm:ss notation. The area highlighted in green is called the selection zone, and is useful if you want to render only a part of your project. Left clicking in the timeline ruler will move the timeline cursor and seek to that position. The Timeline ruler context menu allows you to manage Guides.
- 3 - Track header. This box shows some options for a track. First is the track name (Video 2 in the screenshot). That name can be changed by simply clicking in it. Below are icons to (prevent adding / removing clips), , and from this track. Right clicking in the track header will give you a context menu allowing to manage (add / delete) tracks.
- 4 - The track itself, this is where you can drop your clips.
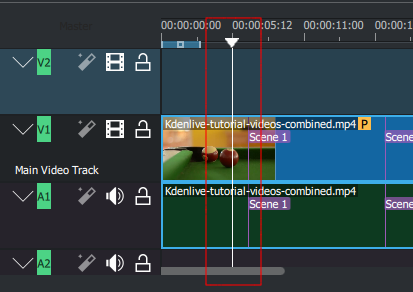
Timeline Cursor/Position Caret/Playhead

This indicates the position we are displaying in the Project Monitor. You can scroll the position by dragging the Timeline cursor (a.k.a Position Caret or Playhead).
Beginning with version 0.9.4, dragging the timeline cursor will play the audio of the clip (a.k.a. Audio Scrubbing). This feature only works if you have checked in Settings>Configure_Kdenlive>Playback.
Tracks
The timeline is made of tracks. There are two kind of tracks: audio and video. The number of tracks is defined when creating a new project in the Project Settings Dialog. Adding a clip in timeline can be achieved by dragging it from the Project Bin or the Clip Monitor.
See also
