Digikam/Geotagging in digiKam 2.0/da: Difference between revisions
(Importing a new version from external source) |
(Importing a new version from external source) |
||
| Line 10: | Line 10: | ||
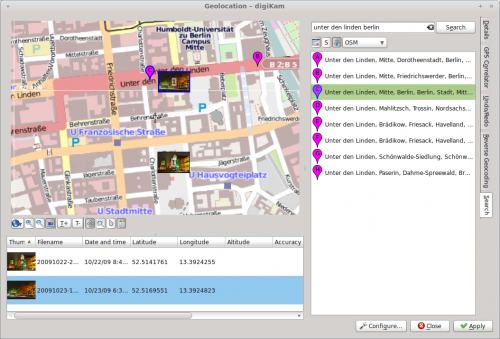
For at geotagge fotos skal du finde de geografiske koordinater på det sted, hvor billedet blev taget og brugerfladen til <menuchoice>Geo-lokering</menuchoice> har flere måder at gøre det på. Først og fremmest kan du bruge musen til at flytte rundt på kortet og udpege det ønskede sted. Som standard bruger Geo-lokerings-brugerfladen tjenesten '''OpenStreetMap''' som kilde til kortene, men du kan skifte til '''Google Maps''' ved hjælp af knappen <menuchoice>Kortindstillinger</menuchoice> under kortfeltet. Hvis du kender stedets fulde adresse eller en del af den, så kan du bruge den indbyggede søgefunktion for at finde den på kortet. Klik på fanebladet <menuchoice>Søg</menuchoice>, skriv adressen i søgefeltet og klik på knappen <menuchoice>Søg</menuchoice>, så skulle der dukke en liste med resultater op med tilsvarende markeringer på kortet. | |||
The easiest way to add geographical coordinates to the photos is to drag them from the list onto the desired spot on the map. Alternatively, you can assign the geographical coordinates of a specific search result to the photos. To do this, select the photos in the list, right-click on the desired search result, and pick the <menuchoice>Move selected images to this position</menuchoice> item from the context menu. | The easiest way to add geographical coordinates to the photos is to drag them from the list onto the desired spot on the map. Alternatively, you can assign the geographical coordinates of a specific search result to the photos. To do this, select the photos in the list, right-click on the desired search result, and pick the <menuchoice>Move selected images to this position</menuchoice> item from the context menu. | ||
Revision as of 09:19, 1 April 2011
Geotagging i digiKam 2.0
Fra Dmitri Popovs blog, 24. marts 2011
Geo-lokalisering er ikke en ny funktion, men i digiKam 2.0 er den blevet gennemgribende omarbejdet for at strømline processen med at geotagge fotos. Den nye brugerflade til geotagging () samler alle værktøjer til geotagging på et sted. Brugerfladen selv består af tre dele: kort-feltet indeholder et kort og en værktøjslinje med forskellige navigeringsværktøjer; under kort-feltet er der en liste af valgte fotos; sidepanelet til højre viser det aktuelt aktive afsnit.

For at geotagge fotos skal du finde de geografiske koordinater på det sted, hvor billedet blev taget og brugerfladen til har flere måder at gøre det på. Først og fremmest kan du bruge musen til at flytte rundt på kortet og udpege det ønskede sted. Som standard bruger Geo-lokerings-brugerfladen tjenesten OpenStreetMap som kilde til kortene, men du kan skifte til Google Maps ved hjælp af knappen under kortfeltet. Hvis du kender stedets fulde adresse eller en del af den, så kan du bruge den indbyggede søgefunktion for at finde den på kortet. Klik på fanebladet , skriv adressen i søgefeltet og klik på knappen , så skulle der dukke en liste med resultater op med tilsvarende markeringer på kortet.
The easiest way to add geographical coordinates to the photos is to drag them from the list onto the desired spot on the map. Alternatively, you can assign the geographical coordinates of a specific search result to the photos. To do this, select the photos in the list, right-click on the desired search result, and pick the item from the context menu.
Once you’ve assigned the geographical coordinates to the photos, press the button to write geotags to the photos.

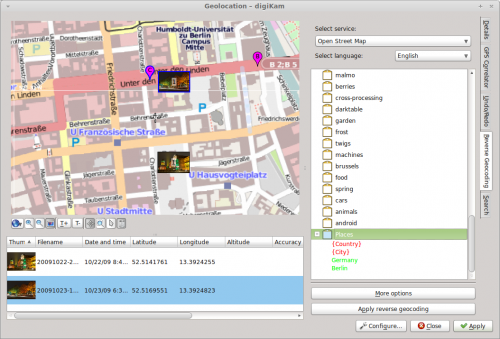
The interface offers another nifty feature called Reverse Geocoding. This tool can retrieve human-readable locations such as city, street, country, etc. for photos based on their geographical coordinates. The obtained location names can be stored in photos as new tags, so you can easily search for photos taken in a specific country, city, or even street.
One way to put this feature to practical use is to create a dedicated Places tag, and then use reverse geocoding to add place-related sub-tags to it. To do this, create a new tag called Places (you can do this in the sidebar). Select then the desired photos and choose . If the photos are not already geotagged, assign geographical coordinates to them. Switch then to the section, right-click on the tag, and use the available context menu items to add the address elements to the tag (e.g., Country and City). Select all the photos in the list and press the button. You should see the country and city sub-tags (e.g., Germany and Berlin) under Places. Hit then the button, and you are done. Now you can use the sidebar to quickly locate photos taken in a specific country and city.
