Digikam/Versioning/it: Difference between revisions
(Importing a new version from external source) |
(Importing a new version from external source) |
||
| Line 5: | Line 5: | ||
Ritoccando le foto in '''digiKam''' potresti forse voler tenere intatti gli originali. Questa è la situazione in cui la funzione ''Revisione'' può essere proprio utile. Ti permette di salvare ogni versione modificata di una foto originale come immagine separata corredata da un elenco di tutte le azioni eseguite. | Ritoccando le foto in '''digiKam''' potresti forse voler tenere intatti gli originali. Questa è la situazione in cui la funzione ''Revisione'' può essere proprio utile. Ti permette di salvare ogni versione modificata di una foto originale come immagine separata corredata da un elenco di tutte le azioni eseguite. | ||
La modalità di funzionamento delle revisioni è molto semplice. Quando sei pronto per salvare una versione modificata di una foto, premi il pulsante <menuchoice>Salva come nuova versione</menuchoice>. In questo modo la versione modificata viene salvata come immagine separata. Tieni a mente che se stai lavorando con un file RAW, tutte le versioni verranno automaticamente convertite in uno dei formati grafici supportati. In modo predefinito è il JPEG, ma puoi passare ad un altro formato supportato. Per far questo vai su <menuchoice>Impostazioni -> Configura digiKam</menuchoice>, passa alla sezione <menuchoice>Modifica delle immagini</menuchoice> e seleziona il formato desiderato dall'elenco a comparsa <menuchoice>Salva file come</menuchoice>. Per ignorare le impostazioni globali puoi salvare una singola versione in un formato differente facendo clic sul triangolo e scegliendo il formato desiderato dal menu <menuchoice>Salva nel formato</menuchoice>. | |||
By default, each version is automatically saved in the same album as the original, so you can end up with multiple thumbnails of the same photo in the album. But '''digiKam''' provides an elegant solution to the problem: you can combine the original and all its versions into a single group. To do this, select the original and its versions, right-click on the selection and choose the <menuchoice>Group Selected Here</menuchoice> command. This combines all the selected photos as one neat bundle, and an icon in the lower-right corner of the thumbnail displays the number of images in the group. Alternatively, you can save the version in a separate album: click on the triangle next to the <menuchoice>Save As New Version</menuchoice> button, select the <menuchoice>Save New Version as</menuchoice> command, and pick the destination folder. | By default, each version is automatically saved in the same album as the original, so you can end up with multiple thumbnails of the same photo in the album. But '''digiKam''' provides an elegant solution to the problem: you can combine the original and all its versions into a single group. To do this, select the original and its versions, right-click on the selection and choose the <menuchoice>Group Selected Here</menuchoice> command. This combines all the selected photos as one neat bundle, and an icon in the lower-right corner of the thumbnail displays the number of images in the group. Alternatively, you can save the version in a separate album: click on the triangle next to the <menuchoice>Save As New Version</menuchoice> button, select the <menuchoice>Save New Version as</menuchoice> command, and pick the destination folder. | ||
Revision as of 09:19, 23 April 2011
Revisioni in digiKam 2
Trascritto dal blog di Dmitri Popov, 28 marzo 2011
Ritoccando le foto in digiKam potresti forse voler tenere intatti gli originali. Questa è la situazione in cui la funzione Revisione può essere proprio utile. Ti permette di salvare ogni versione modificata di una foto originale come immagine separata corredata da un elenco di tutte le azioni eseguite.
La modalità di funzionamento delle revisioni è molto semplice. Quando sei pronto per salvare una versione modificata di una foto, premi il pulsante . In questo modo la versione modificata viene salvata come immagine separata. Tieni a mente che se stai lavorando con un file RAW, tutte le versioni verranno automaticamente convertite in uno dei formati grafici supportati. In modo predefinito è il JPEG, ma puoi passare ad un altro formato supportato. Per far questo vai su , passa alla sezione e seleziona il formato desiderato dall'elenco a comparsa . Per ignorare le impostazioni globali puoi salvare una singola versione in un formato differente facendo clic sul triangolo e scegliendo il formato desiderato dal menu .
By default, each version is automatically saved in the same album as the original, so you can end up with multiple thumbnails of the same photo in the album. But digiKam provides an elegant solution to the problem: you can combine the original and all its versions into a single group. To do this, select the original and its versions, right-click on the selection and choose the command. This combines all the selected photos as one neat bundle, and an icon in the lower-right corner of the thumbnail displays the number of images in the group. Alternatively, you can save the version in a separate album: click on the triangle next to the button, select the command, and pick the destination folder.

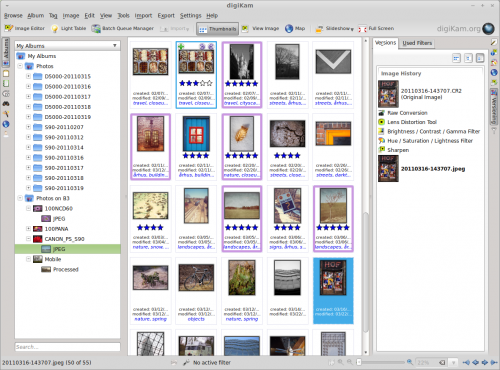
To view all versions of a photo, select the original in its album, and expand the right . You should then see all versions of the selected photo with a complete list of editing actions.
