Kopete/Jabber/Adding friends/it: Difference between revisions
(Importing a new version from external source) |
No edit summary |
||
| (11 intermediate revisions by the same user not shown) | |||
| Line 1: | Line 1: | ||
<languages /> | <languages /> | ||
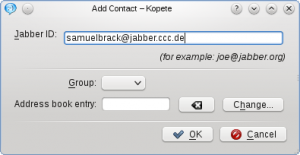
Al primo accesso la finestra di '''Kopete''' è piuttosto vuota. Potrebbe esserci un contatto predefinito aggiunto dal tuo server che forse ti invia un messaggio di benvenuto, ma non c'è alcun contatto reale nel tuo roster (questa parola identifica l' "elenco dei contatti" nel mondo Jabber). Il primo passo per aggiungere amici in Jabber è, naturalmente, chiedere loro l'ID Jabber. Quando ne hai uno puoi immediatamente aggiungerlo a '''Kopete'''. Puoi fare clic su <menuchoice>Aggiungi -> tuoJID@esempio.org</menuchoice> o <menuchoice>File -> Aggiungi contatto -> tuoJID@esempio.org</menuchoice>. Compare una nuova finestra che ti chiede l'<menuchoice>ID Jabber</menuchoice> che vuoi aggiungere al tuo roster. Semplicemente digitalo e fai clic su <menuchoice>OK</menuchoice>. L'opzione <menuchoice>Gruppo</menuchoice> viene utilizzata quando hai specificato dei gruppi di contatti (esempio "famiglia" e "lavoro"). È possibile definire una connessione con [[Special:myLanguage/KAddressBook|KAddressBook]] tramite <menuchoice>Voce della rubrica</menuchoice>, in questo modo puoi scambiare informazioni come le immagini del profilo tra le due applicazioni. | |||
[[File:Kopetetutorial_snap009_addfriend.png|thumb|center|300px| | [[File:Kopetetutorial_snap009_addfriend.png|thumb|center|300px|Aggiungere un amico]] | ||
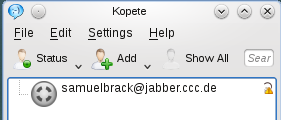
Ora hai aggiunto il tuo primo amico al roster. Ma prima di poter iniziare a scrivergli/le messaggi, il tuo contatto deve autorizzare la tua richiesta. Fino a ciò il contatto presenterà un piccolo punto esclamativo giallo a destra del campo del contatto. | |||
[[File:Kopetetutorial_snap010_exlamationmarkfriend.png|thumb|center|300px| | [[File:Kopetetutorial_snap010_exlamationmarkfriend.png|thumb|center|300px|Il tuo contatto]] | ||
Una volta che il tuo amico ha autorizzato la tua richiesta o ti ha aggiunto al suo roster, la sua icona sarà colorata quando presente in linea. L'esatto significato delle differenti icone (In linea, Assente, ecc.) può essere visto nello <menuchoice>Stato</menuchoice> che tu stesso puoi impostare. Ricevi una notifica quando vieni autorizzato. | |||
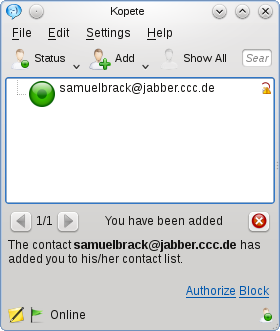
Normalmente anche il tuo amico ti inserirà nella sua lista dei contatti, quindi pure tu dovrai autorizzare questa richiesta. '''Kopete''' notifica questo in basso con una bandierina verde e con la descrizione della richiesta. Fai clic su <menuchoice>Autorizza</menuchoice> per accettare. L'area di notifica può essere chiusa facendo clic sulla x nell'angolo in alto a destra dell'area stessa. | |||
[[File:Kopetetutorial_snap011_addedbyfriend.png|thumb|center|300px| | [[File:Kopetetutorial_snap011_addedbyfriend.png|thumb|center|300px|Ora sei stato aggiunto dal tuo contatto]] | ||
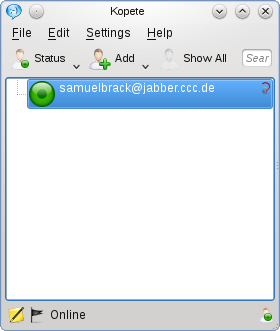
Dopo questa procedura dovresti vedere un elenco di contatti come nella prossima immagine. | |||
[[File:Kopetetutorial_snap012_fullauthorized.png|thumb|center|300px| | [[File:Kopetetutorial_snap012_fullauthorized.png|thumb|center|300px|Il tuo contatto è completamente autorizzato]] | ||
Ora hai aggiunto con successo il tuo primo contatto al roster. | |||
<hr /> | <hr /> | ||
{{Prevnext|Special:myLanguage/Kopete/Jabber|Special:myLanguage/Kopete/Jabber/Messaging_and_sending_files| | {{Prevnext|Special:myLanguage/Kopete/Jabber|Special:myLanguage/Kopete/Jabber/Messaging_and_sending_files|Ritorna all'indice|Pagina 6: Scrivere messaggi ed inviare file}} | ||
[[Category:Internet]] | [[Category:Internet/it]] | ||
Latest revision as of 09:27, 23 April 2011
Al primo accesso la finestra di Kopete è piuttosto vuota. Potrebbe esserci un contatto predefinito aggiunto dal tuo server che forse ti invia un messaggio di benvenuto, ma non c'è alcun contatto reale nel tuo roster (questa parola identifica l' "elenco dei contatti" nel mondo Jabber). Il primo passo per aggiungere amici in Jabber è, naturalmente, chiedere loro l'ID Jabber. Quando ne hai uno puoi immediatamente aggiungerlo a Kopete. Puoi fare clic su o . Compare una nuova finestra che ti chiede l' che vuoi aggiungere al tuo roster. Semplicemente digitalo e fai clic su . L'opzione viene utilizzata quando hai specificato dei gruppi di contatti (esempio "famiglia" e "lavoro"). È possibile definire una connessione con KAddressBook tramite , in questo modo puoi scambiare informazioni come le immagini del profilo tra le due applicazioni.

Ora hai aggiunto il tuo primo amico al roster. Ma prima di poter iniziare a scrivergli/le messaggi, il tuo contatto deve autorizzare la tua richiesta. Fino a ciò il contatto presenterà un piccolo punto esclamativo giallo a destra del campo del contatto.

Una volta che il tuo amico ha autorizzato la tua richiesta o ti ha aggiunto al suo roster, la sua icona sarà colorata quando presente in linea. L'esatto significato delle differenti icone (In linea, Assente, ecc.) può essere visto nello che tu stesso puoi impostare. Ricevi una notifica quando vieni autorizzato.
Normalmente anche il tuo amico ti inserirà nella sua lista dei contatti, quindi pure tu dovrai autorizzare questa richiesta. Kopete notifica questo in basso con una bandierina verde e con la descrizione della richiesta. Fai clic su per accettare. L'area di notifica può essere chiusa facendo clic sulla x nell'angolo in alto a destra dell'area stessa.

Dopo questa procedura dovresti vedere un elenco di contatti come nella prossima immagine.

Ora hai aggiunto con successo il tuo primo contatto al roster.
- ← Ritorna all'indice
- Kopete/Jabber/Adding friends/it
- Pagina 6: Scrivere messaggi ed inviare file →
