Digikam/Batch Queue Manager and Script
Process Photos with digiKam’s Batch Queue Manager and a Bash Script
Transcribed from Dmitri Popov's blog, 11 July 2011
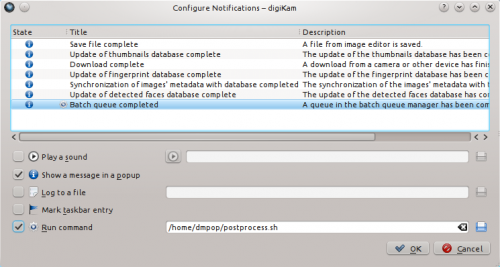
One of digiKam’s lesser known features is the ability to link scripts to notifications. At first sight, this may seem like a rather obscure functionality, but it can be put to some clever uses. Say, you want to keep a portfolio of selected photos on a mobile device. Resizing multiple photos to a specified size to make it easier to view them on the mobile device and transferring the processed photos from digiKam to the mobile device manually is not very practical. And this is where the ability to trigger scripts via notifications can come in handy. You can attach a simple Bash script to the Batch queue completed notification, so it’s triggered automatically when the Batch Queue Manager tool is done processing photos.
The Bash script is very simple, indeed. It uses the rsync tool to copy the processed photos from the source directory (in this case, it’s /home/user/Photos/Processed) to the /DCIM/Camera directory on the mounted SD card:
#!/bin/bash
rsync -avz --delete /home/user/Photos/Processed /media/0CFA-5602/DCIM/Camera
Paste the code above into an empty text file and save it as a postprocess.sh file (don’t forget to replace the example paths with the actual paths to the source and destination directories). Make then the script executable using the chmod o+x postprocess.sh command.

In digiKam, choose and select the item. Tick the check box, and enter the path to the postprocess.sh script in the appropriate field. As you might have guessed, this links the script to the notification, so the script is triggered as soon as the batch operation is finished.
Next, create a tag (e.g.,transfer) in digiKam and assign it to the photos you want to transfer to the mobile device. Alternatively, you can use a specific color label for that. Use then the right sidebar to display the tagged or labelled photos, select them, and press Ctrl + B (or choose ) to add them to a new batch queue. In the section, click on the tab and select the sub-album. Under the tab, double-click on the tool to add it to the section. In the pane, specify the desired length. You can choose between several presets, or enable the option and specify the desired length.
Hit then the button, and once the batch operation is completed, the assigned Bash script copies the resized photos to the mounted SD card.
You can tweak the script to perform other post-processing actions, too. For example, if you use the llgal command-line tool to generate static HTML photo galleries, you can tweak the script to add the processed photos to an HTML album. The script may look something like this:
cd /home/user/Photos/Processed
llgal --exif --li -L --sx 800 --sy 600
In other words, you can do all kinds of clever tricks by linking scripts to notifications.
