digiKam/Fotos umbenennen
Fotos umbenennen mit digiKam
This article originally appeared in Scribbles and Snaps and is reproduced with the kind permission of Dmitri Popov.
Giving your photos meaningful names makes it significantly easier to keep tabs on them. Of course, renaming each and every photo by hand is not particularly practical, especially if you take dozens or even hundreds of photos each day. This is when digiKam’s feature can come in rather handy. You can use it to define rather advanced renaming rules and apply them to multiple photos in one fell swoop.

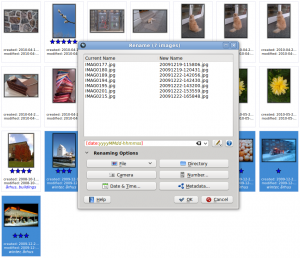
To put the tool to practical use, select the photos you want to rename and press the button in the main toolbar (you can also choose -> or press F2). The dialog window offers a vast range of renaming options which allow you to create complex renaming rules. But you might want to start with a simple rule that renames photos using the date and time data. To do this, press the button and select from the drop-down list. This will pull the date and time info from the photo’s metadata.
Next, you have to specify a date/time format by selecting the appropriate item from the drop-down list. If none of the available formatting options satisfy you, select the item, which lets you construct the formatting string manually. For example, the
yyyyMMdd-hhmmss
formatting string produces file names like
20100531-173501
and
20100701-110111
while the
MMM-dd-yyyy-dddd
string generates names like
May-31-2010-Monday
and
June-01-2010-Tuesday
The clever part is that you can immediately see the result of the renaming string right below the field. For a full list of available formatting options, check the official Qt documentation.
Besides date and time, the dialog window offers a few other useful options. The button, for example, allows you to add the camera model to the file name. This can be useful if you are using several cameras and you want to quickly identify photos taken with a specific camera. The button gives you access to EXIF and other photo metadata you can use in renaming rules.

Next to the field where you enter the renaming rule, there is a button that lets you specify so-called modifiers or actions that will be applied to the file names during the renaming operation. For example, using the modifiers, you can convert all file names to lower or uppercase, or capitalize the first letter. Here is a quick overview of other useful modifiers:
- – Removes leading, trailing, and extra spaces.
- – Adds unique numerical values to identical file names.
- – Performs search and replace. The modifier supports regular expressions.
- – Lets you specify a specific fragment of the file name for the renaming rule. For example, the {5-} modifier in the [file]{5-} rule removes the first four characters of the file name, so IMAG0113.jpg, IMAG0351.jpg, and IMAG0573.jpg are renamed to 0113.jpg, 0351.jpg, and 0573.jpg
While digiKam offers a wide range of other features that can help you to keep tabs on your photos, it’s worth experimenting with the tool. This way, you can quickly locate or identify specific photos even when digiKam is not running.
