Telepathy/fr: Difference between revisions
ChristianW (talk | contribs) No edit summary |
Updating to match new version of source page |
||
| (5 intermediate revisions by one other user not shown) | |||
| Line 1: | Line 1: | ||
<languages /> | <languages /> | ||
<div class="mw-translate-fuzzy"> | |||
{{Construction}} | {{Construction}} | ||
{{Info | 1 = S'il vous plaît ajouter des informations générales à propos de KDE Telepathy au dessus de la section FAQ, et copiez les questions et réponses des forums ou des listes de diffusion dans la section FAQ}} | {{Info | 1 = S'il vous plaît ajouter des informations générales à propos de KDE Telepathy au dessus de la section FAQ, et copiez les questions et réponses des forums ou des listes de diffusion dans la section FAQ}} | ||
</div> | |||
== Description == | == Description == | ||
| Line 9: | Line 11: | ||
== FAQ == | == FAQ == | ||
<span id="How_do_I_add_a_new_IM_accounts"></span> | |||
=== Comment ajouter un nouveau compte IM === | === Comment ajouter un nouveau compte IM === | ||
| Line 20: | Line 23: | ||
* Click on an IM network and follow the steps. | * Click on an IM network and follow the steps. | ||
<span id="How_do_I_add_a_contact"></span> | |||
=== Comment ajouter un contact === | === Comment ajouter un contact === | ||
Ouvrez la liste de contacts. Cliquez sur <menuchoice>Ajouter un contact</menuchoice> dans la barre d'outils. Vous aurez alors besoins de choisir à quel compte le contact doit être ajouté et d'entrer l'ID/email du contact que vous souhaitez ajouter. | Ouvrez la liste de contacts. Cliquez sur <menuchoice>Ajouter un contact</menuchoice> dans la barre d'outils. Vous aurez alors besoins de choisir à quel compte le contact doit être ajouté et d'entrer l'ID/email du contact que vous souhaitez ajouter. | ||
=== | <span id="How_can_I_have_quick_access_to_my_online_state,_and_easily_open_the_contact_list"></span> | ||
=== Comment puis-je rapidement accéder à mon état, et ouvrir facilement la liste de contacts === | |||
Faites un clic droit sur le bandeau système. Propriétés du bandeau système. Dans <menuchoice>Extra items</menuchoice> choisissez <menuchoice>Configuration de la messagerie instantanée</menuchoice>. | |||
<span id="How_can_I_make_the_contact_list_dock_to_the_systray"></span> | |||
=== Comment placer la liste de contacts dans le bandeau système === | === Comment placer la liste de contacts dans le bandeau système === | ||
Vous ne pouvez pas. Exécutez les étapes ci-dessus pour quelque chose de mieux. | Vous ne pouvez pas. Exécutez les étapes ci-dessus pour quelque chose de mieux. | ||
=== | <span id="How_do_I_add_a_Google_Talk_account_if_I_use_2-step_verification"></span> | ||
=== Comment ajouter un compte Google Talk quand on utilise une vérification à deux étapes === | |||
Ce guide suppose que vous avez installé [[Special:myLanguage/KDE_Wallet_Manager|KWallet]]. | |||
* Create an [https://accounts.google.com/IssuedAuthSubTokens application-specific password]. | * Create an [https://accounts.google.com/IssuedAuthSubTokens application-specific password]. | ||
Latest revision as of 06:48, 30 August 2023
Description
KDE Telepathy fournit une suite d'application pour une expérience complète de messagerie instantanée.
FAQ
Comment ajouter un nouveau compte IM
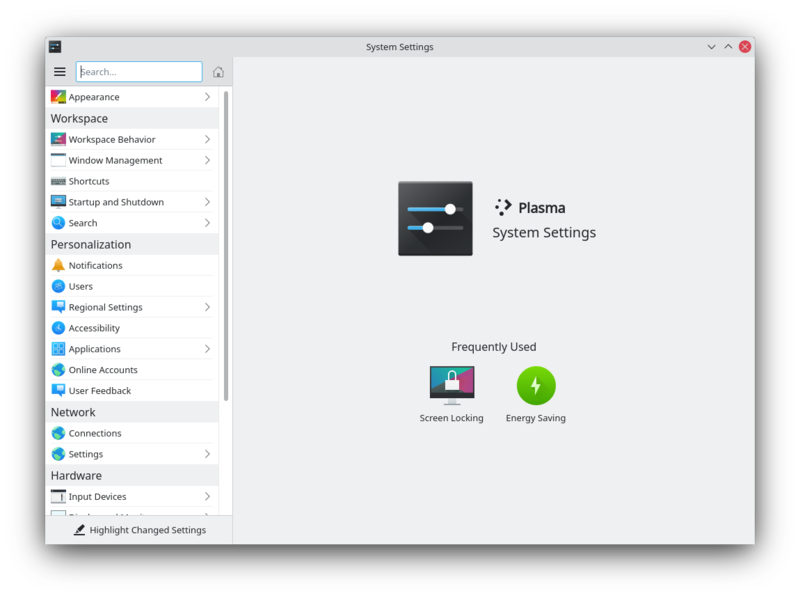
- Ouvrez Configuration Système .

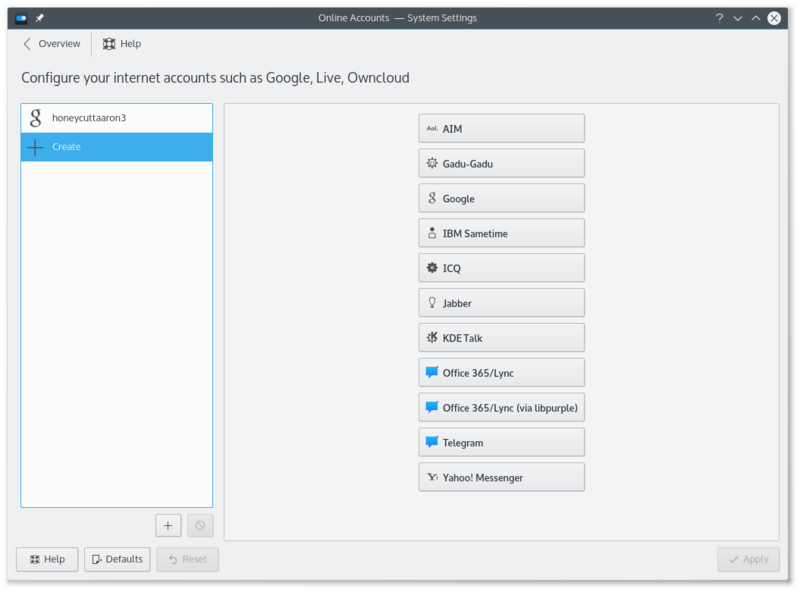
- Open .
- Then click .

- Click on an IM network and follow the steps.
Comment ajouter un contact
Ouvrez la liste de contacts. Cliquez sur dans la barre d'outils. Vous aurez alors besoins de choisir à quel compte le contact doit être ajouté et d'entrer l'ID/email du contact que vous souhaitez ajouter.
Comment puis-je rapidement accéder à mon état, et ouvrir facilement la liste de contacts
Faites un clic droit sur le bandeau système. Propriétés du bandeau système. Dans choisissez .
Comment placer la liste de contacts dans le bandeau système
Vous ne pouvez pas. Exécutez les étapes ci-dessus pour quelque chose de mieux.
Comment ajouter un compte Google Talk quand on utilise une vérification à deux étapes
Ce guide suppose que vous avez installé KWallet.
- Create an application-specific password.
- Open System Settings.
- Open .
- Click on .
- Click on the Google Talk icon.
- You might see a warning about additional plugins. Check that they are installed.
- Enter your email address and your password. Finish the wizard.
- You should then see a window. There should be two fields if you run KWallet for the first time, one if you have already created a wallet. Use any password you want.
Integrate the KDE-Telepathy VoIP module into KAddressBook
- Open KAddressBook (e.g. in Kontact)
- Select menu and then .
- In the section select .
- Enter the following command: ktp-dialout-ui %n
- Press .
Clicking on a telephone number in KAddressBook will open the KDE-Telepathy VoIP dialog. Select your ID (if you have more than one) and start your call.
Where are chat logs stored
Chat logs are stored in ~/.local/share/TpLogger
How to view which account is being used for the contact in the chat window
- Right click on the chat window toolbar and select
- Search for Account Icon on the left side and add it to the right side (by clicking the right arrow)
- Click to save and exit,
Now you can see an account icon at the end of the toolbar, which gives a helpful indication of the account being used.
Tips and Tricks
- When chatting you can click on an emoticon to change it back into text. This is useful when receiving code which accidentally is rendered into smilies.


